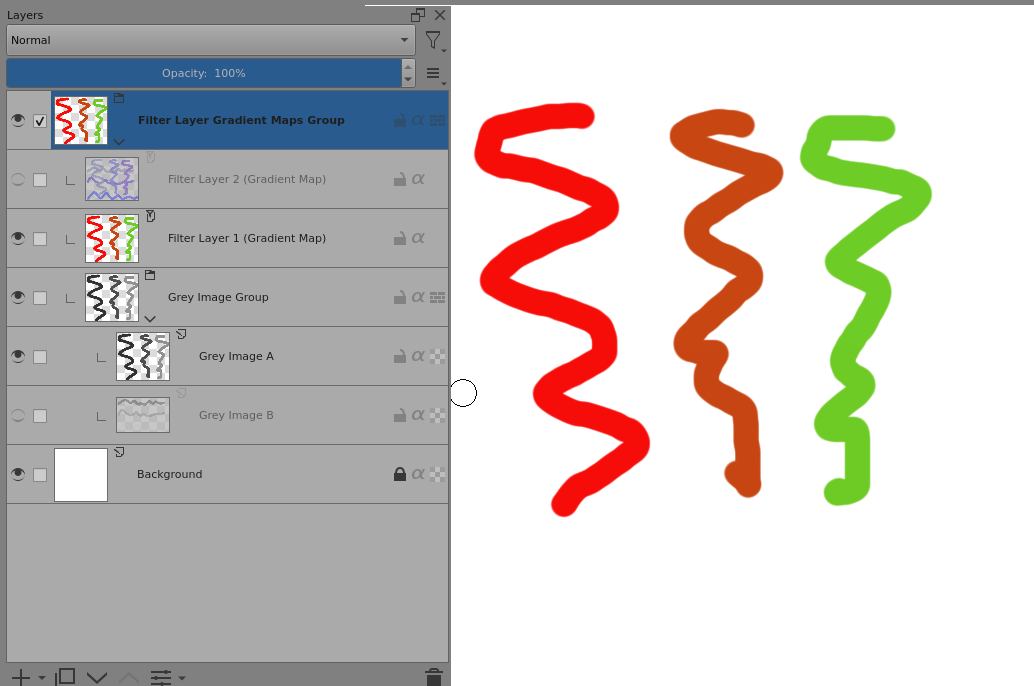
I have some gradient maps and I want to group them both to organize the mess (I’ll be using several maps for the illustration) and to quickly turn on/off visibility when needed. However when I group them they lose their effect.
The maps are above another group containing the black and white painting I wish to color with the maps.
A Filter Layer can only ‘see’ layers below it in the group it is in.
So, if you group Filter Layers then any image they are intended to apply to must also be in their group under them and can itself be a group:
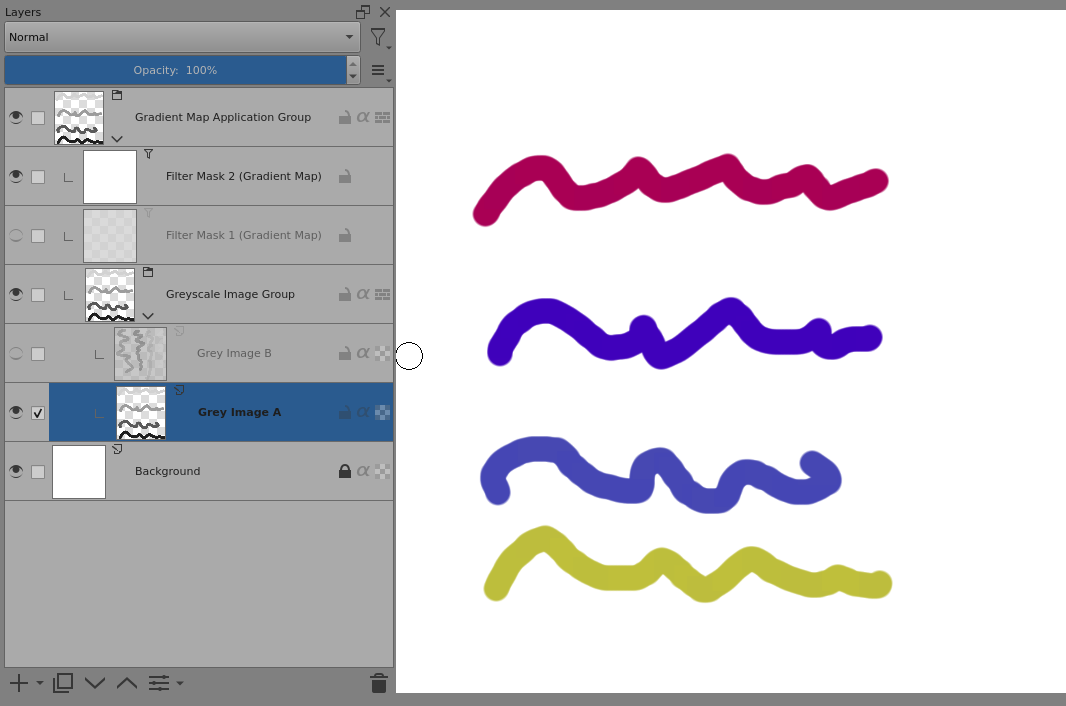
A Filter Mask can only be a child of an image layer or a group and only affects its parent layer or group.
So, if you group Filter Masks, they must be children of a group that contains the image you want to apply the mask to. That image can itself be contained in a lower level group:
I did what you explained and it works fine but as I intended to have several groups with multiple maps inside, I think I would have to copy the shading layer to each map group with two more layers containing background color and canvas textures since the shading layer is over the background ones on darken blending mode (my intention is to emulate transparency effects typical from traditional painting).
It seems to me the complication will surpass the benefits. XD
On addition, when testing I noted something worked right when following your instructions: the opacity slide on each color in the gradient map really made that color transparent in relation with the background. The way it’s currently set, when using the oppacity in the gradient maps they turned everyting under transparente, including the background layers. Not a problem right now, but it was nice to see it working properly since I tried before and had this other result.
Any other explanation or information you may have I’m listening. Thanks again!
That is certainly the case (depending how keen and desperate you are) if you’re doing manual copying to maintain consistent content in many groups after a change to a ‘source’ image somewhere else.
What you can try is using clone layers. Right-click → Add → Add Clone Layer.
You can also create a keyboard shortcut for that action.
A clone layer is a continuously updated copy of the image content of another layer, the ‘source layer’ and is affected by any filter/transform mask applied to its source layer.
So, if you don’t want it to be affected then you need to put the source layer (which can be a group) inside a group and apply the mask to the containing group layer and then clone the unaffected source layer.
You can make multiple clones of the same layer and you can clone a group.
You can add filter masks and transform masks to a clone if you like.
You can’t change the source layer of a clone. You have to delete the clone and make a suitable new one so plan ahead if you want to use multiple clones.
You can make a clone of a clone but I always get very confused if I do that.
Clone layers are expensive in CPU power so you can get noticeable lag if you use many of them.
Give them a try and see how well they perform for you.
Out of curiosity, did you try the Passthrough option on the group? I use the Filter Layer and Filter Masks a lot (textures/halftones/gradient fills for comics art, mostly) and have found when I run into an issue where a desired result wasn’t happening, it was because I needed to toggle the Passthrough option for the group.
I’ll try later on a smaller, less figure populated work for sure! It seems complex as you said and I think the CPU limitations will be relevant. Thank you very much!
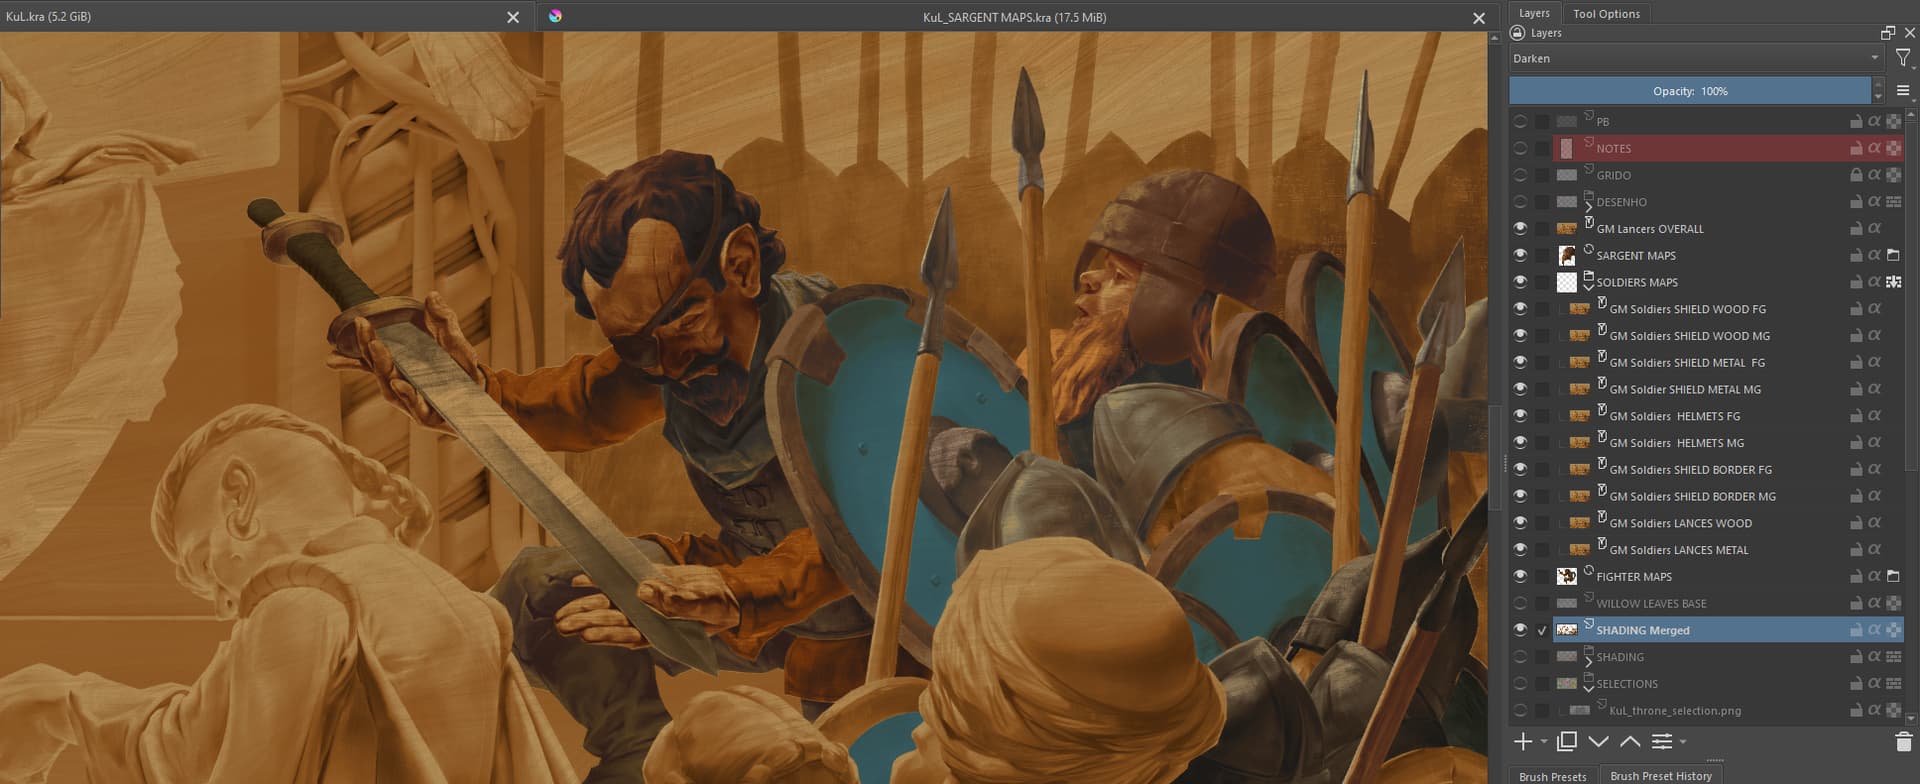
May I abuse your generosity and ask you another thing about the gradient maps? The maps are stacked, each one covers a section of a character, for example, there’s one for skin, one for boots and so on. There’s no overlap, each map only affects its own area and what motivated me to make groups was krita’s updating each one of them if I change something on the bottom ones, which on occasions takes some time since the map count is growing. Is this normal, can it be prevented in any way since there’s no overlap? Any input on this will be appreciated!
May I abuse your generosity and ask you another thing about the gradient maps? The maps are stacked, each one covers a section of a character, for example, there’s one for skin, one for boots and so on. There’s no overlap, each map only affects its own area and what motivated me to make groups was krita’s updating each one of them if I change something on the bottom ones, which on occasions takes some time since the map count is growing. Is this normal, can it be prevented in any way since there’s no overlap? Any input on this will be appreciated!
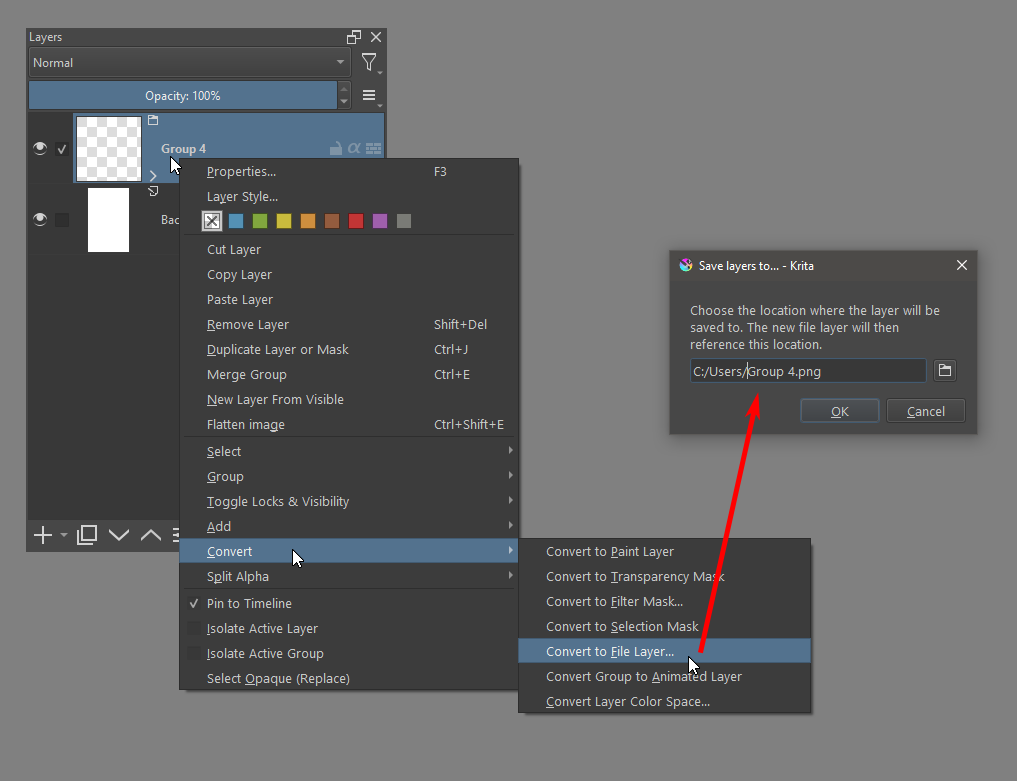
The only thing that comes to mind which might help is using File Layers. And I say “might” because I just learned of them about a month or so ago. So, maybe someone with more experience on them will say different. However, from my limited experimenting, they seem to be helping with my larger files that use a lot of layers. If you’re not familiar with them, a File Layer essentially allows Krita to take another file on your computer and display it as a flat layer (like merging, but the merged layer is actually an independent file you can open and edit later on, as needed).
So, you could right click on groups you aren’t currently working on and convert them to File Layers (see attached image). Which would keep the layers you have intact but essentially merged as a flat layer (EDIT: be sure you save the File Layer as a .kra file type to keep them in a state you can edit independently). If you ever need to make changes to that group, you can then click the folder icon on the File Layer to open that file within Krita (which opens as a separate document).
Now… for me, and my limited experimenting, that’s been useful. But I’ve been them for comic book stuff (so keeping my text and speech bubbles on another file; or my linework separate from my coloring). How it would work in this case, I’m not entirely sure.
Yes. They are very useful for speeding up compositing and thus removing lag.
You need to organise your work so it can have different parts of it done in different .kra files then you can work on one part (one .kra file) that has the other parts brought in via a File Layer.
The file can be a .png file or a .kra file. For a .kra file, the merged image (an internal .png file) which is stored in the .kra file is used.
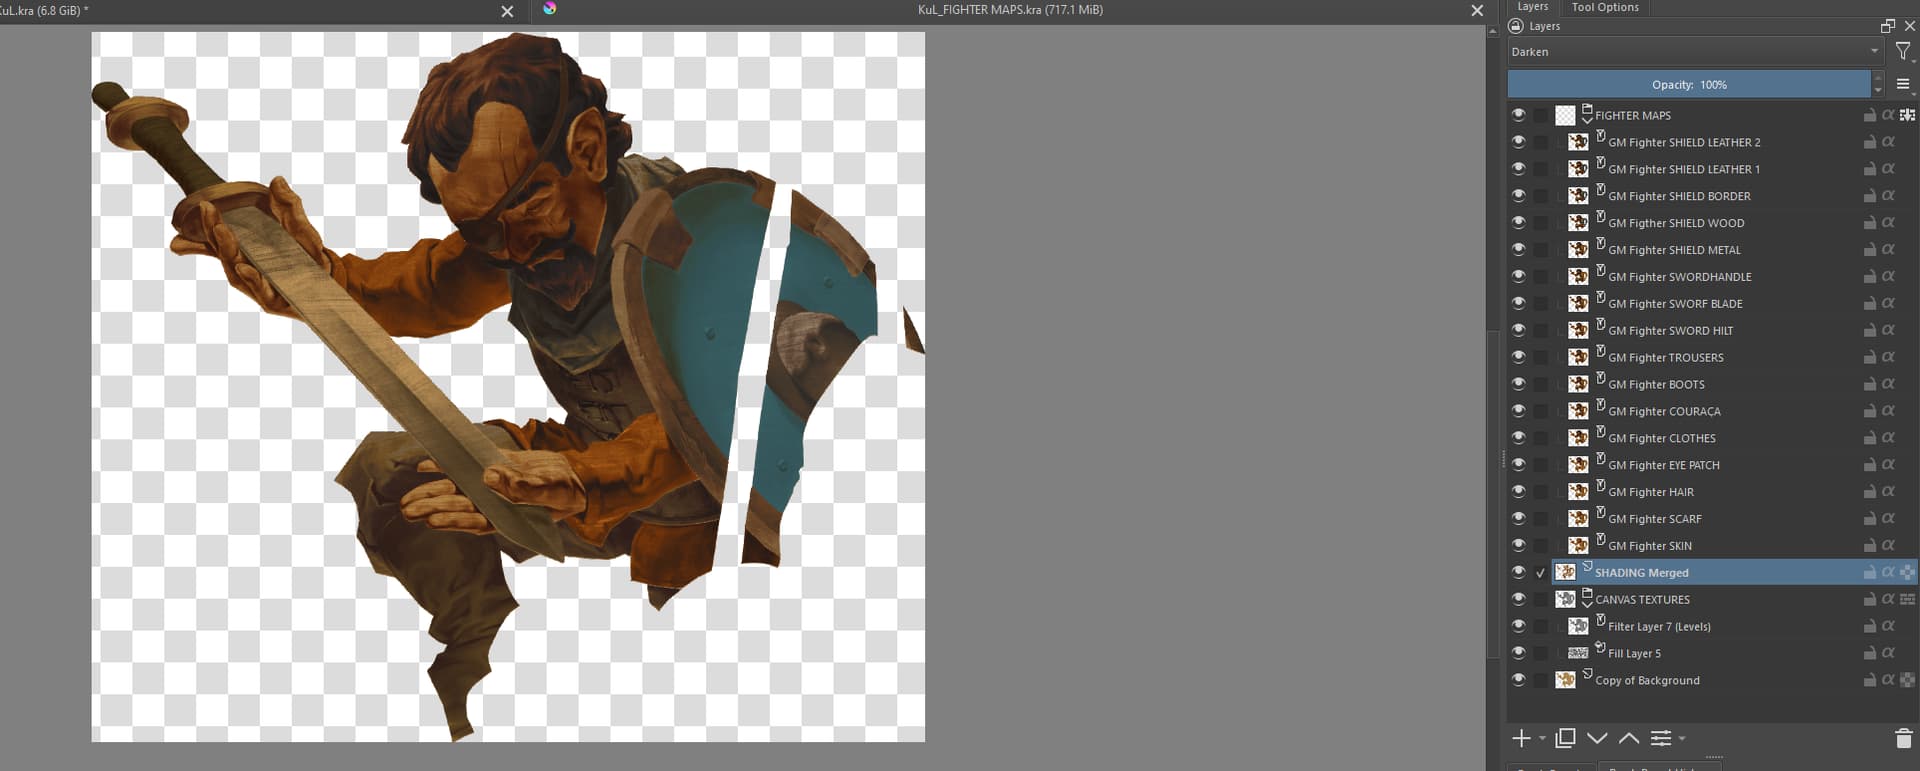
I tried converting the Fighter group to a .kra file and it went from 10.0 Gib to 6.8 Gib, very good. But the problem is the whole map thing went down again, I suppose because the maps dind’t had nothing to interact to, nothing to pass through to.
So I did like Ahab explained in the beginning and copied to the external file the whole character selection area containing the shading layer, background color and texture fill. I had to align all the parts in new file since the paste command pasted everything in different positions (is there some “paste in place” option?) and them the thing worked again!
It seems I’ll be doing the same to the other characters. It is an extra job I was not expecting but I guess it is the better way to move forward keeping the file manageable (krita crashed when I was adding the last map I did for the spears poles on the right).
For copy/paste between two open files, you can use Edit → Paste into Active Layer which seems to do the trick.
It does automatically open the Transform Tool on the pasted content (in case you want to transform/move it but you can just click the freehand brush tool (or whatever tool) to get out of that. Try it to see if it’s good for you.
What you’re doing does seem like the way to go for this ‘separation’ process.
Is your computer quite ‘weak’ ? That can be a problem for some people.
Also, filling up RAM can be a problem for large/complex .kra files.
For low RAM, using file layers will be a big help as long as you don’t have too many of the ‘little’ .kra files open at the same time.
Also, at regular intervals, Save then Close your work, Quit krita then restart it and pick up where you left off. That helps.
A bit old but it has 20 gb RAM. If it serves as comparison, I usually work on Photoshop with the same method, gradient maps over a shading layer, and didn’t had any such problem. The last work I posted here I made with the same method and had no problems although I didn’t had the same maps number. Looking at the memory usage on krita the “Projections” indicator reduced considerably after I created the file layers. Before it was going through the roof, maybe 70-80% of the memory was going to it. The interaction between the maps, shading layer on darken over fill layer on overlay over a background color would be the culprit? This “projection” refers to it?