SUMMARY
Anti-aliasing + Fuziness in Contiguous Selection tool is causing huge area to be selected as semi-transparent pixels
Tested with 4.4.5 appimage and 5.0 nightly.
STEPS TO REPRODUCE
Create a new document
Fill the canvas with Gradient
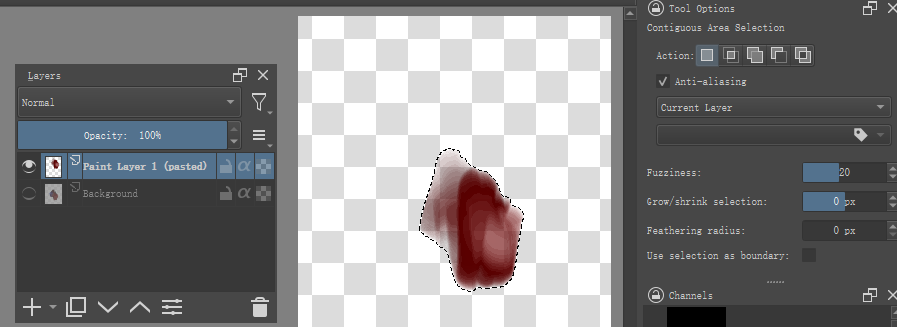
Use Contiguous Selection tool, turn on Anti-aliasing and set Fuziness to 8, Growing to 0, Feathering to 1.
Select some area on the Gradient
Ctrl+C, Ctrl+V, now the selection has been copied and pasted as a new layer.
Hide the original gradient layer and also hide the background.
OBSERVED RESULT
Almost all of the pasted pixels are semi-transparent. This is not ideal to work with, because we can’t pick color from it reliably. Unwanted color from lower layers that once was blocked, now blending with everything else of the pasted layer.
I think the current logic is to treat every bit of deviation from the sample point as somewhat transparent.
EXPECTED RESULT
Ideally:
Fuziness should affect how large the selection becomes;
Anti-aliasing makes a fixed, 3-5 pixels-wide fading zone around the selection’s outline, which is semi-transparent.
Everything else inside the selection should be 100% Opaque.
This particular selection tool does use alpha variation on the selection mask to indicate how ‘well’ or not the selected region pixel matches the originally clicked pixel.
This effect can be turned off by turning off Anti-aliasing.
I’ve now realised that I don’t know what ‘Use selection as boundary’ actually does.
Maybe somebody, perhaps @tiar, can explain it?
If the image layer has semi-transparent pixels, the multiplication (?) by the selection mask alpha variation causes gross banding on a smooth gradient. This is the case for all image bit depths, whether integer or float.
I never put much though in it because I rarely need the selection tools and always thought it means it limits the selection to the boundary of an existing selection.
“Anti-aliasing” is not the same as I thought. I don’t know if this is how it is designed.
About “Feathering radius”
When “Anti-aliasing” is not checked, only the selection area can be expanded.
Ctrl+C to copy, Ctrl+V to paste, the feathering effect cannot be presented.
Yes, that is the usual (traditional) use of the term ‘Anti-aliasing’, also the softening of the edges of text to make it look better.
A more accurate name for the option would be ‘Use applied alpha to indicated deviation from an exact match to the initially selected pixel’.
Yes and I think it should work as you expect. It seems that the feathering is not treated as a separate property and its alpha fall off is suppressed by turning ‘Anti-aliasing’ off.
Are you saying that “Feathering radius” is associated with the “Anti-aliasing” effect?
But even if the “Feathering radius” is set to 0 or 1, when “Anti-aliasing” is enabled, it will look transparent as a whole.
I think it is because the value of “Feathering radius” expands the range of the selection, resulting in a transparent effect that looks different after enabling “Anti-aliasing”.
I’m saying that alpha fall off of feathering is suppressed by 'Anti-aliasing being turned off and so yes, it is affected and in a way they are linked or associated.
I’m not saying that this is how it should be. I personally think that feathering alpha fall off should not be affected.
That’s because of what the ‘Anti-aliasing’ (confusing name) option does in the situation you’re working with, isn’t it?
‘Feathering radius’ expands the selection in the same way that ‘Feathering radius’ expands a filled region when using the Fill Tool, with an alpha fall off transition across the boundary.
So, that seems to be the ‘standard’ way in which ‘Feathering radius’ is implemented.
I think that @tysontan’s suggestion of an Advanced (extra) options checkbox is a good way to do it.
I can usually find my way around a complicated set of options but the Fill tool options still confuse me.
For that, with Advanced options off, I’d expect the Threshold, Grow and Feathering sliders to be there but the Sample to be not shown and to be All Layers. i.e. simple filling of a colouring layer with a separate lineart layer.
If I wanted to use ‘advanced’ facilities then I’d check the Advanced box and then have the rest of the options become visible, initially in the default/simple state.
(Other people may have very different ideas of course )
When the Advanced options are disabled from view, they should all be set back to the ‘simple’ default state.
(I think some people will disagree with that and I can understand why they would.)
When the Advanced options appear, they should be visible in pre-existing blank space at the bottom of the Tool Option docker so that the docker doesn’t have to be dragged to be taller in order to see them. (I think that happens at the moment with tool options .)
I agree that there needs to be more tool tips added to explain what each option does. “Feathering”, “Fuzziness”, and the new “softness” option not in Krita yet sound very similar to each other. A user should be able to read what each option does without consulting the manual first imo.
And I agree getting the “tool presents” feature would help because I think it’s impossible to have a “one size fits all” configuration for everyone.
I think instead of a “advanced options”, the fill/select options should be organized into similar categories like was said in this comment.
There should be a better way to indicate that this can be used for selecting a layer to use as a reference. By categorizing it or by hovering thier mouse over the “color labeled layers” text and getting a explanation. The average user has no idea Krita has “reference layers” like ClipStudio
I concur with @fizzyflower and also think that the options are not much. If at all some options need to be hidden then instead of tabs I would suggest adding a accordion or collapsible section, when user wants they can expand the section and access other options. The state of the section should be remembered if it is expanded it should stay expanded. If it is tabs it would be pointless clicks for those who actually use the other options as if it is a penalty for being that user who uses these options.
Also +1 for adding more explainatory tool tips.
The colour label selection drop down can be optimised by making it smaller or a selectable grid (like the palette dropdown we get elsewhere) rather than list of colours.


 )
)