When doing a portrait, I often want to make small adjustments and move features slightly to correct. I’ve been doing this by selecting the element, moving selection, then filling in void that results.
I’ve seen people on their speed draws move elements and it appears they aren’t using the selection tool. I imagine that there is a much better way to accomplish this without distorting the feature that I’m moving.
Have you looked at the Liquify feature?
Maybe that doesn’t cover your use case, but it’s nice for moving things a bit without having it blur too much
If I am to do large changes, to fill holes I like to put the thing I moved on a layer on top, and the use the deform brushes to push the paint over the “gaps” and under the new layer. That kinda fills it in roughly, though it needs cleanup. I have a brush in my brush pack that is basically a “move” but it’s no falloff, so it just pushes whatever is in that circle along (quickly shown in 1:06). I like to push existing paint into those gaps
I thought liquify distorts quite a bit, perhaps I’m wrong so I’ll play around with it again. I’m often having to move a facial feature and have the feature drawn correctly, just not in the right spot.
I have your brushes installed (tysm). I have to experiment with them more, but I’m excited to start using these. Are you referring to the one called “smear” that comes up in a rectangular shape? That’s a great one and might work nicely. I see that I can move an eye for instance, without distortion of the eye. I would then just fix the area that has smeared around it.
Now, I’ll continue to play with your brushes. There’s some really beautiful textures. Thanks again!
It can distort quite a bit, though if you have a larger brush it can help it not get “wobbly”, but it ain’t perfect.
Yeah, Smear! You could perhaps even change the square with a circle or whatever shape you feel help move the thing you want best.
Uhm, wouldn’t each facial feature be on its own layer? So can’t you just move the entire layer? Then there are no gaps to fill, and you can change expressions simply by hiding the layers.
That would certainly make changing things easier. I’m so used to doing all the features on the same layer, but maybe it’s time to change my process. Thanks for the suggestion.
Rather than liquify, new mesh transform feels better to me. It is quicker and much more responsive in my opinion. And it doesn’t leave gaps. Although it is only useful for few cases. Many times, I have to cut and move and then fill the gaps.
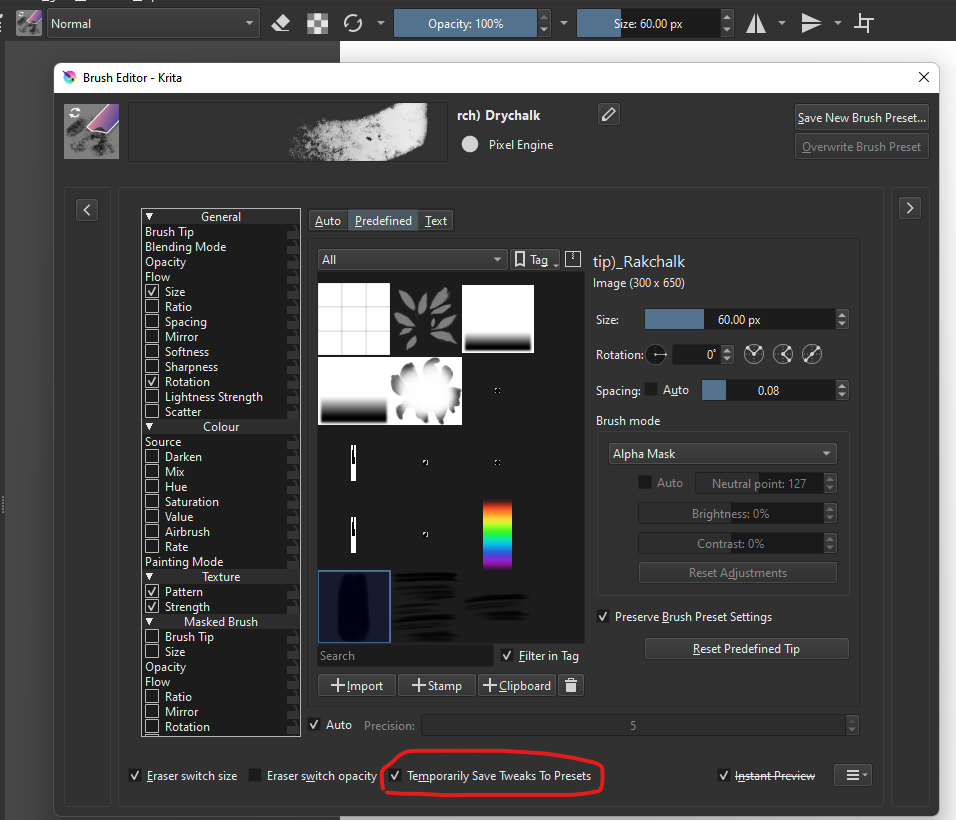
In this window you can play around with sliders to change the shape, also change the “Shape” dropdown into a circle for instance. A circle that is slightly angled and with a ratio that is satisfactory you can for instance move an eye easier.
The green outline is where you can add custom shapes. On that window there is even a “+Clipboard” button which imports your clipboard as a brush shape. That means that you can draw a black blob around the eye you want to move, select it with a lasso tool or something, and copy it. Copying something adds it to your clipboard, and pressing “+Clipboard” will make that into a brush shape in that list. This is a super cool feature that I forget exists and should use more often haha
I also agree with @Anurag_Ekka for many cases, that is such a great tip!
So helpful, thank you. I just subscribed to your youtube channel so I’ll be learning more of these little gems!
If you make changes to brushes, does it just apply to that file only? I feel like I messed up one time and can’t remember exactly how. There’s one window where I expect to see a “save” or “cancel” button, but you just close the window to get out of it. I haven’t done much in K5 yet, so I don’t know if this is still the case.
In 4, I altered a brush from an existing brush and it’s clear in that window as you are given the option to change/overwrite default or not.
Thank you, I appreciate the kind words a lot!
If you change a brush the changes will be only temporary. If you close Krita, the brush will return to original when you open it again.
You probably know of this already but this button makes it so that the brush remembers the changes even if you change to another brush and back. Although, it still will reset back to original if you close Krita. I always keep it on
If you want to make a new brush with your changes, you can use the “Save New Brush Preset”
That way you can give it a new name and it will therefore become a new brush.
“Overwrite Brush Preset” will overwrite the brush, replacing the original with your new one forever (Krita will keep a backup in the files for you to dig up just in case though!). Before I thiink this didn’t warn you, but after Krita 5 you get the warning.
Closing Krita will not give you a warning that you have unchanged changes to your brushes so beware. Always “Save New Brush Preset” if you have made changes that you want to keep as a new brush and make sure you don’t close Krita before you have done so