@hulmanen@I9S@Deevad@RamonM and anyone else interested.
I commented in the irc channel adding more texture blending modes to the brushes and it was suggested to make a phabricator task explaining the motivation/use cases for new modes.
So it would be great if you can comment here why do you think this is needed, how the brushes should behave, how would you use it, what other artists achieve with those modes, and so on. Then with that info a more robust proposal could be made.
I would propose the 2 first features I described in a previous post:
Add blending modes, specially the ones that leave fully transparent areas of the brush tip transparent and fully opaque areas opaque, applying the texture mainly in the semi-transparent areas (this seems obvious at this point, examples could be overlay and height).
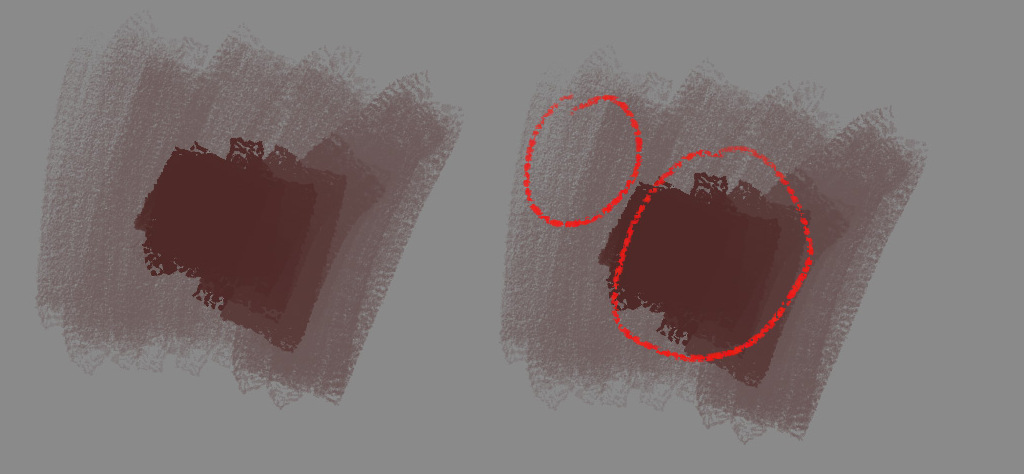
Apply texture to the whole stroke after the opacity is applied. Right now it is applied per dab, so if modes which preserve fully opaque areas of the brush tip image are going to be implemented, that would give the effect in the middle in the following image if the opacity varies. I think that allowing to texture after the opacity is applied could add more possibilities (see bottom strokes in the image):
Well, right now what I need is to make the task and convince core developers that this is a good and valuable addition to krita, so as I said, any motivation/use cases you and other people can come up with would help explaining this in the task.
I think your proposal about applying the texture at the end, not per-dab is pretty much what I want.
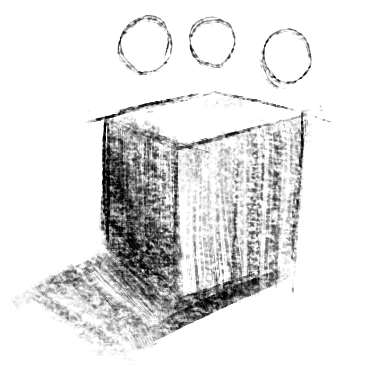
I want: A brush that at high pressure gives a thick coverage, and at low pressure can be used like a bristle brush on textured paper or canvas. So kind of like a pencil that you can press into the grain of the paper to get a burnished, smooth output, or lightly rake the pencil over the paper to get a grainy shade. Or like an ink brush that’s dried out just a bit, so the tip still puts out a lot of ink, but when pressed flat, will give a dry output.
For me, I first ran into the need for a different texture blending mode when I noticed that heavily textured brushes can’t be used for detail work currently. To emulate a semi-dry brush, I’ve got a modified version of the brush “Bristles-2 Flat Rough”, that uses a texture. I also use pen rotation to control the rotation of the brush. The idea is that since it’s an elongated brush stamp, I could do shading with the “flat” of the brush and detail work by rotating the brush to give a thinner profile, or simply by adjusting the size of the brush.
Here’s what I get now:
It’s fine for rough shading, but as you can see, no good for fine line, because there’s no way to get the texture to have 0 effect. That’s the #1 pain point for me.
Secondly, texture in general is very useful as a way of modulating colour values. For example, making a brightly coloured underpainting and then painting a contrasting colour over that with a textured brush is a common technique used to increase perceived colour vibrancy. The problem now is that you can’t get from showing the underpainting a bit to blocking it out completely without going over the same area many times, which is frustrating to do.
More generally, being able to transition from textured shading to full coverage would make it possible to do more with a single brush, which is important for workflow efficiency and comfortability.
I never used texture brushes too extensively as they always felt hard to control. I tried multiple solutions to be able to control the “density” of a predefined brushtips - animated brushes controlled by pressure were okay-ish but insanely hard to create and modify. What worked the best were brushtips with the whole grayscale range and pattern being placed randomly on each stroke. It allowed to achieve “full coverage” with drawing multiple strokes in one place, but this workflow still felt so artificial for me, that I always used texture brushes only as a sort of post-processing, and not for designing.
Recently I thought how a brush would behave if the pattern was randomly placed on each dab instead of stroke, which could theoretically allow to fully cover an area with drawing there multiple times (kind of like flow does for transparency), but it’s hard to predict if this would be usable, as those textures could get fully covered too fast.
What you proposed here looks like the actual solution to my problems, that could fix the issues I always had with textured brushes. Hard to tell before I test it, but what you get here looks very, very promising.
I thought developers already agreed to add new blending modes … @RamonM and @Deevad highly up with us. So I think all going to be ok.
I just summarize my thoughts I already mention in other threads. It is obvious common things still may be it will help some way:
Adding more blending modes allow to versatile brushwork, thats way Krita’s brush engine became more open to artists with various technics. We already showed that existing modes and options not enough to achieve a certain result. ‘Height’-types modes (height, hardmix, burn and overlay in some cases) that allowing to fully appear and fully disappear texture into solid color with one stroke highly used by painterly, ‘semi-traditional’, ‘traditional’ artists (e.g. Greg Rutkowski, Marco Bucci, Yizheng Ke, Craig Mullins). Btw, traditional oil pastel makes similar sort of feeling like ps’s brush with “height”. Before switching to Krita I found myself developing my style into that way. So going to Krita had some uncomfortably for me… (Since now I am focusing more on the basics not brushwork it is going someway smoothly).
Here the fragments of works I made couple years ago with PS massively using texture brushes with “Height” and “Hardmix” modes:
And look to the forehead, and overall stroke transition. Some of them made as a fundament and some as a post-processing like @wojtryb mentioned.
And yes, all those pictures can be achieved with Krita. And with MSPaint too. I even saw like one japanese guy makes interesting landscapes with MSExcel. And some of Krita’s and PS users paint with mouse. To achieve the same results with other brushes/methods requires different approaches and workflow in mindset. But mind is really hard to change.
And that can’t be done at all. It is combining of previous effect with opacity/flow pressure.
More blending modes wider a compatibility with Photoshop. It is REALLY IMPORTANT. As I mentioned I don’t able to get feeling from brushes I used in PS. That’s why it is important to make more blend modes — Krita’s ability to give a home for an artists who migrating from PS, the simpler way the better. A lot of pro artist make tutors in PS and followers/students of course looking in that way. E.g. they show simple options of certain brush in PS to achieve some effect (opacity/flow + texture), and entry digital artists try to replicate it. In case they should find sufficient result in the Krita with that simple way as teacher shows in PS is better will be. So adding blending modes closest to photoshop has is simply broader the Krita’s users amount.
+With new modes Ps’s brush packs also should be more easly interpolated into Krita.
As for applying texture to the stroke, not to the tip, I never used this in PS since it is feeling to me too artificial. But more options is always good. And it helps the compatibility with PS brushes.
Hello everyone, unfortunately I couldn’t argue about the merits of textured brushes, or new blend modes as I never painted with such brushes. However the topic really got my interested, and this time I tried to implement what I think are photoshop’s Height mode into Krita.
I’m not a good programmer, probably a worse mathematician and it was my first time coding in C++. However, thanks to @Deif_Lou code snippets above I had a chance to build Krita using custom code.
I linked a Youtube Video with some test using my formula. I had a limited access to photoshop, only some pictures or try outs without a pen. So I’m unsure if it is the same Effect.
I thought it was interesting results.
Forgive me about the stutters, I only have a old PC with a AMD FX 8350, and since my GPU died I’m using a Geforce GT 210 (Yep, series 200). So recording the screen was kinda hard.
I’m writing a document to put in the phabricator task explaining some of the modes, including height and linear height. I just have to write the section about applying the texture after the opacity to the whole stroke instead of per dab.
It turned out longer than expected, but has images and detailed explanations.
I changed the line on Multiply, like you and deif_Lou said before.
File: kis_texture_option.cpp on Line 384.
if (m_texturingMode == MULTIPLY) {
    int maskA = *iter->oldRawData();
    int dabA = dab->colorSpace()->opacityU8(dabData);

    int w = ((dabA) + ((255 - maskA) * (1.0 - pressure)) - ((1.0 - pressure) * 255)*1.08) / (1.0 - pressure);

    dabA = qBound(0, w, 255);
    dab->colorSpace()->setOpacity(dabData, static_cast<quint8>(dabA), 1);
}
For what I saw on Photoshop’s Height mode, the blend occurs on each dab so that was my approach.
If you want I can try to explain my train of thought behind this equation.
Hey, maybe just add a new mode (so the Multiply will work the same way it worked before) and submit a merge request? I can help you submitting. That way it will make it clear for everyone how to test and whatnot. (it would be good to attach a screenshot and possibly either a brush preset for that or just point to the existing default preset).
If it solves the issue, then it will save a few people some more work, too.
I would actually like to have a bit more control over things but maybe it will be good enough for now.
Oh and maskA - you probably need to access the alpha properly to make it work in other color spaces, the same way dabA is found.
I think the best stroke test is to use superflat tip (around 20x1 ratio) with only opacity pressure sensitivity (without using “texture strength” dynamic)
@I9S I don’t think this can work without texture strength. Opacity can be set at 100%, the texture provides the pressure response with the method proposed here.
The formula proposed take the pressure from Texture strength. With texture strength turn off Krita default it to 1.0. Here what this means (as far I do know):
Every dab would have the same pressure, which means the same level of blend in the whole stroke.
The formula can be simplified as (dab+mask)/(1-pressure), if the pressure is 1.0 it would divide by 0.
The first point may be a way to implement the same level of blend to the whole stroke, instead of each dab.
The second point shows my shortcoming as a mathematician, the formula divided by 0 is invalid so the stroke doesn’t happen, it become invisible.
I made a video with the brush settings you said, if I understood them correctly. Ratio 0.05 / Opacity controlled by pressure.
Is this the effect you want?
Well, I’ve made a proposal as a phabricator task. It includes explanations about various modes including height and linear height. I left out the “apply the texture to the whole dab” part because after looking at the code it seems it is more complex than I thought so maybe it’s better to make another task for that: https://phabricator.kde.org/T14345
@tiar: I would add a new blend mode but couldn’t figure it out… Any pointers on that? I’m completely unfamiliar with C++ and not much of a coder in general.
Hello, did you try my blending mode and the one Deif_Lou proposed in the phabricator? I think the two end up very different.
What do you think of submitting mine as a merge request? If my method seem useful and interesting enough it may be worth it, and it wouldn’t bloat the phabricator request Deif_Lou made. As Tiar said before it may be faster and easier to pass a merge. I never coded on C++, but I’m willing to try making a new blend mode. @tiar If you can spare any time to give us some points it would be greatly appreciated. Like how to properly access the Alpha in maskA on my code.

 I’ll be around for test.