I would prefer if any of you added that method to the Phabricator task deif_lou made? with the same template of showing the change?
Generally in case like this (just adding a new “blending mode”) a MR would be enough but since there are lots of people with lots of different ideas… maybe it’s a good idea to keep them together…
@Daishishi , I tried this just now. I’m not sure if I messed up with splicing your code in, but there seems to be some output even at near 0 pressure. At the top of the stroke is the faintest output I could get:
You didn’t messed up. My formula was sightly wrong, and became evident after looking at Deif_Lou’s formula and this video https://youtu.be/_1bdGXUm7IQ?t=1640
At 0 pressure my formula would return a result = (dab + mask) - 255
The base of my formula was assuming the tip and texture were a type of multiply blend, however Height Blend is a subtract variation.
I corrected the formula so it is a subtract variation. A plus side is that now the strength curve can be linear and the result stroke is still decent (although I recommend a sine curve).
if (m_texturingMode == MULTIPLY) {
    int maskA = *iter->oldRawData();
    int dabA = dab->colorSpace()->opacityU8(dabData);

    float s = (1 - pressure);
    int w = ( ( dabA - ( maskA * s ) - (255 * s ) ) / s ) + (255 * pressure);

    dabA = qBound(0, w, 255);
    dab->colorSpace()->setOpacity(dabData, static_cast<quint8>(dabA), 1);
    }
I found this implementation much better then my previous one, and similar to the video I linked above.
@hulmanen@Daishishi
In the first formula by @Daishishi if I substitute the 1.08 by 1 and simplify, I get dab / (1 - strength) - tex and not (dab + tex) / (1 - strength) . That can be rewriten as:
w = 1 / (1 - strength)
result = dab * w - tex
which is the subtract mode with the dab scaled by a function of the strength. If the strength is 0 then w is 1 and so dab is not changed. That’s why when the strength is 0 there may be some visible output. As the strength approaches 1 then w approaches infinity. So dab is always scaled up somewhat exponentially, getting a lot larger than tex.
So if you still want to use a reciprocal function to scale dab and have it be 0 when the strength is 0, you could try w = 1 / (1 - strength) - 1.
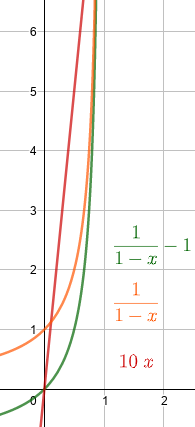
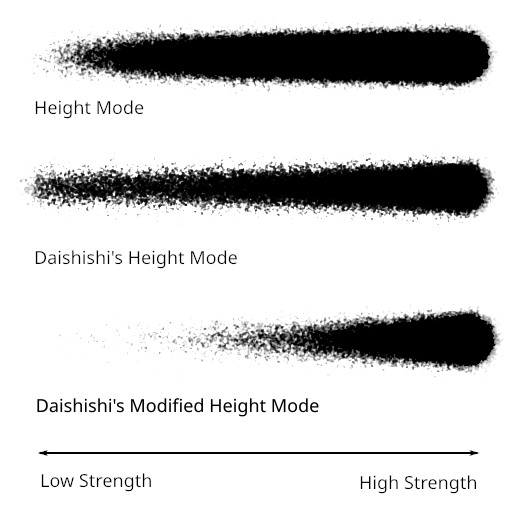
Another thing to note is that this mode is similar to the height mode. The formulas are the same, it only changes the weighting function, in the case of PS height, the dab scales linearly with the strength and in the case of yours, it scales with the recripocal function. I made a graph of the weighting functions:
I like how in the second row there is more of the pattern stuff but on the last row there is way too much white. Maybe it would be possible to do something in between? Something like y = 3/(1 - x) - 3 might work, I guess?
@Daishishi, your last formula can be simplified as dab / (1 - strength) - (1 - strength) - mask, and I think it is a good candidate to a “custom krita height mode”. It is simple and gives a good transition like tiar likes by default. Tomorrow I’ll comment some more.
Probably will be my last post about my formula. I would hide in a hole if it wasn’t hilarious and kinda of amazing. To explain I have to show how I tried to simplify my equation.
First step: Defining a value to the pressure offset w = 1 - strength
Second step: Applying the offset to the formula Height = ( ( dabA - ( maskA * w) - (255 * w ) ) / w ) + (255 * pressure)
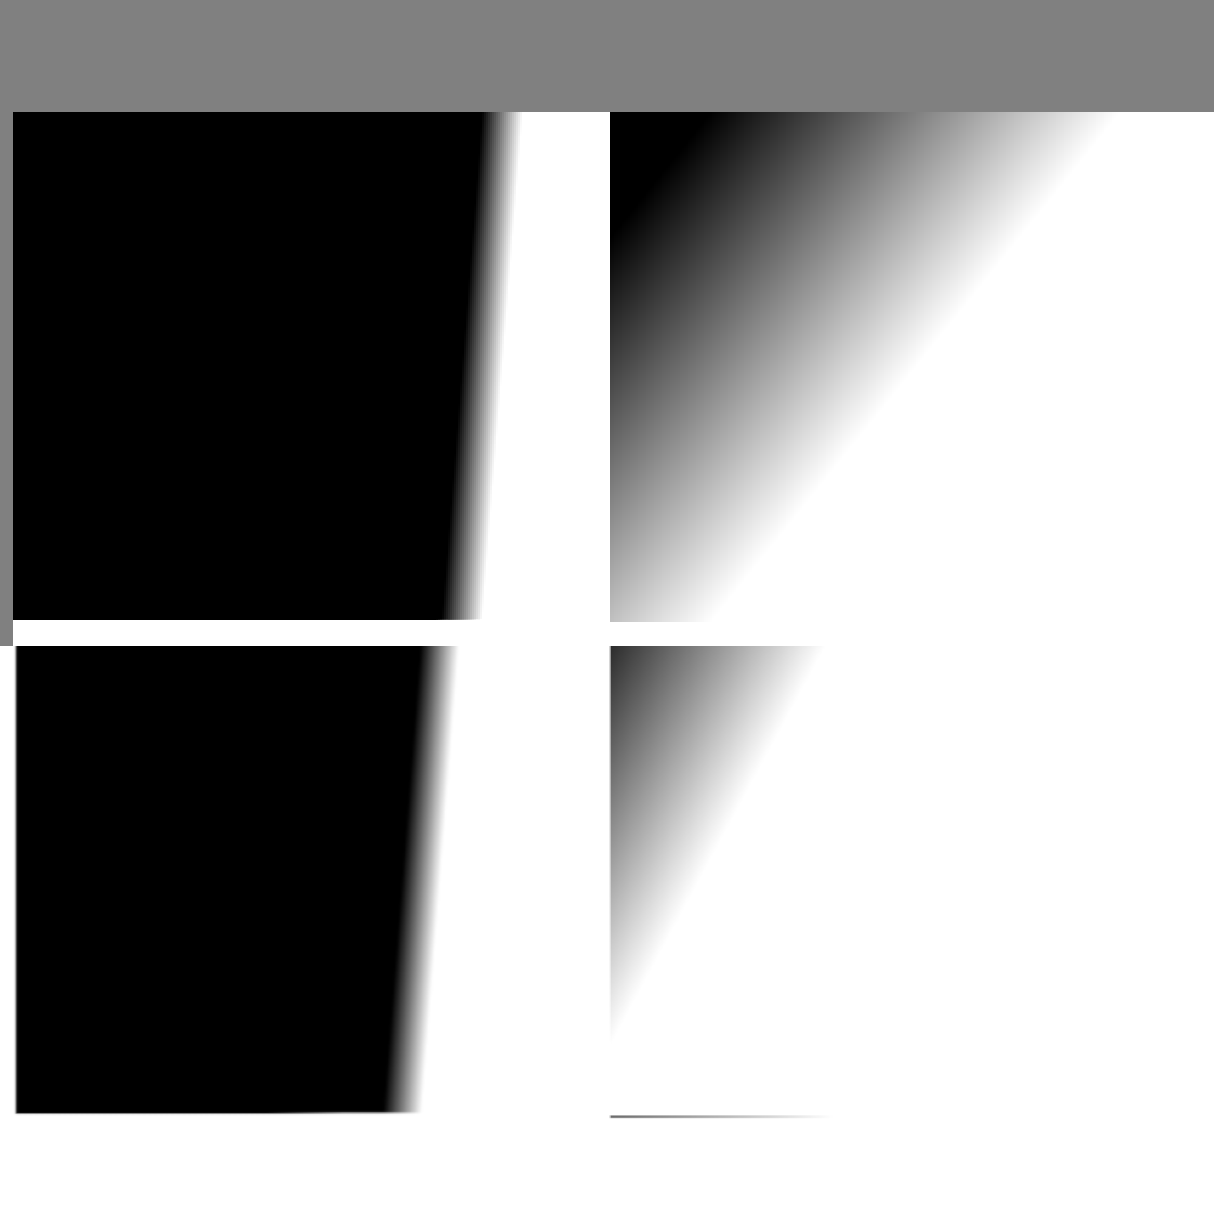
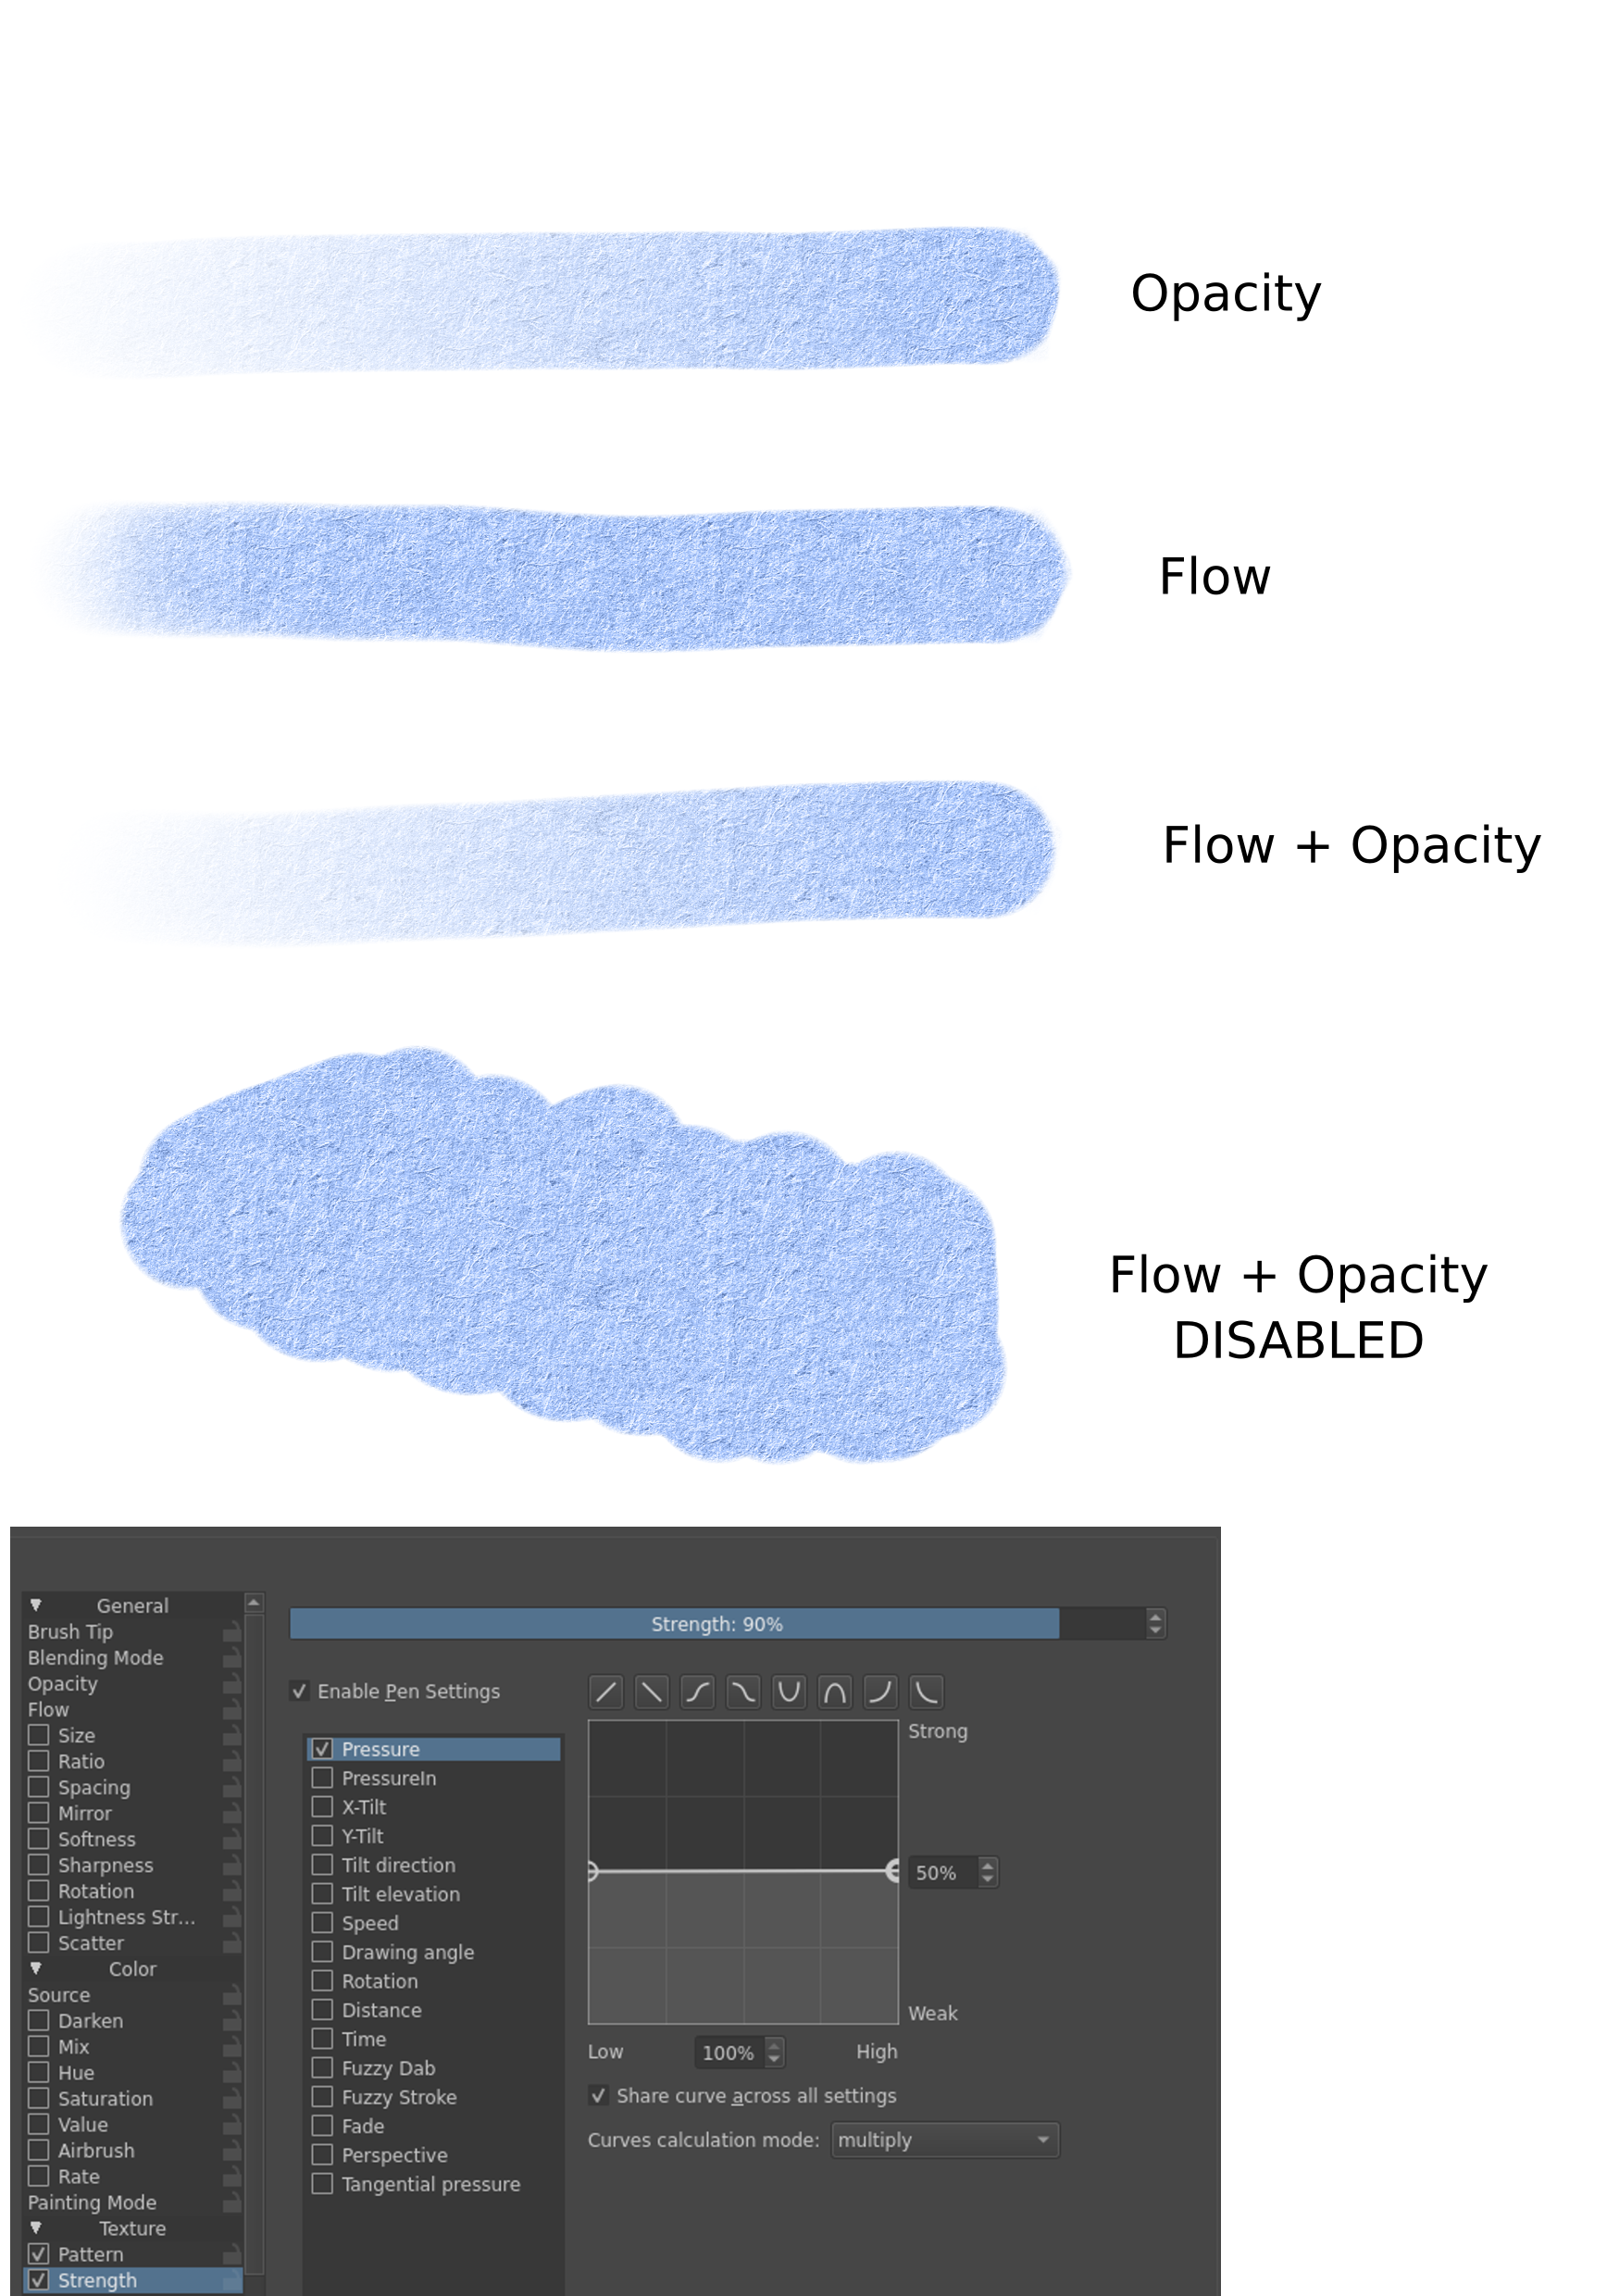
Third step: Removing unnecessary variables of the equation. In this case that ' * pressure' at the end. The + 255 was needed. The Result of the equation had to be summed with ‘255’ to keep the blend ‘linear’ (first row of the image bellow), without it the blend would ‘offset’ (second row of the Image) Height = ( ( dabA - ( maskA * w) - (255 * w ) ) / w ) + 255
Fourth step: Trying to simplify the portion of the equation inside the parentheses. Realizing almost every term is multipling with 'w', so I just had to divide every term inside the parentheses by 'w'. Height = ( ( [dabA / w] - [ (maskA*w) / w ] - [ (255*w) / w ] ) / [ w / w ] ) + 255
The result: Height = (dabA / w) - maskA - 255 + 255
Now this explain why I had to sum the result of the equation with 255
So my equation is: Height = dabA / w - maskA @Deif_Lou equation is : Height = dabA * w - maskA
The difference is how each of us calculated 'w'. Mine ranges from [0,1], Deif_Lou ranges from [0,10]
This meant I could get away dividing dabA, and making a stroke with pressure 0 would equal the subtract mode, and a stroke with pressure ~99 that would be completed black.
I was kinda amazed realizing I had the same equation as Deif_Lou, but insanely complicated. Now it should be obvious there is no need for implementing my equation as it is just the same already proposed, but with a ‘worse’ minimum that stop at the classical subtract mode, and with a overall shorter range.
This was very enlightening and fun, thanks for all the support. Also, sorry for kinda of wasting time running in circles.
@Daishishi, my own equations were quite unnecessarily complicated, too. I was just thinking about the conceptual idea I wanted to execute, and less the math of it… It gets surprisingly complex surpringly fast, considering how simple the equations have turned out.
I’ll take a last look at my own proposal now, to see if it actually brings anything to the table. Right now I think I’d prefer a solution that keeps in the [0,1] range, although I think in Photoshop the height mode does go outside that range for some reason, which is why the blend strength apparently needs to be brought below 10% there for it to really be useable.
edit: I guess the big thing my proposal had was the “softness” attribute. Can we adjust the hardness/softness of the blend with the equations you two have come up with?
Edit2: In principle, adjusting the contrast of the texture should do what I intend with softness, but I suspect the texture gets clamped to [0,1] before it is composited with the dab. If we had float values at that point, then simply offsetting the texture by -0.5 and applying a multiplier would change the harshness of the texture.
@Daishishi yes that last formula is the same essentially. But the one with the 255 * pressure gives dab / (1 - strength) - (1 - strength) - mask which is different, it gives transparent dabs if strength is 0 and the transition from low pressure to high pressure is nice. I’ll add it to the phabricator task. It needs a name though.
@hulmanen right now the softness would have to be computed as a function of the dab, the texure or the strength, which I guess is not what you want. Adding an extra parameter would be more complex.
Oh right, the last formula really give different results. Transparent strokes with a wider range of lower pressures, and a ‘longer’ period of transition between a textured stroke to a fully opaque. I will try to think of a name, but I’m so bad at naming things.
Assuming dab = 255, mask = 255 and pressure = 0.5
When I tried simplifying that last formula I got: w = (1 - pressure) Height = (dab / w) - (255 * w) - mask
The result is ‘127.5’
@Deif_Lou your simplified formula ditches the 255? Like in: w = (1 - pressure) Height = (dab / w) - w - mask
The result is ‘254.5’
Or it is structure differently? Maybe: Height = dab / (w - w - mask) Which is the same as dab / - mask
The result is ‘-1’
Surely I messed up, knowing how bad I’m at math. Could you explain? Really sorry but I’m curious.
         if (m_texturingMode == MULTIPLY) {
                float softness = 0.01; //hardcoded for now
                int maskA = *iter->oldRawData();  //Texture pattern appears to be being applied invertedly?
                int dabA = dab->colorSpace()->opacityU8(dabData) * pressure;
                float output = (maskA -(dabA  + softness  / 2)) / (softness  / -2); // inverted whitepoint and blackpoint due to texture appearing inverted
                dabA = qBound(0, static_cast<int>(output) , 255);
                dab->colorSpace()->setOpacity(dabData, static_cast<quint8>(dabA), 1);

          }
Some notes:
I had a bit of a time wrapping my head around working in int vs float, so I wound up testing what every part of this does. In doing so, I just set ‘dabA = maskA’, and this seemed to indicate the texture is inverted before it is applied, somehow. So I inverted my whitepoint / blackpoint math and things started to work. The result is simplified from output = (maskA - (dabA + softness / 2)) / (dabA - softness / 2) - (dabA + softness / 2). Note that I define dabA such that pressure is baked into that variable.
I think maybe there’s something that makes it a bit harsher than it could be at softness 1. OTOH maybe it’s just how this concept ends up looking, since at any value other than 0.5 the texture gets clipped somewhat. Maybe there’s a way around that, but I’m done for today.
I saw you added the Custom Linear Height to the phabricator. It’s awesome.
That scaledStrength to prevent dividing by 0, genius.
I was think if my last formula had a simpler iteration, and I stumbled across the very similar (and maybe less demanding) dab / (1-pressure) - (mask / pressure). On my test the results were pretty similar and maybe with a wider range of control. I posted a image with my tests.
I’ve updated the task with @Daishishi’s height mode and also includes the linear variation for completeness.
@Daishishi: I’m coding all these modes in Krita in a local branch that I’ll push that to my repository so that painters can try them. As of naming I called there your mode Height and the Photoshop’s Height (Photoshop).
My formulas here and in the task use values in the range [0, 1] for the dab, texture and strength. In Krita the values have to be in the range [0, 255]. Its like using fixed point arithmetic. For example, your mode is:
 const int strengthInt = static_cast<int>(qRound(0.99 * strength * 255.0));
 dabA = qBound(0, dabA * 255 / oneMinusStrengthInt - oneMinusStrengthInt - textureA, 255);
(The scaling by 0.99 is just to avoid the division by 0 and also super hard edges when the strength is close to 100%).
If you divide dabA * 255 / oneMinusStrengthInt - oneMinusStrengthInt - textureA by 255 you get dab / (1 - strength) - (1 - strength) - tex.
Now the formula for dab = 255, mask = 255 and pressure = 0.5 gives130 but that because it uses integers so if strength is 0.5 then 1 - strength is also 0.5, but if you use integers and values in the range [0, 255] you get different values:
Well I like the previous approach better it is more similar to the original height formula. The new one also scales the texture and the result is more contrasted. Performance-wise it adds an additional division which are expensive.
I think that (maskA -(dabA + softness / 2)) / (softness / -2) can be simplified as (2/softness) * (dab - mask) + 1 and that the 2/softness and the +1 act as a contrast adjustment. For this maybe it is better to make a separate feature request proposing to add some type of levels adjustement to the stroke.
I really hope that all of your amazing work in researching and implementing new texturing blend modes eventually comes to fruition! This would be a great feature to add to Krita’s brush engine!!! I don’t really understand all the maths of it too much but I enjoy watching how you all are trying to figure out the right algorithms for these new blend modes. Like the mythical height and linear height algorithms.
I hope too that there would be a feature to render the texture as a full stroke instead of “texture per dab” like was discussed previously. Before I thought Krita didn’t have the “texture each tip” feature. But now I discovered that it’s Krita’s default mode! When I put krita’s textures in photoshop and enable “texture each tip” with the same blend mode, the result in photoshop looks almost the same as in Krita. And in Krita when I put the textures in “lightness mode” it looks very similar to the way it looks in photoshop with “texture each tip” disabled. I guess this means “lightness mode” applies the texture to the whole stroke instead of per dab?
I believe that a optional mode that applies the texture to the whole stroke would be useful for some artists. This would allow the texture to stay uniform and consistent when being applied with a single stroke. When the texture is applied per dab the texture can overlap with each other in the same stroke. This may be useful for artists with art styles that use brushes with flat uniform textures. But I think for most situations, the default “per-dab texturing” looks nicer when you’re using texture brushes for regular painting or painting strokes that relies more on the brush tip
I think if these extra texturing modes are implemented, I might be able to easily port almost any photoshop brush to krita and have it run in Krita almost the same way it runs in photoshop. I always believed Krita’s brush engine was more powerful and flexible than photoshop’s in every way except in some of it’s brush texturing capabilities. This will really bring so many more possibilities. I can’t wait to eventually test a build with them!
I think I would be nice to see linear height added as a blending mode to the masked brushes too because a lot of photoshop dual brushes use that mode too. But in photoshop “linear height” dual brushes seem to work very similarly to the “subtract” masked brush blending mode in krita so it might be a little pointless.
I’m not sure if anyone might find this helpful or not for referencing but I made a comparison pic of various default krita textures put in “height texturing mode” in photoshop. I just used a basic round brush with flow pen pressure enabled, 10% spacing, depth is 10%, and invert texture is disabled
@fizzyflower@anon62843690 I was thinking about this option of choosing the texture per stroke, and while seeing Fizzy’s (cute) drawing an idea struck me. It isn’t the same thing as disabling the pen pressure (or setting it to a levelled strength) and choosing a texture strength to your liking?
In photoshop choosing texture per stroke disable the pen pressure right?
Maybe you both could try it out and give some feedback. It is possible I’m missing some nuance detail about your request, and this idea of mine is inadequate.
@Daishishi : I think this wouldn’t work with any of the “height” methods proposed here, since those depend on modulating the texture strength. I have to say, I think I don’t quite have a proper grasp of the order of operations that go into compositing a stroke. I thought the dab that we composite pattern with already had opacity and flow baked in, but now I think maybe the dab and texture get composited together first, and then the result has opacity and flow applied to it.
@Deif_Lou : That does seem to produce the same result. Good catch. I’m not sure about separating the request though, does adjusting the stroke this way make sense in the context of any other blending mode? For “subtract” at least, the contrast adjustment in pattern settings seems sufficient to me.