Different layers from different frames

Hello again,

I’m trying to make an animation with different frames. If I move a layer on the first frame, said layer is moved on all the frames!

How can I limit layer movement to each specific frame as opposed to having the movement to all frames?

I’ve tried to Google this but couldn’t find anything. If this already explained a link would be appreciated :slight_smile:.

The problem is that if I move a layer on the first frame for example (say the feet),

All animations have different frames, along the Timeline.
An animation can have more than one animated layer.
To move the content of a particular frame, you make sure the layer that contains it is selected in the Layers docker, then you click the frame on the Timeline to select it, then you use the Move tool.

It’s difficult to know exactly what you’re doing and seeing without screenshots or a video screen recording.
It may be that you’ve misunderstood the best and effective ways to use the animation facilities.

Can you post a full screen screenshot showing the Layers docker and the Timeline for the situation where you’re having poblems?

Sure! This is what my screen looks like. Does that help?

It gives a better idea, yes.
As a quick suggestion, it may be a good idea to float the Layers docker and drag it over the Brush Preset docker to have them both tabbed in the same space. That would give you a taller Layers docker which is useful for multi-layer animations. You may need to widen the Brush Preset docker space before you do that.

So, you have Arms 2 as an animated layer with one keyframe at frame-0.
Arms is a non-animated layer so whatever is drawn on there will be visible and unchanging throughout the entire animation.
I don’t know what’s under the Arms layer but it seems to have something significant on its frame-0 in the Timeline.

If you Move the image on the Arms layer then that moved image will appear in every frame of the animation. The Arms layer doesn’t have any frames because it’s not animated, it’s a fixed background image.

If you want that non-animated image on the Arms layer to be animated, you can right-click on its frame-0 and do Create Duplicate Frame. That will bring its non-animated image onto frame-0 and it will become an animated layer. Then you can proceed however you like with it as an animation with multiple frames.

Ok, I’ve moved the layers docker around with the brushes.

I still don’t really understand… sorry.

Arms seems to work. If I use the animation curve at the bottom, I can move the arm layer on one frame without it being moved on the second frame.

But it doesn’t work for everything. Here’s an example:

I want to erase the line which goes under the hand like so:
image_2020-12-04_084636

However if I do and change to the second frame, the line is gone! I don’t want this to happen as I want the erased line to be on the first frame only, not in the second one.

Now I think it might be because it’s not considered an animated layer like you’ve mentioned since the squares are not blue as opposed to the arms layer which is blue for the two different frames:

So based on your explanations, I need to right click the first frame of the frame I want to be animated and ‘Create Duplicate Frame.’

…but I must’ve misunderstood because that didn’t work for me, the line would still disappear on frame 1 when I erased it from frame 0. What did work was for me to ‘copy to clipboard’ frame 0 into the frame 1. When I erased the line in frame 0, frame 1 remained intact.

Although it did work, I don’t understand the logic of it all.

From what I can tell:

  1. A non-animated frame (grey box) remains the same.
  2. Blue is an animated frame.
  3. What is the blue line running in the middle?

Do you have any previous experience of using another animation application before you started using krita?
If so, then any differences in krita may be causing you confusion.

If not, do you have previous experience of producing animations in krita?
(I know you recently did an Animation Loop of five frames.)
If not, then you have the problem of learning concepts, tools and methods.
This is always a large, long and confusing task.

If you’re using the Animation Curves facilty, and you have little experience in animation, I strongly suggest that you don’t use it.
Animation Curves are intended for long term opacity changes for various special effects and they an be quite confusing to learn and use.

I can understand your concern about your artwork and its appearance, since that is the end result that people see.
However, I think that it woud be a good idea to put that project to one side and start a new project where the artwork is simple ‘blobs and lines’, which are very quick and easy to draw.
Then you could concentrate on learning the tools, methods and techniques.

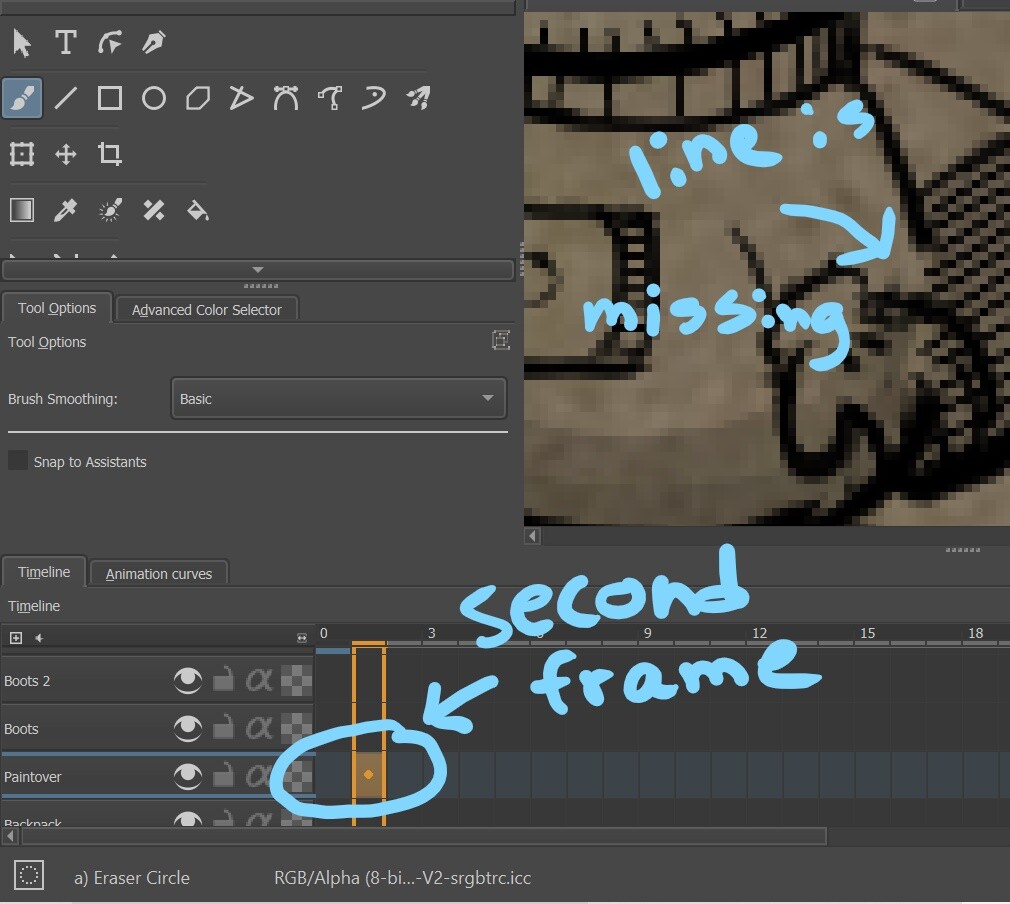
In your third posted image above, the ‘Paintover’ layer is not an animated layer, You can tell it’s not animated because it doesn’t have a lightbulb icon to the left of frame-0.

In the Timeline, blue frames are keyframes (they have content).
A grey frame with a blue line around it is a Blank Frame, i.e. a frame that is defined as a frame but with no content.
An empty grey frame has no defined content.
A frame with a horizontal blue line is a Held frame. That indicates that the content during playback will be whatever the last defined frame was. i.e., previous content is held for display.

Of course it did. The content of frame-1 would be the same as frame-0 because it was held.

Yes, because frame-1 is now a separate defined frame, a keyframe and hence it can have separate/different content.

You need to learn about the tools and how they work and behave.

https://docs.krita.org/en/reference_manual/dockers/timeline.html

This topic was automatically closed 15 days after the last reply. New replies are no longer allowed.