A set of 2 sizes of paper for manga with layouts, for web publishing or printing
Manga Templates Sizes:
You have 2 types of paper most used for manga.
- A5 182,00 x 257,00 mm (Final page size 148,00 x 210,00 mm)
- B6 148,00 x 210,00 mm (Final page size 128,00 x 182,00 mm)
Bleed
- 3mm Bleed.
- 5mm Bleed.
Resolution
- 350Dpi for Color pages
- 600 Dpi for Monochrome pages
How to use
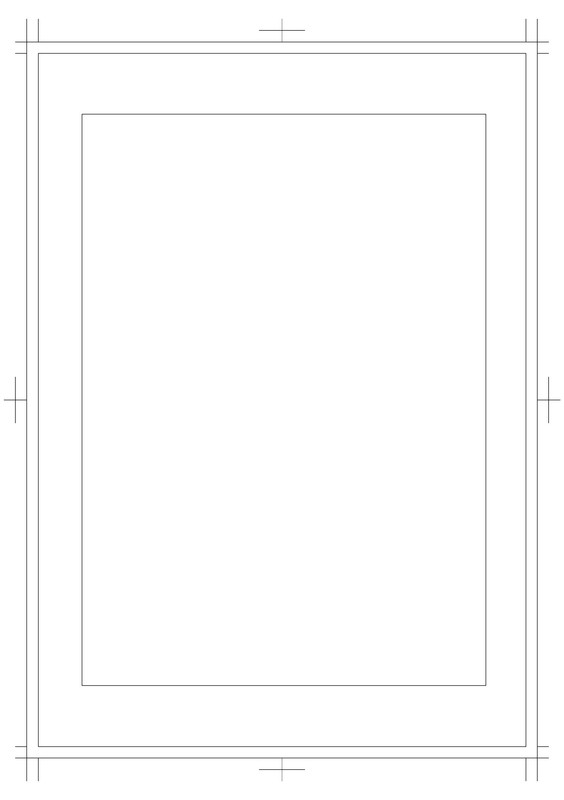
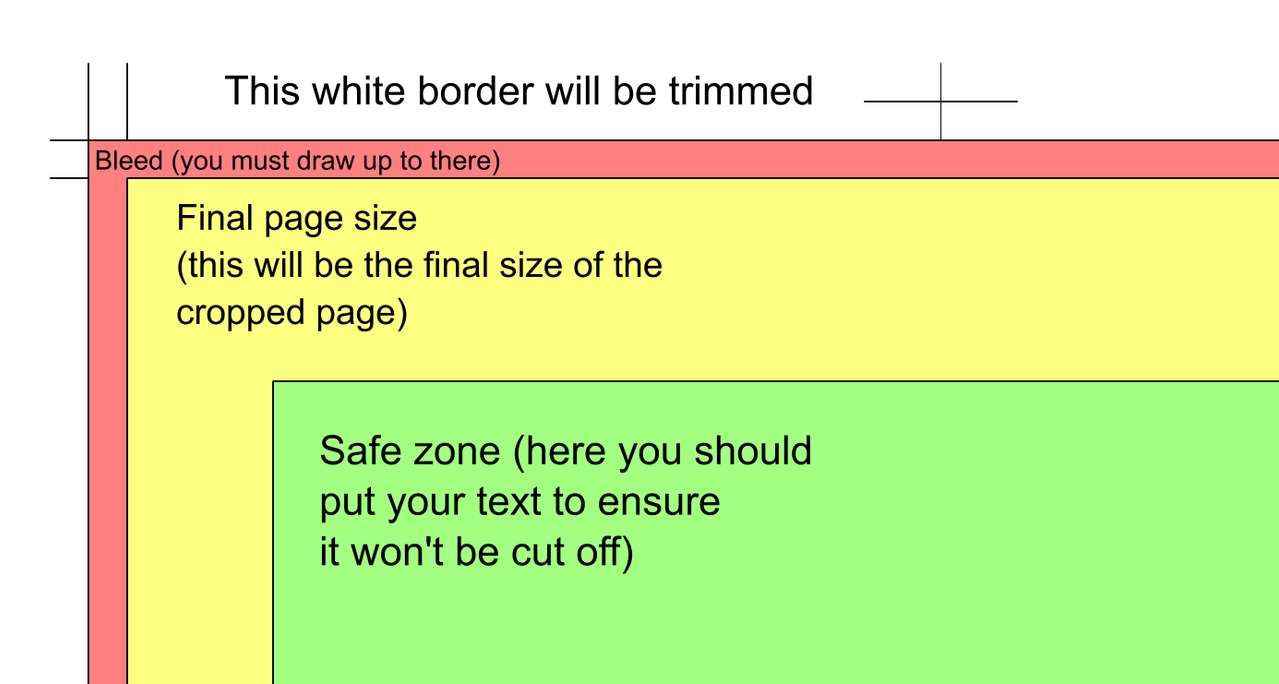
In the template you will see various marks like this. This is what means every line.
-
The first border is the trim line area; this is what the printer will cut if you decide to send your manga to print.
The horizontal and vertical lines, as well as the plus signs (+), are the trim marks that the printer will use as a cutting guide. Make sure you never cover these marks with the drawing, or printers won’t accept work where the cutting marks are covered. -
The second red border is the bleed. You should draw up to this area and no further.
This is because machine cuts aren’t always precise, so it’s recommended to draw up to this area to avoid white lines at the page’s edges. -
The yellow border indicates the final size your page will have once it’s cropped.
-
And finally, the green box is the safe zone; it’s where your text should go to ensure it’s displayed correctly during binding and that it isn’t cut off.
(It’s recommended that the text be inside this box, but you can place it outside, not too close to the end of the page, if needed.)
How to send your manga for printing or publishing on the web
For printing 
To send your manga to a printer, you must send the complete page (with or without crop marks, as specified by the printer).
If you need to send them with crop marks, in the file, within the folder, hide the “BLEED” and “TRIM-FINAL-PAGE” layers, leaving only the crop marks. Remember never to cover the crop marks.
Now you just need to export your page as PNG (lighter) or TIFF (heavier) and, using a PDF editor, combine all the pages into a single final PDF file and send it to the printer.
For web publishing 
To publish your manga online, select the “TRIM-FINAL-PAGE” layer and then go to Image > Trim to Current Layer. This will crop the canvas to the final page size. Simply hide the folder and export it as a PNG and you’re ready to publish.
![]() WARNING: Do not save the cropped file. Press CTRL+Z to revert to the original size and save it if you want to print it later.
WARNING: Do not save the cropped file. Press CTRL+Z to revert to the original size and save it if you want to print it later. ![]()