Hello,
I would like to request for a feature known as “Map Displace” or “Map Displacement”
What’s a “Map Displacement”?
It’s something based on 2 layers, one is the map, and the other one is the image/paint that we want to deforms-distorts based on black/grey/white values of the other layer/image, called the map (if I understood how it works)
What for?
To have a realistic effect on texts, paints, images, when they are blend with a textured background (the map).
An effect like a text, a paint or an image to become for example: a flag in the wind, or matches the deformation of a wrinkled clothe, or matches a disformed wall like a disformed bricked wall like a new ly paint street tag/paint on a old broken wall, painted mock-up teeShirt, reflections following the ripples of water, and so…
Example:
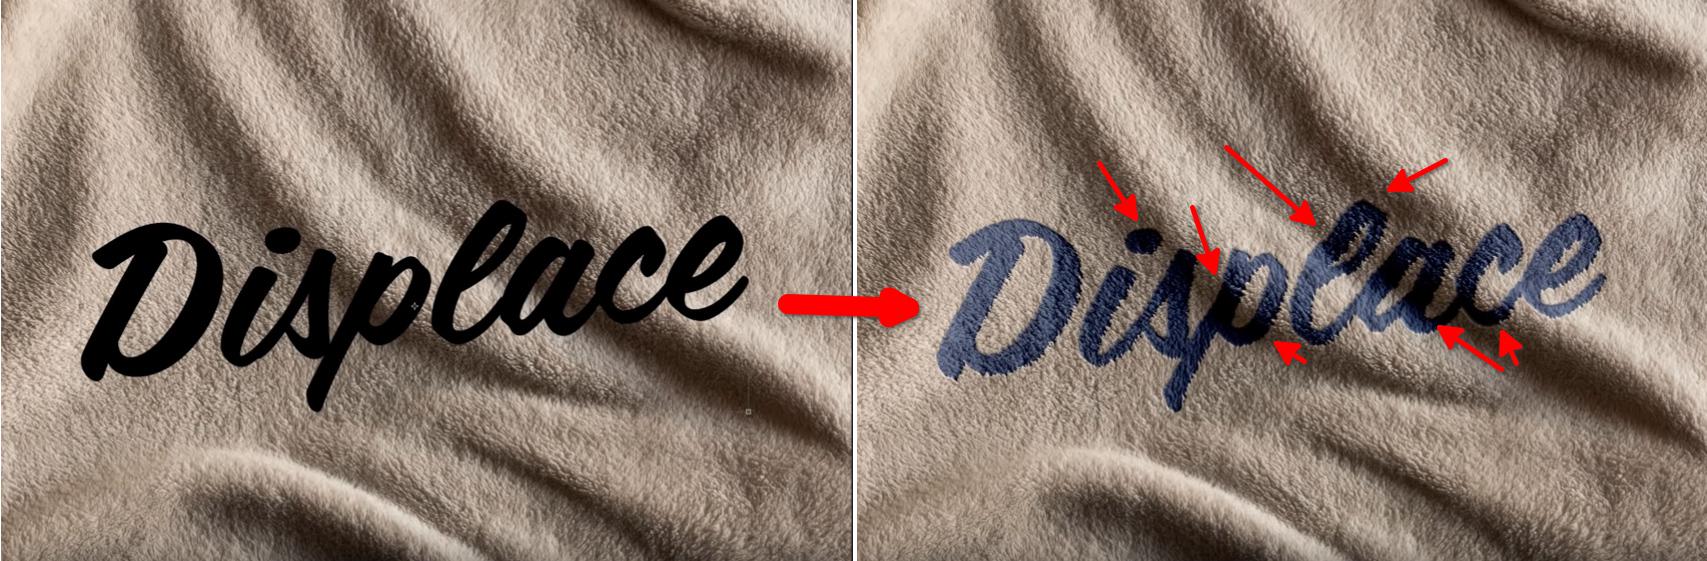
I quickly made it in GIMP for visual purpose
Please, see how the “bumps” have displaced the original paint to match the “wrinkled - creased” texture

Below an example from: How to Conform Text to a Surface Using a Displacement Map in Photoshop - YouTube (see also how the displacement map made the text “furry” around the letter.
Why?
Because all blending effects nor the different Actual Maps that Krita provides, do not disform-transforms the “matters” to look like it was “Folded” or wrapped" around an object.
Do you have a link that shows or explains “Map Displace/Displacement”:
The beginning of this doc.
https://docs.gimp.org/2.10/en/gimp-filter-displace.html
it’s a GIMP doc reference that explain in better words that I could, how it works (change the 2 letters ( /en/ ) in the URL to have it in your favorite language)
Some Visual references? (YouTube, timed at the most important part, except the first video)
- Gimp: Text Portrait With Displacement Map - YouTube (with GIMP)
- GIMP Tutorial - How to Wrap Texture on Photo with Displacement Maps by VscorpianC - YouTube (timed to the most important part)
- Blend Anything on Any Surface in Photoshop! - YouTube (with Photoshop at that timed line to see how Map Displace can put a proper texture on the text)
- Create a Realistic Mockup of Logo / Text Using a Displacement Map in Photoshop - YouTube (also timed
 )
)
Do you have a simple way to do it quickly for the developers to take a look at?
Yes with GIMP a very quick way to try it.
- Be assured that It is Not a Krita comparison, it’s ONLY the simplest way I found for you to “try” out on how the Map Displace/Displacement works without the need to buy a software.
So in GIMP, create a new image (we don’t care about color or alpha),
- Then go to Filters/G’MIC_Qt > Patterns/Satin, the default values are fair enough, just click OK, (it’s just to create a very-quick random map as example), This layer will be the map.
- Import an image as layer mode Grain Merge or Multiply or screen or overlay or so, depending the brightness/darkness of this image put that new layer above the “Satin” layer from G’MIC
- Make sure that this image layer is selected.
- Then Filters>Map>Displace… a new inter-active window opens
- The two “Aux input” give the options for 2 different layers (2 maps), select the satin layer as “aux input” (both Aux input)
- Then slowly move the cursors “Horizontal/Vertical” to the right or to the left
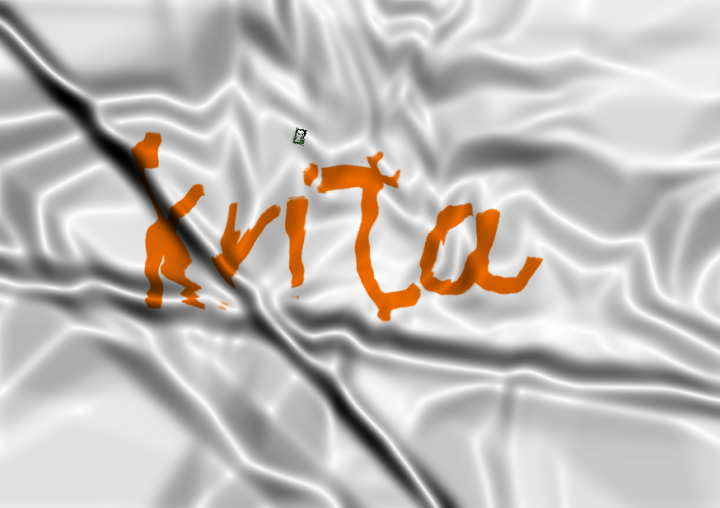
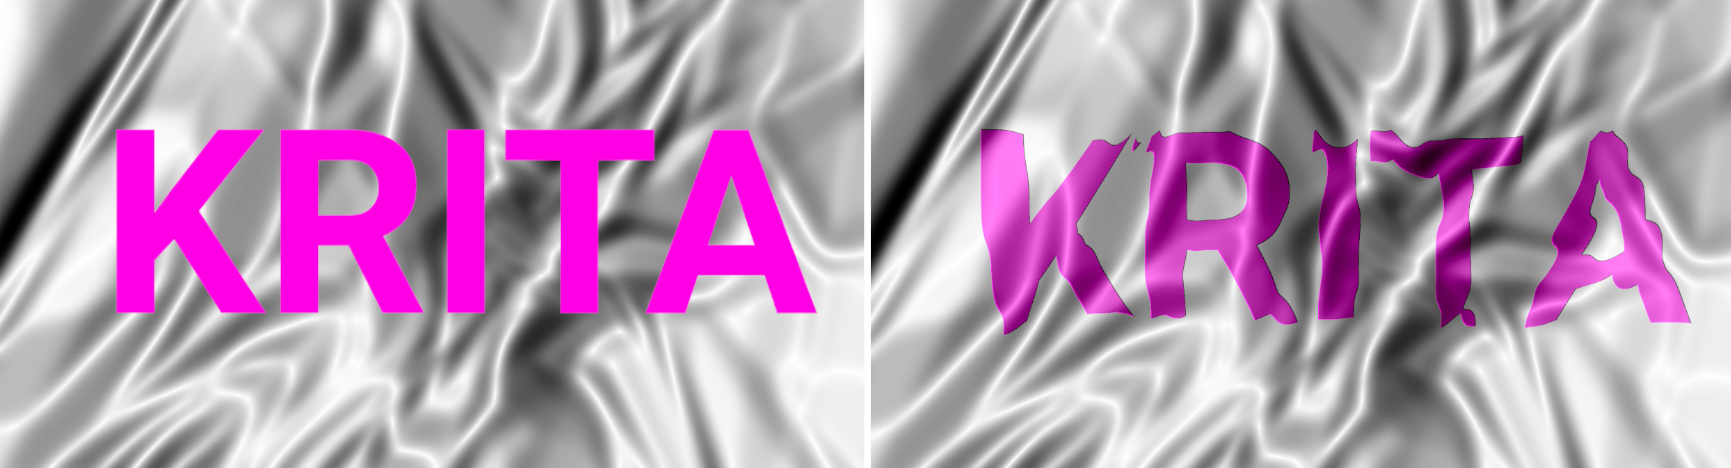
Another example: Instead of an image I did it with a text (OK, I did it way to quickly, it’s just to give you the idea)

In the hope that my explanations were not confusing and that I gave enough infos. (Plz, ask me if any lack of infos I can provide)
In all case, thanks a lot for your time reading this.
EDIT, I forgot a “mock-up” alike (I just copied GIMP as it give a good idea with lots of options (way more options than I actually use)