please do ![]() , I keep having different opinion while analyzing other artist works. Having someone that can explain how they would do stuff will help a lot for me, when trying to see problem from different perspective/more objectively.
, I keep having different opinion while analyzing other artist works. Having someone that can explain how they would do stuff will help a lot for me, when trying to see problem from different perspective/more objectively.
1 Like
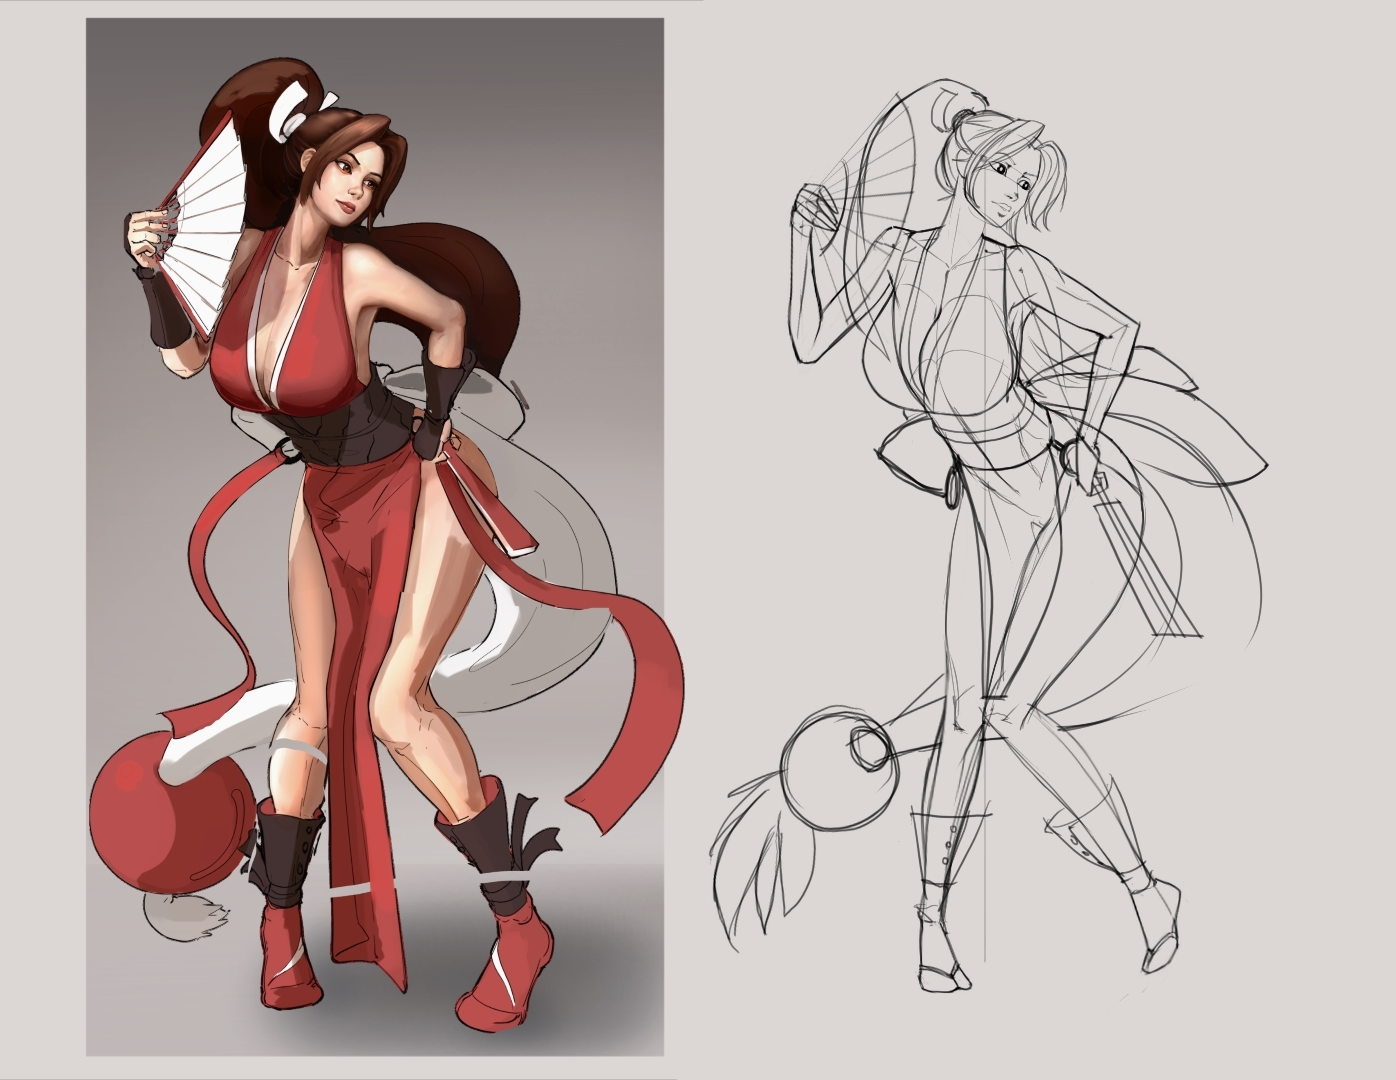
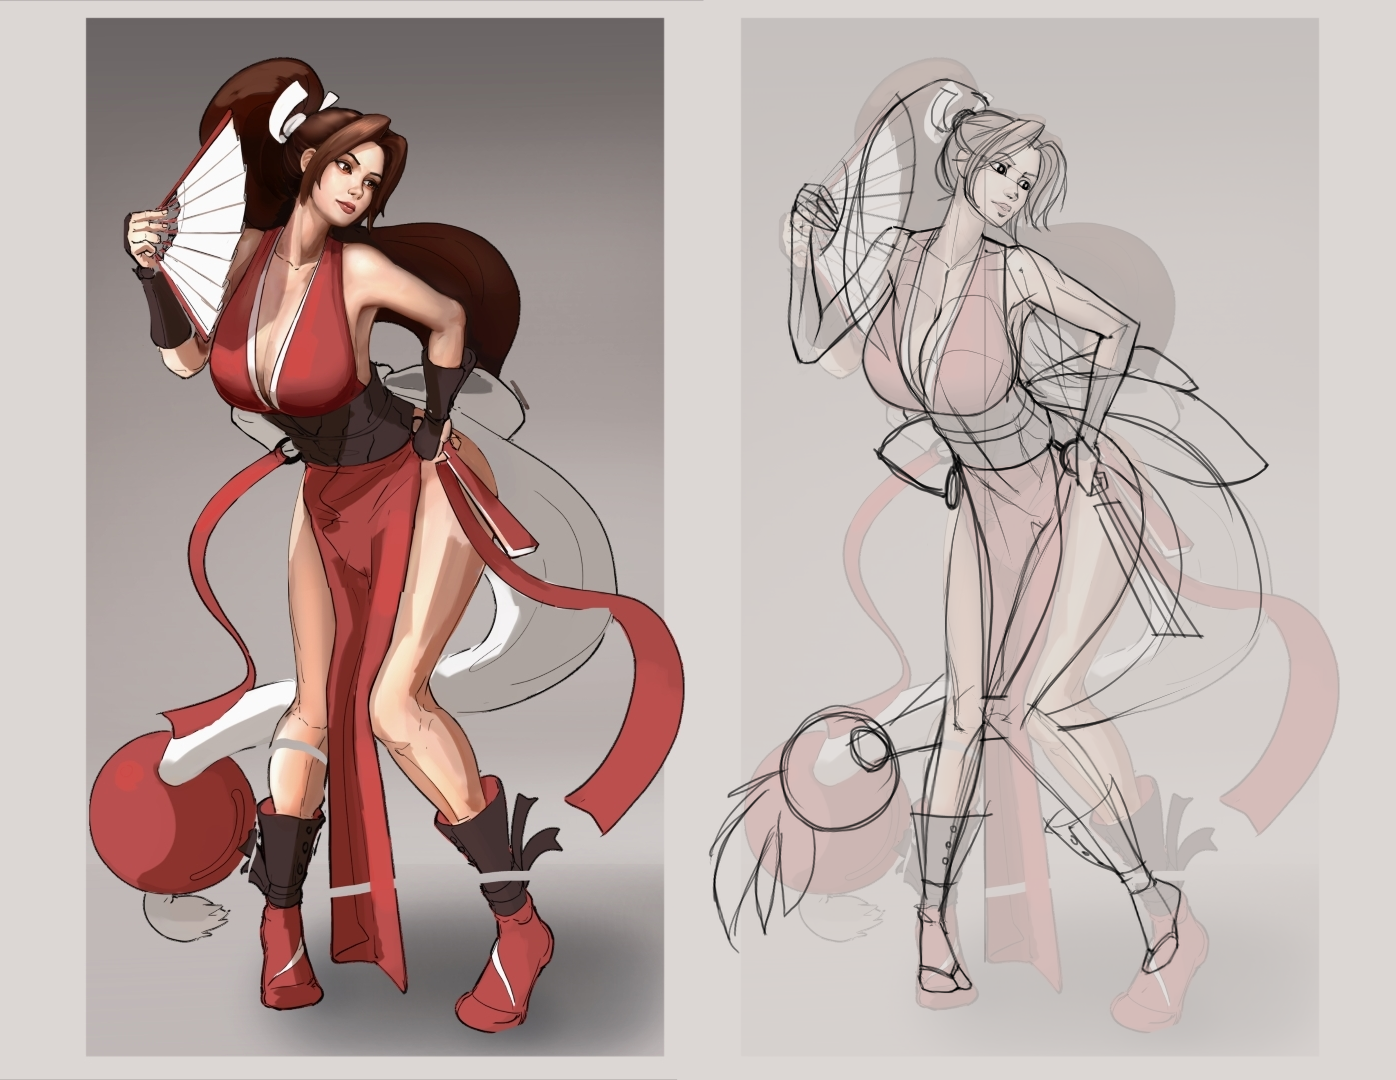
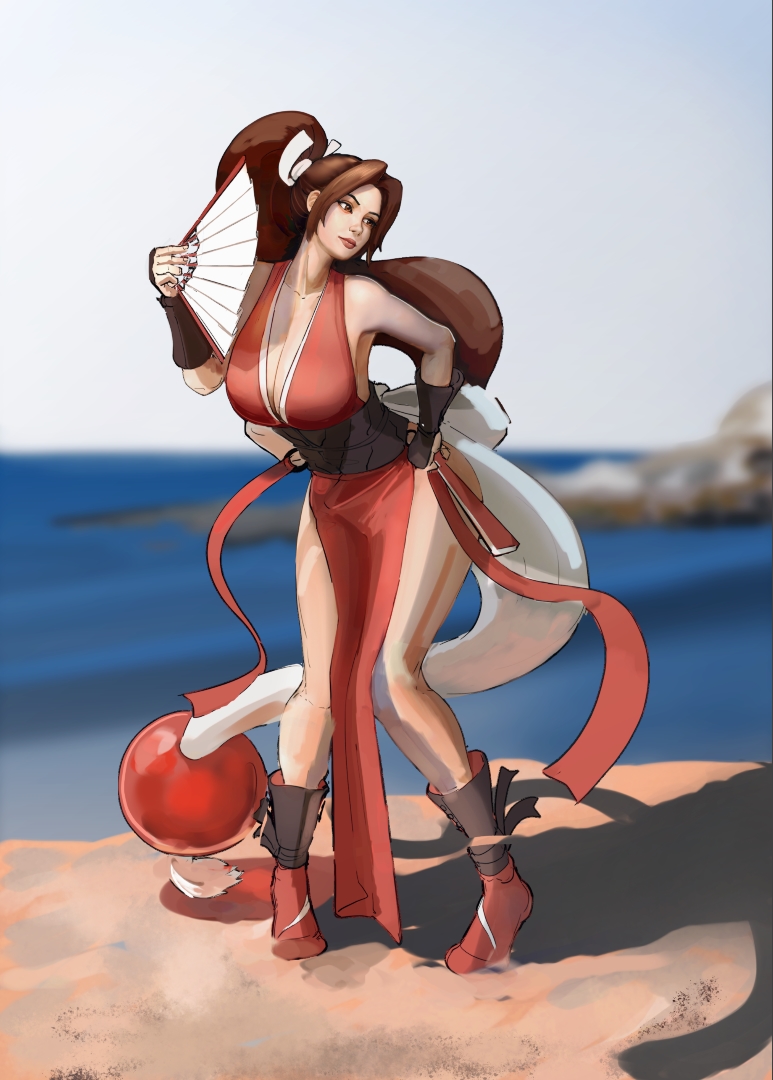
It’s also interesting how even official artwork of a character often changes a lot over the years, and Mai Shiranui even appears in two franchises…
I’m currently somewhat stuck in Blender. I figured I need a more reliable 3D model that doesn’t mislead me all the time, which tuned into quite some research for data of real people, and anatomy to figure out how to place the bones correctly (rather than following guides that typically go for least deformation headaches rather than correctness) etc…
I’ve mostly pinned down the proportions and started remodeling the “BodyChan” model (which is only loosely based on the real posable figure you can buy). The joints still look horrible, but it can be posed more or less already:
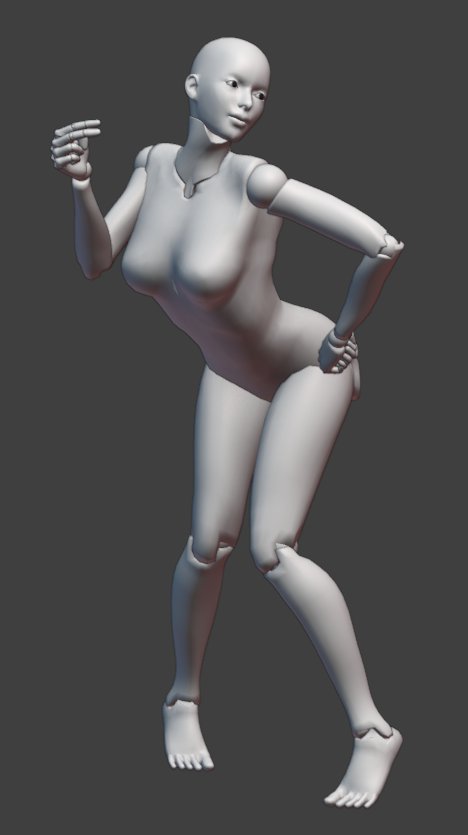
That shouldn’t be too far from how a real 171cm tall womanwould look like in that pose, assuming I didn’t mess up too badly.
Some observations: Her left ellbow seems to point backwards, but with her putting the fist on the hip, this seems impossible. Also, leaning the head backwards like that looks pretty extreme in 3D, definitely uncomfortable and probably the most extreme an average human can do.
3 Likes
@EyeOdin oh wow,
- I like your right arm position better than mine, spreading it more like that may make the composition has better balance since I intentionally make her left ribbon spread more to her left and it probably need something to compensate.
- I see that my right forearm might be tad bit shorter for the perspective now that I have something to compare, and I assume you moved her right hand lower to compensate the longer forearm and twist it more to adhere to the hips better as contact point. I might have to add those area in mine as something to fix too, I might draw it bend back more.
- My drawn left leg might be too big for this perspective now that I can compare things again. The idea was the leg that is in front should bigger, but I think I might have made it too big.
- I like the ratio of the base ribbon you drew compared to the character size.
- I might drop the ball to the floor as to make it more believable as something a person that cosplay Mai could do irl.
- I think I see both has similar problem with the actual height ratio of the upper and lower part of the character. Now when I imagined she stand straight, it’s like she is 4/5th Leg lol. I think it could work in a more stylized work. But I need to fix that somehow because I want mine to be more plausible as painting from an irl cosplay/live action scene.
thank you for taking the time drawing the sketch.
@Lynx3d
Try using a skeleton figure (as in bone) to imagine the base for figure to pose, and set it as the smallest form the figure can be where to can imagine to add the muscle and skin later.
I feel splitting the process of imagining the figure in 2 phases will help:
- the skeleton/simplified skeleton (hard body that won’t squish) and have that hard body variables restriction.
- the meat and skin part phase (soft body that can squish). This is important when drawing contact point against other object.
Also IMO trying to get the looks 100% correct according to IRL rule/constraint is very very hard, you will probably increase your skill in 3D modelling a lot more than 2D drawing. I always think at such moment it will probably better to focus on just 3D modelling ![]() .
.
That’s just my opinion tho, but you do what you need to do to not second guess your work. But if it were me, I probably aim to just 80% accuracy on following irl rule and only crank it higher when the work is simply drawing something from real life as is. Not sure if other feel the same way as me, but even though restriction is good for consistency (objectiveness), it is quite stressful to limit the creativity (subjectivity) too much.
you might want to see tenten’s mindset when imagining figure pose. I think with the help of a more simplified 3D model, you won’t need to fiddle with the more complex model that resemble complete human https://www.artstation.com/artwork/PX22WB
1 Like
I must say that only after seeing the 3D did I really understand how her feet are really connecting with the ground, I thought she was lifting the forward foot up doing like a cutsey thing. I really did that wrong and also the head being perhaps too small for her body. But I would be kinda in that realm regardless.
I must say I like how you create depth with the knees alone, I tend to flatten things a bit too much for my taste. I also like your perspective depth you give and I tend to fall into orthographic without noticing it. But I am happy it helps even if just a bit.
1 Like
And I totally missed she has a folded fan in the other hand and I got the orientation all wrong…![]()
Anyway, thanks for that link to tenten, indeed gave me some useful input too.
The idea is not to make a perfect 3D model (although you’re right that right now I’m definitely learning more how to model and rig in Blender, but I’ve actually been more interested in that stuff before I discovered Krita for me, so it’s a little detour to the past for me).
The result must just be close enough to a real human to work with, in movement and proportion.
And in the time I spent so far, I think I’ve learned a couple of things that will hopefully help me drawing without just copying a pose from a reference too.
I thought about just rigging a human skeleton too, but forearms and lower legs would be a challenge…I’d need to create a custom rig from scratch.
But I just found a cool (and pretty old) tutorial how to better simulate knees with a simple bone setup. I’m totally going to try to hack that into my rigify setup because it’s so elegant…
1 Like
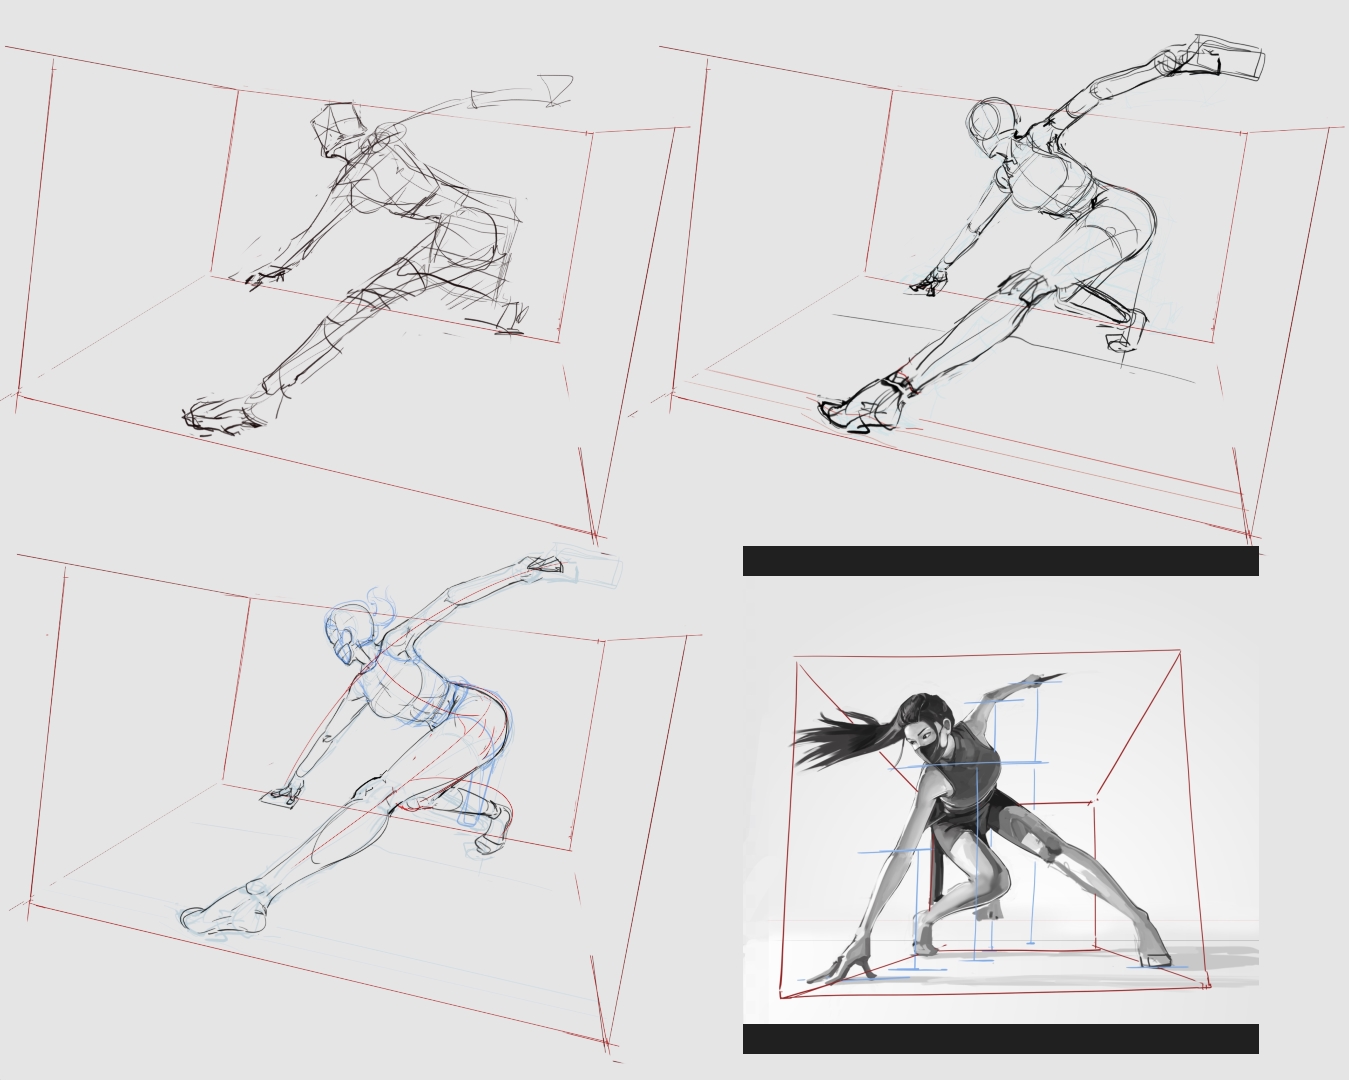
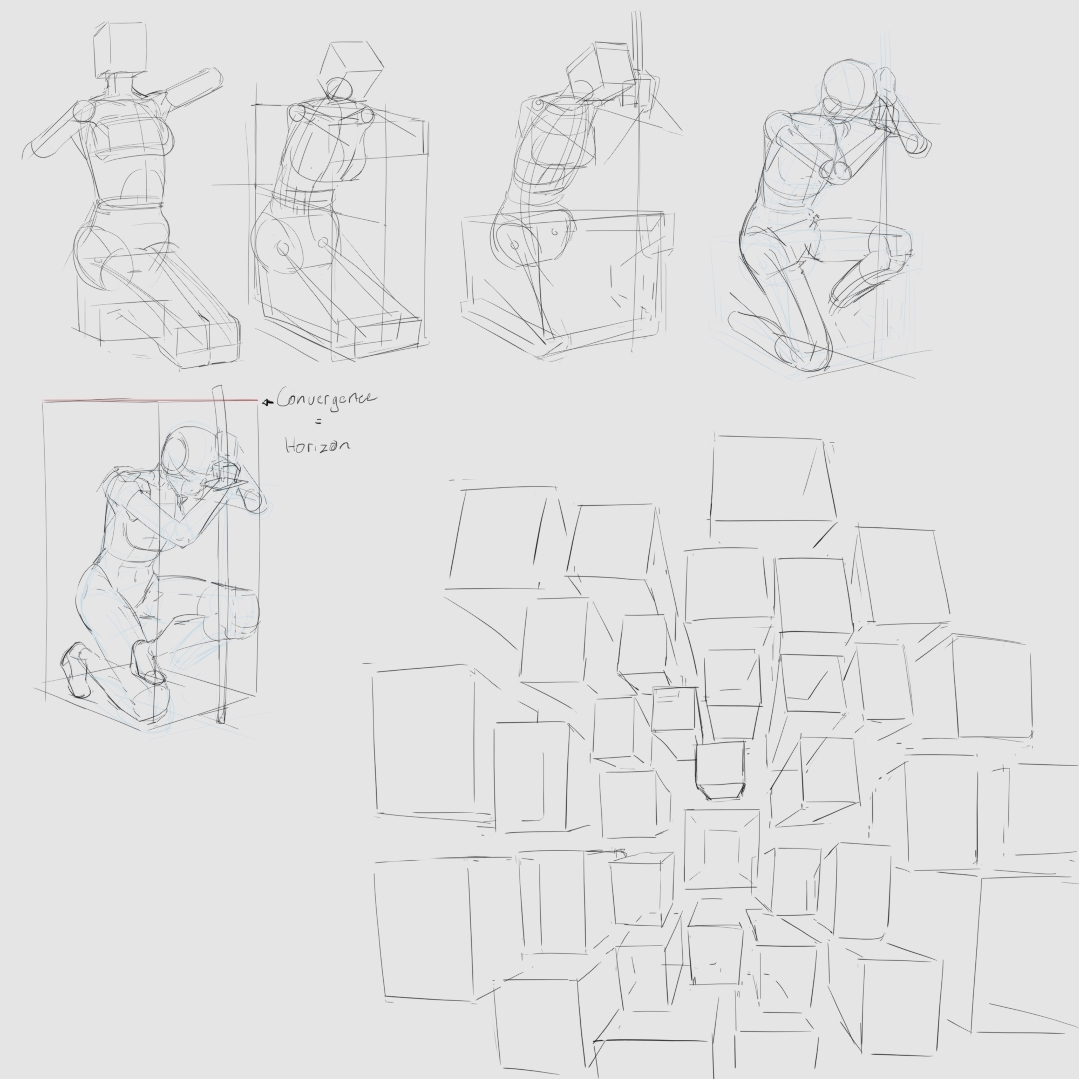
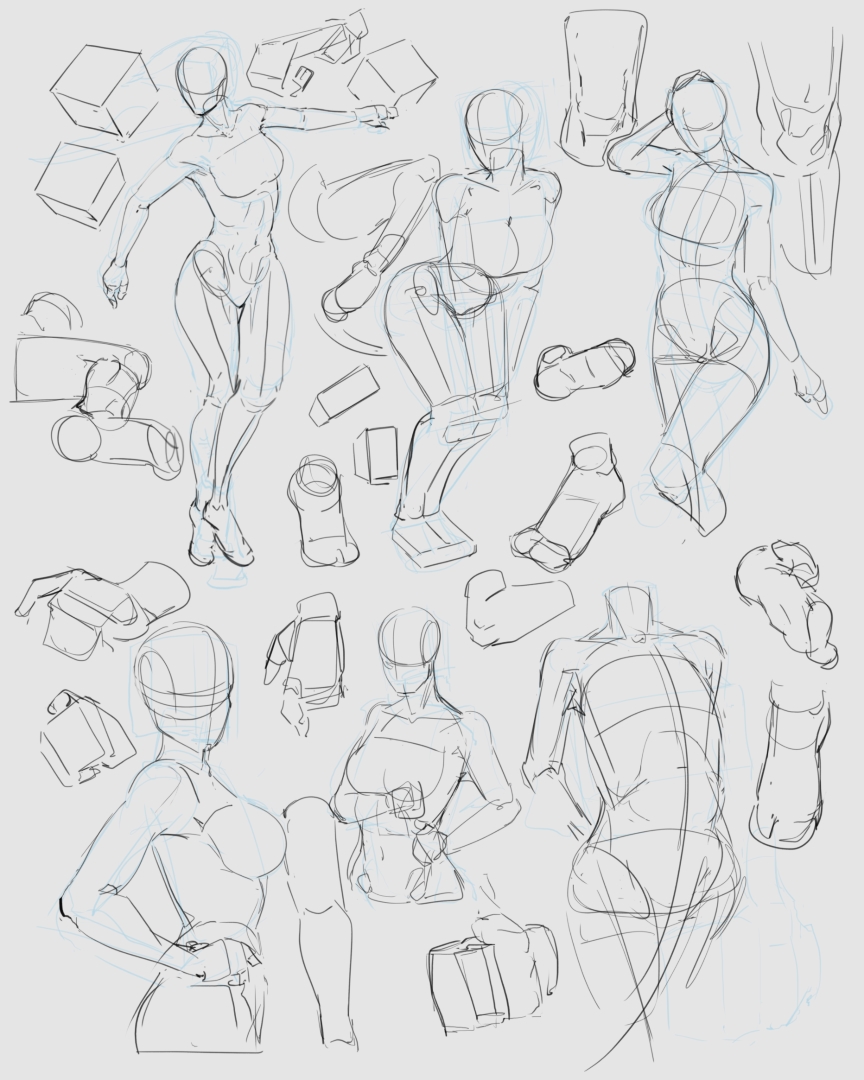
Sorry for the behinds. But I just want to show what I did to practice the rotational action I mentioned few months ago. I think the way to practice it is to rotate the boxes, not the actual figure. This is why it is very important to me to draw cube (box with same edge length) correctly, as that is the form anchor in judging other object in the same perspective.
After the boxes is correctly rotated, then the problem can be shifted to how much we know about the object, for figure in this occasion is familiarity with human anatomy. I am still not good and have a lot more to improve upon but at the very least I now know what to focus and not just draw blindly without actual goal.
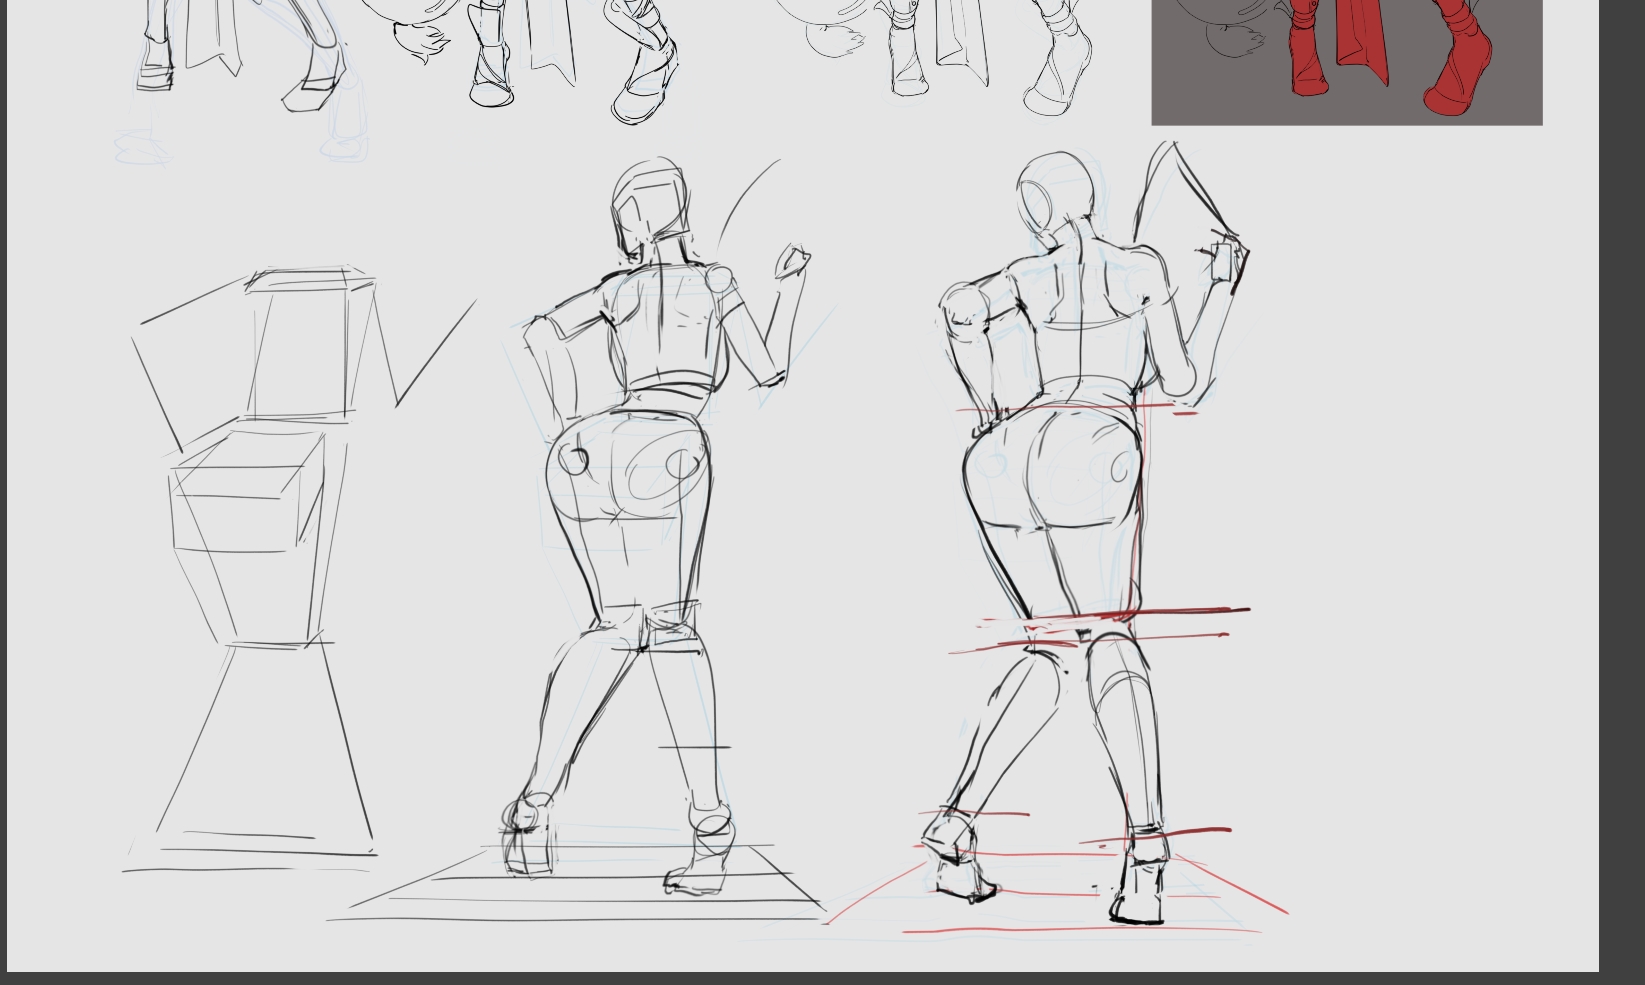
This is probably better example, not the best since the pose is still not familiar to me.
3 Likes
I decided to do some color check since I don’t have much time during work day. Something make it still doesn’t fit, maybe lack of rim lighting on her far side. This is fork file, so the original is safe, I keep telling myself to not destroy another one without backup.
3 Likes
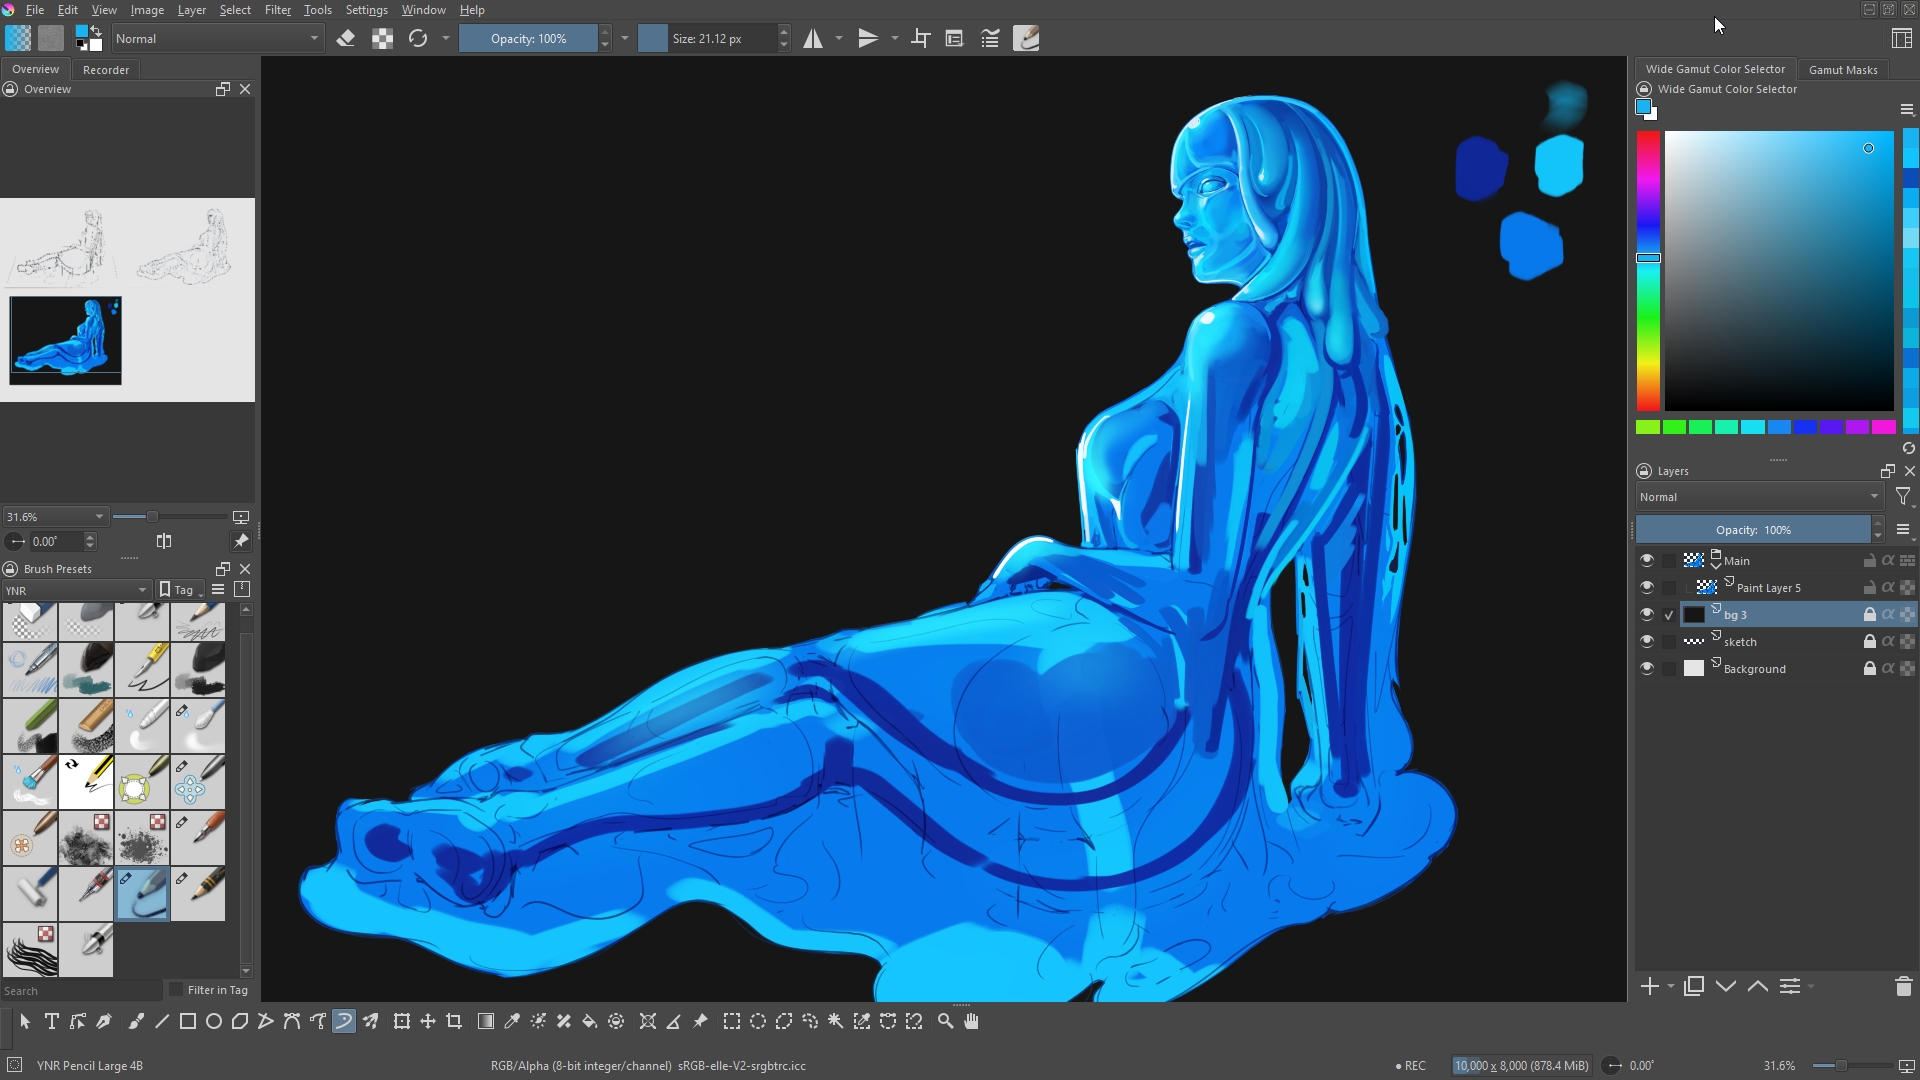
A bit unstable again. Anyway just wants to show that after the form is complete, effects like material/texture is less confusing because based on the form you know what constraints are in place.
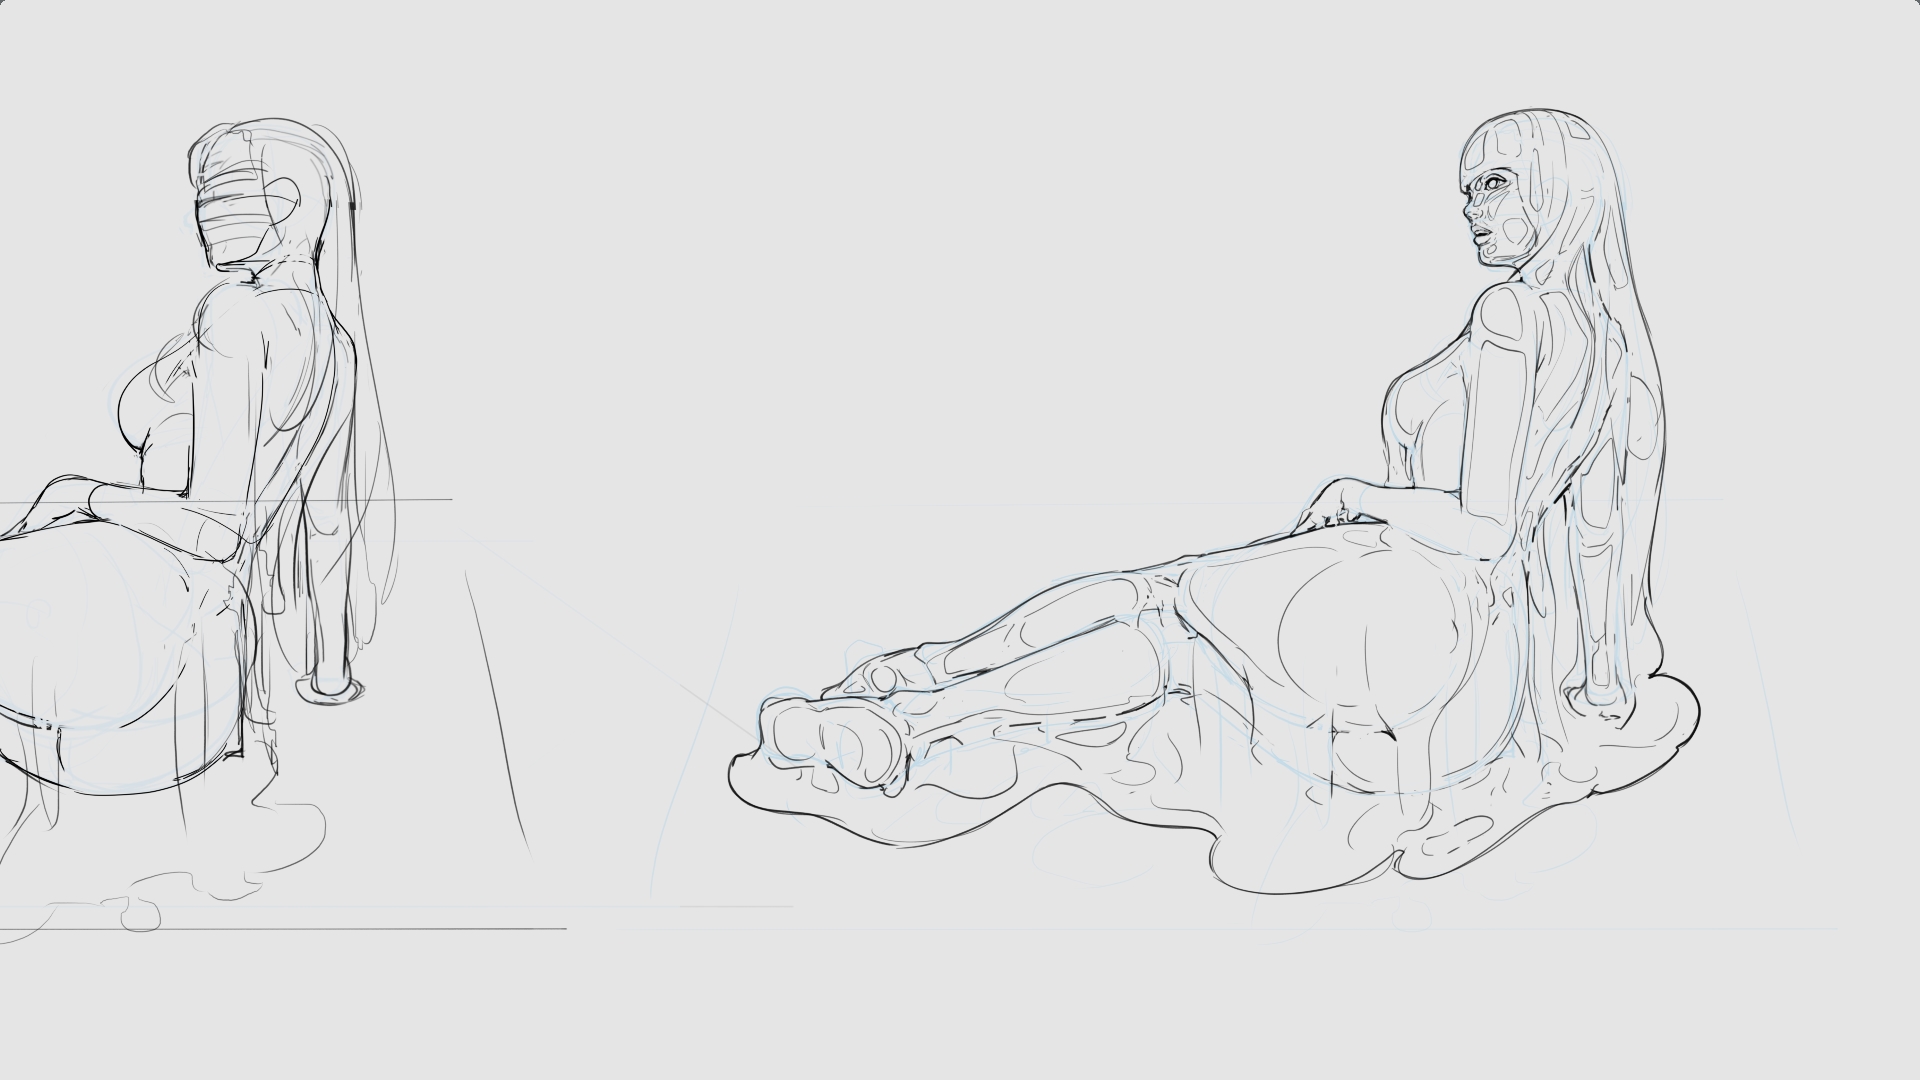
Slime girl sketch
edit:
some of the shading techniques I am comfortable to use need everything in one layer, especially the one that create the many type of edges. Still can’t figure the less destructive method.
Rambling, no need to click this
This might be important, brain told me to write it here.
Our brain has limitation of what it can think at once, or so I believe based on my own exp and my observation of other people. So I think it is better to define the problems we have, group them in term of foundational priority, and most importantly tackle them in sequence.
If we focus on the form first then material later, when we finish both and we realize the material has mistakes, we redo the material only because the material is “after” the form. But if we finish both and realize the form was wrong we need to redo both.
To know the permutation of every visible condition of an object is important, which is why repetition is important, since that is where artist get the insight, and that’s where the speed and confidence comes from. But for me it is very scary if I repeat mistakes after mistakes and keep going the wrong path because I don’t know what’s right yet. It probably just comes from personal trauma that makes me overthinking of everything, so if your head is still clear, don’t listen to me.
2 Likes

that’s the kind of training you seriously need bro, do hundreds of hours of them and you’ll become really good at drawing ! Keep up the work !
1 Like
Yeah just need to know the real purpose of each type of practice. I can’t follow things blindly, and start copying what people does without knowing the purpose, or else I develop the wrong habit. It happened before, and it will happen again if I am not careful.
edit2:
5 Likes
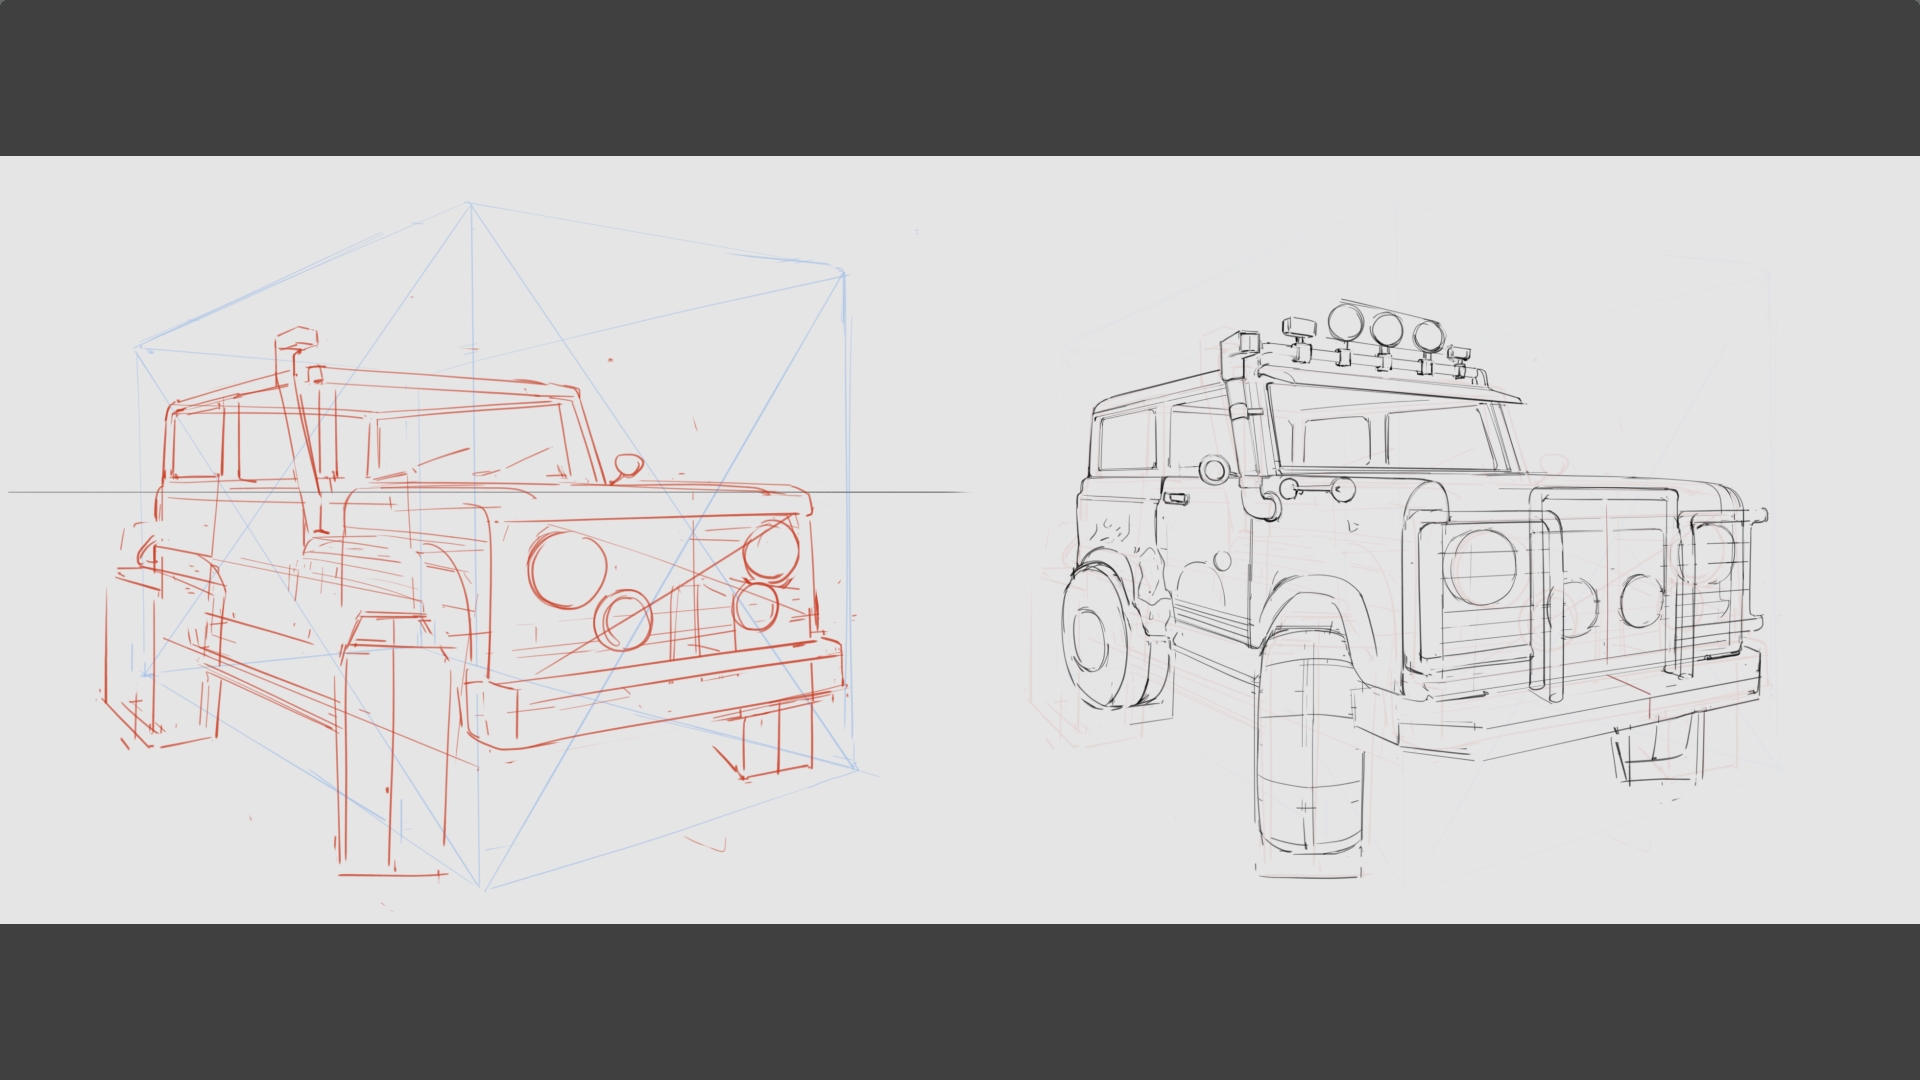
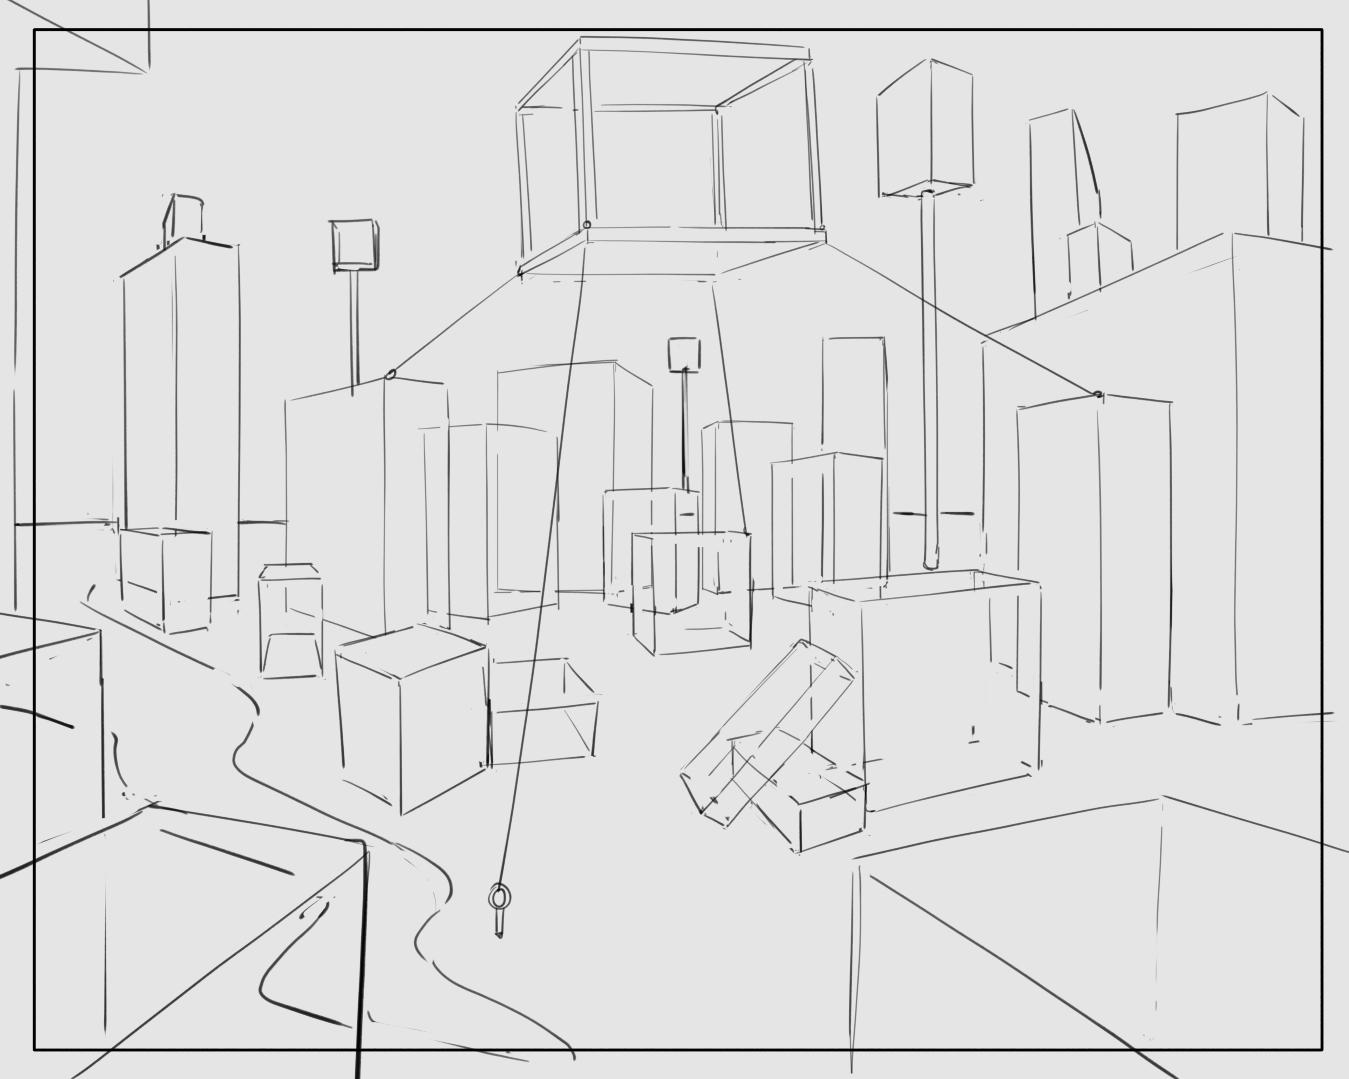
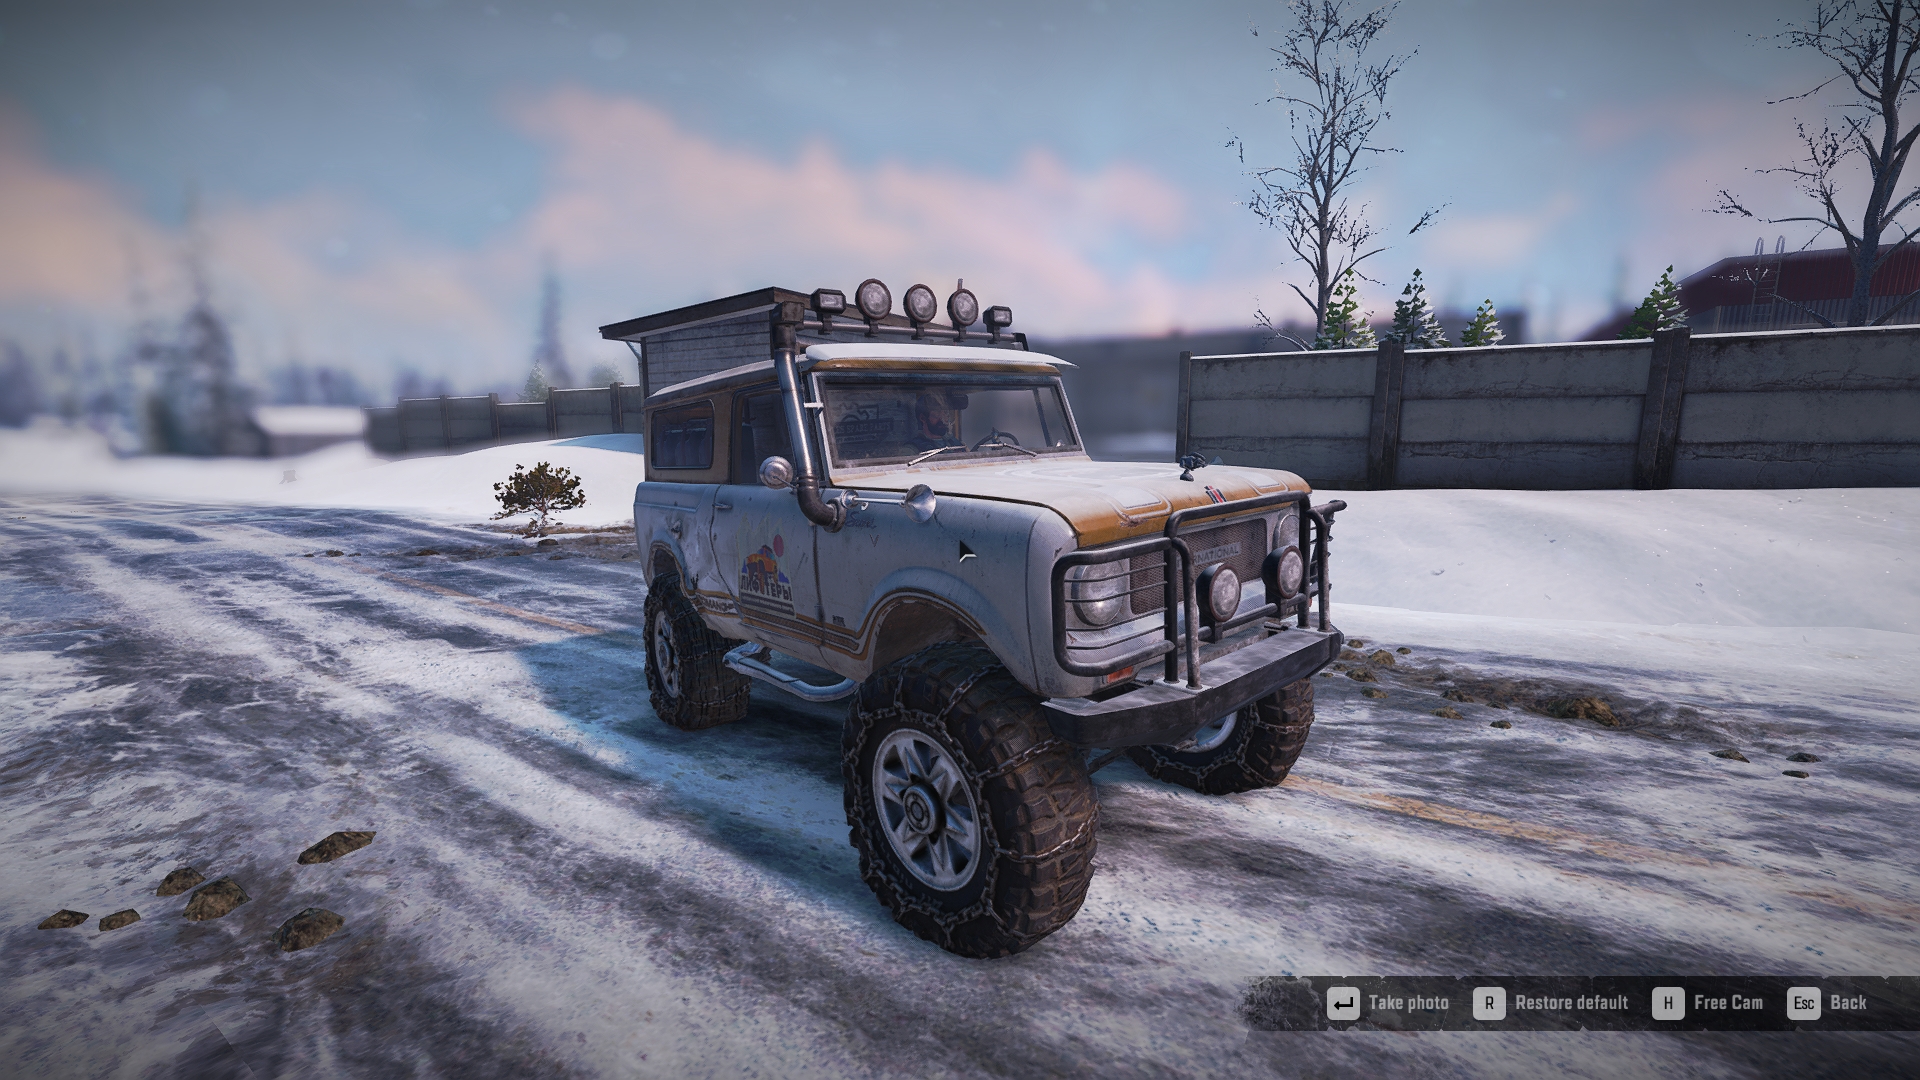
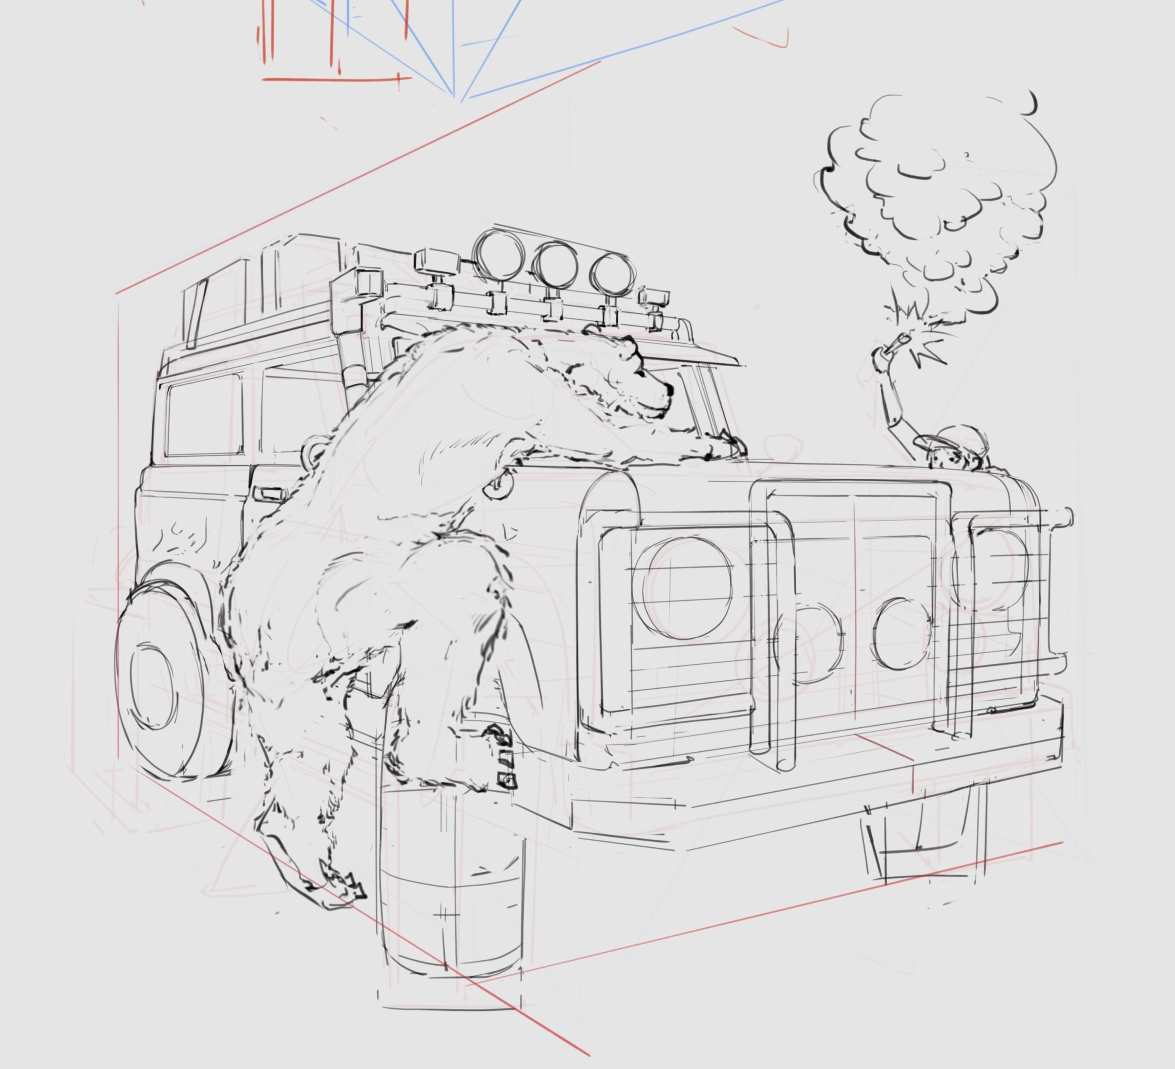
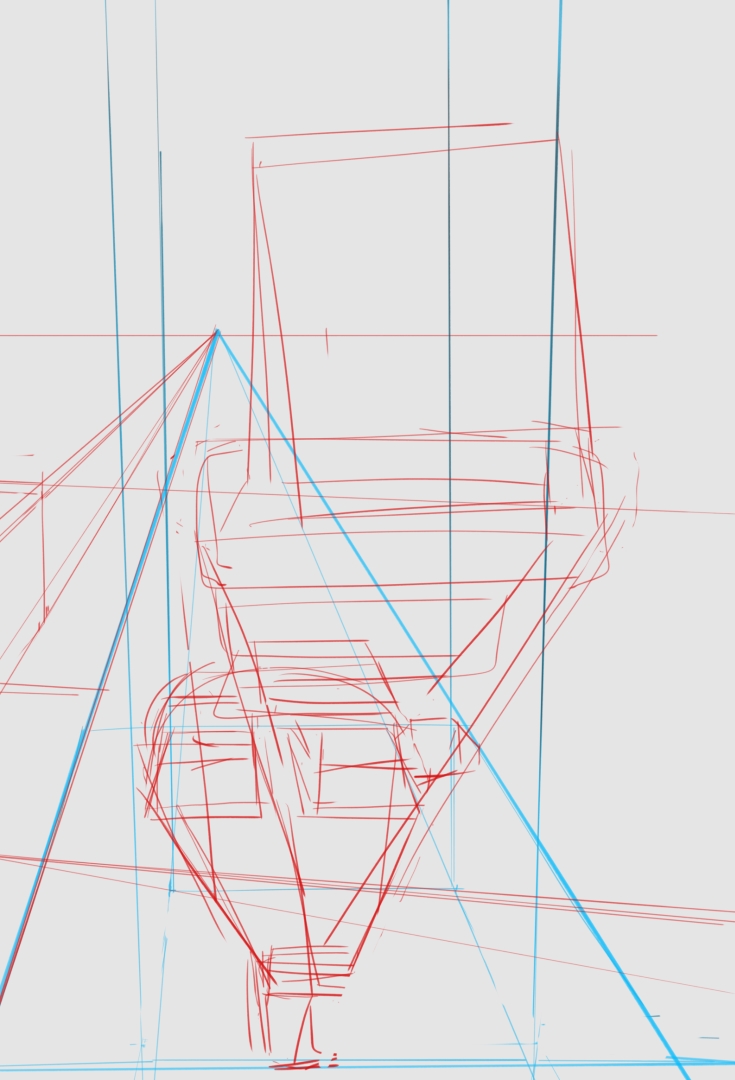
Ref: Screenshot from my own playthrough of the video game Snowrunner. So IMO if I were to draw this with just my observation skill, it will be much faster but I will be tied to the ref and can’t add or remove stuff unless I redraw the boxes again.
So the test now, can I actually add things to the one where I chose the perspective on my own for the scene?
Edit:
"Come here! you little sh*t… " lol
7 Likes
“Ooooh delicious and shiny!”
2 Likes
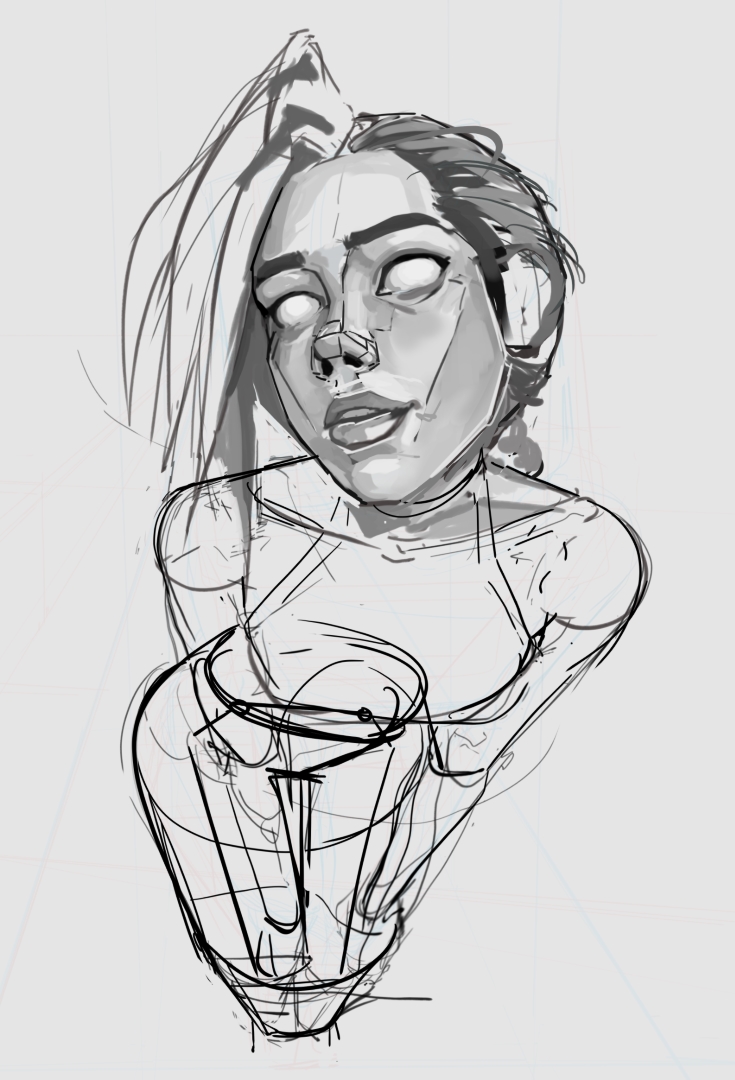
I think I am getting better drawing the right width and length without looking at ref. But I still haven’t memorize human anatomy enough to immediately draw the body details.
Edit:
Gonna do the same test as the Scout Vehicle but with a human figure.
edit2:
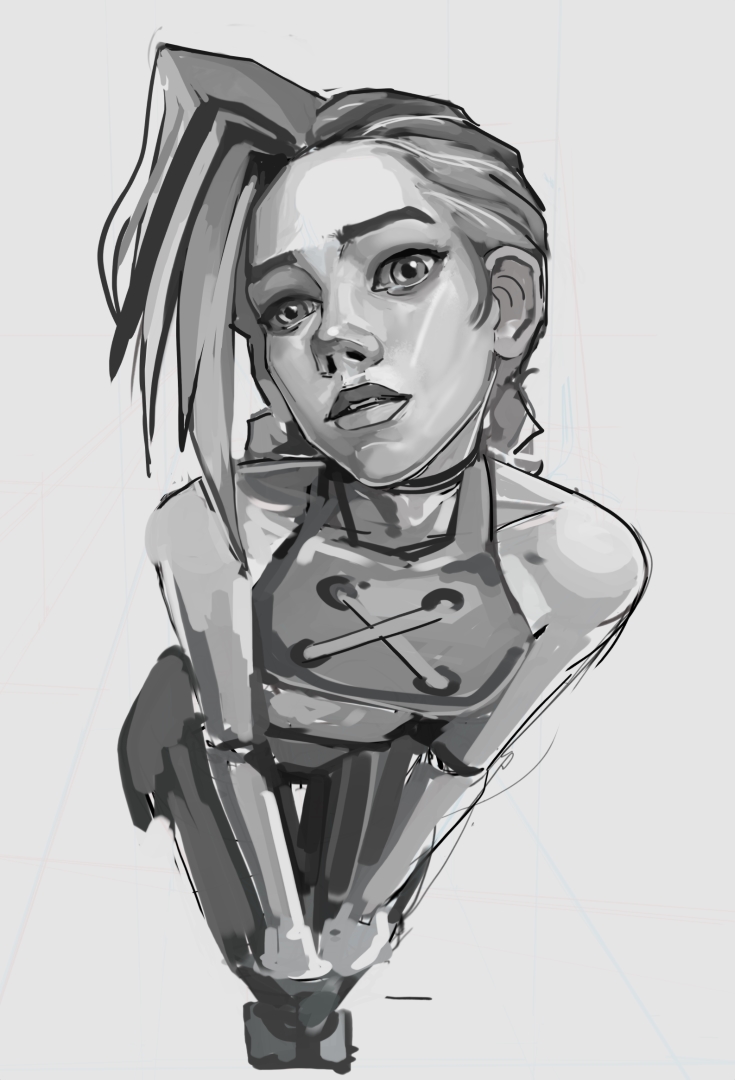
This gave me headaches have to cut the sessions short. Been thinking of lowering my shading details… idk if I should
8 Likes
I did some research again, based on some pointer given here on a book by Charles Bargue. When I search his name, I found out there’s a readable pdf copy on google first page (internet archive??) Unfortunately for me it is similar to what Proko explain about in few of his more advance techniques on youtube. What to be aware of when analyzing something, dynamic non-hard number measurement techniques, reference lines and points, basically observation techniques. I didn’t read it whole through just skimmed it since most of the pages is drawing plate to practice copying.
Those knowledge and techniques are important especially if you want to draw in very detailed manner. But oh boy it brings back some traumatic memory. I did my first clean copy without using grids, I think a month before Open AI first announced their LLM tech. And the small groups I was in disbanded one by one soon after.
Anyway it is a good reminder tho about what I need to be extra aware of when create my own figure with non exact ref images. I have my own theory about image variables (composition), and I am still searching a way to do a good consistent partial variables transfer.
Edit:
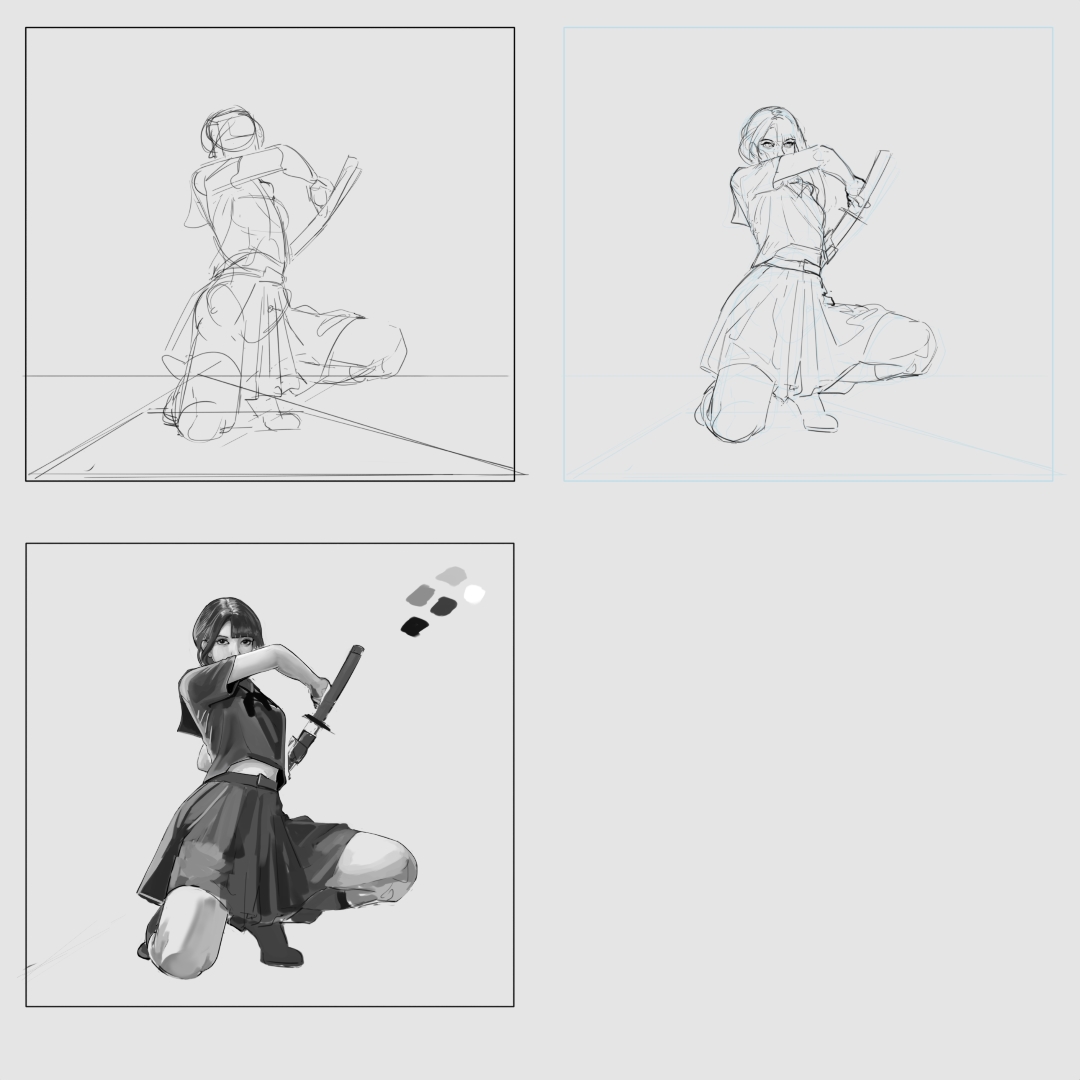
So this is actually the rough, because I can’t imagine the details pass this with just my memory. I do lack of permutation practice for some parts.
4 Likes
I am quite sick right now, but somehow my brain works better or at least I somehow view thing in different perspective (Pun intended).
Turns out there’s condition for each type of perspective. I noticed 3 points perspective happen when the plane where the camera stand is not parallel to the camera horizon line. That means 1 and 2 points can only happen when the ground is parallel to the camera.
There area multiple occasions I couldn’t do my usual “extending an image” projects because I tried to draw/add 1/2 points perspective while the ref is actually pointing up or down which is 3 points perspective, so the tapper from above or below is missing, that’s why my brain gave warning yet I can’t figure out the mistakes. I am so dumb for not realizing that all these times.
I also figure out why concept art that has the character standing in full view make sense when it has no visible tapper/flat looking. Because it is viewed from greater distance/higher focal length/both hence the distortion is not very visible. Also is it just me or the FoV setting in video game work in the opposite way of Focal Length?
4 Likes
The more important thing is to have these “break-thru-points”, to recognize them yourself is even better as someone telling you it is like that.
Michelist
1 Like
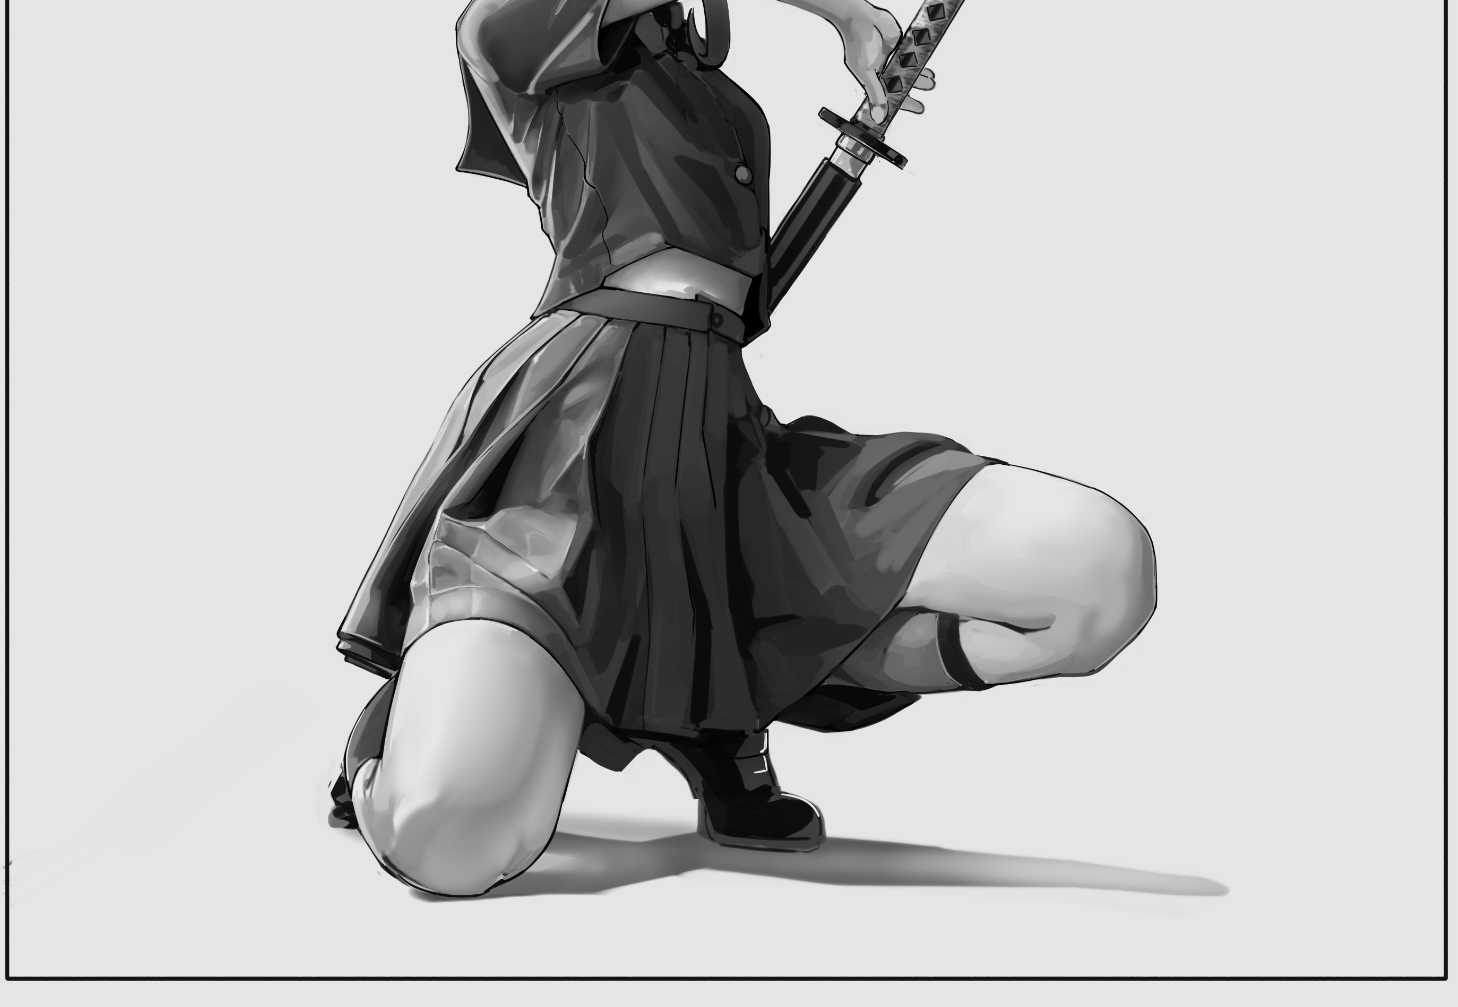
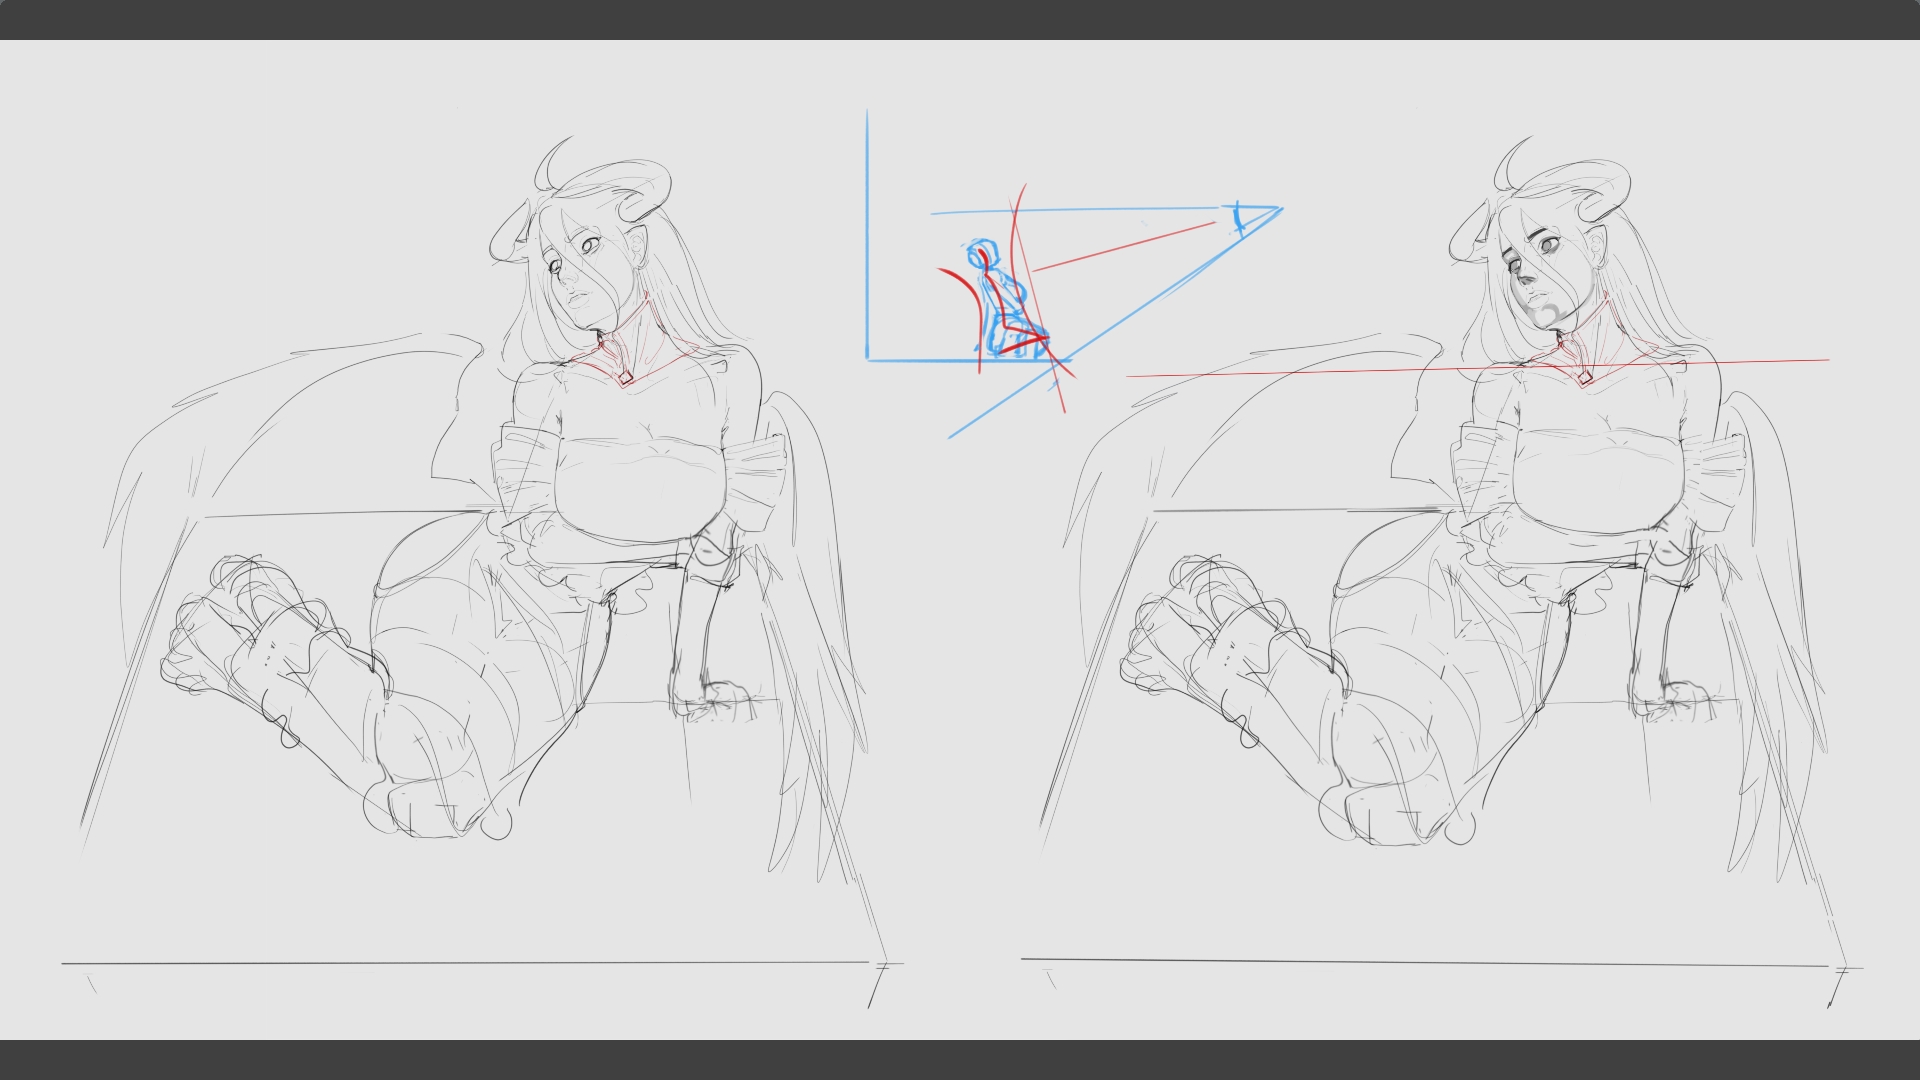
Size ratio between parts are based on distance to the viewer, tapper mostly based on the angle of the view, both are distortion type imo. Because the model bent her torso back, the size ratio is actually similar with the default figure diagram, maybe slightly smaller head because that is a bit further than the rest.
I think I use the wrong term for horizon line and eye view level. Is horizon line the ground plane’s horizon or the eye horizon? This is the problem when I have no 1 consistent information source. I feel like this is a 1st semester art student problem, and I tried studying all these since 2018 and still to this day playing jigsaw puzzle of info.
2 Likes
Just spend some time learning geometry instead of tid bits. you can digest it pretty quickly for what you need in hand drawn art. But I must say a thing. a Blender camera is a perfect virtual camera without lens distortion. lens distortion would be something added later in post production if they want it. lens distortion is what give perspective have that circular shape to it which is ignored in pure geometry and 3d as you can imagine