Hi everyone, sorry for not being able to reply in time to everyone’s comments, my older laptop broke, so I lost all of my files. I had to buy a new one. ![]() I don’t know if I will able to refine this retro comic pack in the future, as I don’t have access to the original files anymore. I loved seeing all of your artworks made with these brushes and textures. I actually found a easier way to convert a clean digital artwork into a vintage comic looking drawing before my old laptop broke, so if you want, I can try to make another forum post about it. Thanks for the support, everyone! And thank you for testing and playing around with this Krita pack
I don’t know if I will able to refine this retro comic pack in the future, as I don’t have access to the original files anymore. I loved seeing all of your artworks made with these brushes and textures. I actually found a easier way to convert a clean digital artwork into a vintage comic looking drawing before my old laptop broke, so if you want, I can try to make another forum post about it. Thanks for the support, everyone! And thank you for testing and playing around with this Krita pack ![]()
6 Likes
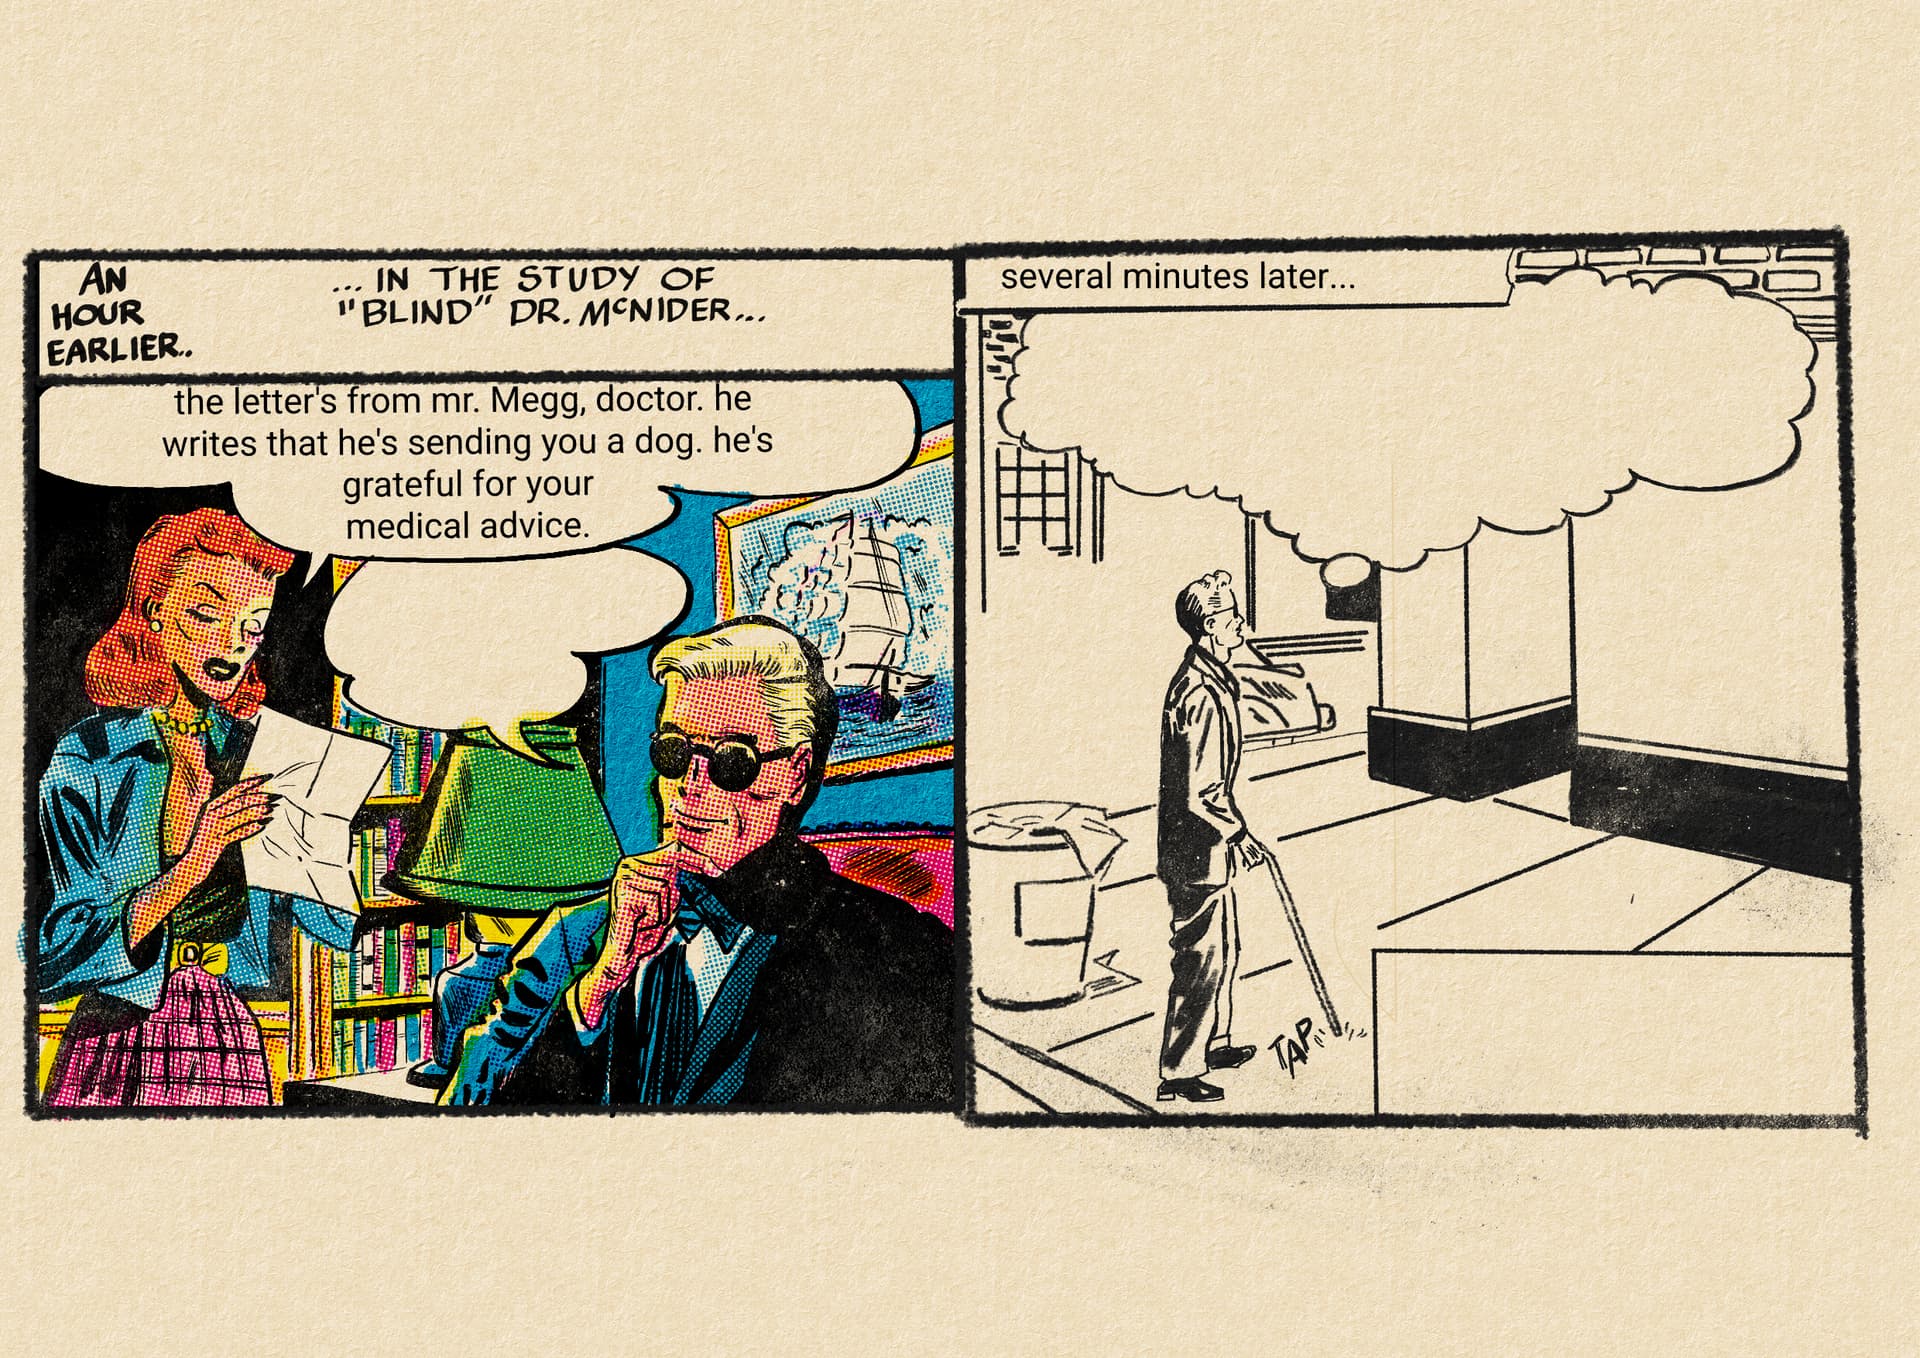
Hi. Awesome use and update on the brushes. I too agree about making them colourcoded. I would like to make these even more great, but I havent done anything to them yeti. Here is an example of what I did: made on android tablet. I wishes android made custom fonts possible, or could Krita do it like Clip studio paint does? Inside the app.
5 Likes

Hi @vwvwvwvwvw
If this image was linked to demonstrate how you used the brushes, it would be better to upload your image. Many users here won’t click on unknown links.
1 Like
I just trial and errror. If it doesn’t work, just erase and try a different brush. Your picture looks great, nothing weird about it’s skin colour.
hello im new would like to ask how did you achieve this way of lineart, i did what it said in the layer section but all it did was checked a inner glow stuff. and it doesnt work? what to do ![]()
Wow, I have never seen this sort of thing before, thank you @Puplaroid for such a wonderful bundle! I spent all afternoon doing colour swatches, which I will upload for anyone interested (I used the paper template, with the only change being the deletion of the ‘paper texture’ layer’). The CMYK in the top right are NOT under any filters, and I colour-picked them directly. The actual swatches are under the ‘worn ink texture’ filter layer, so they look more vintage.
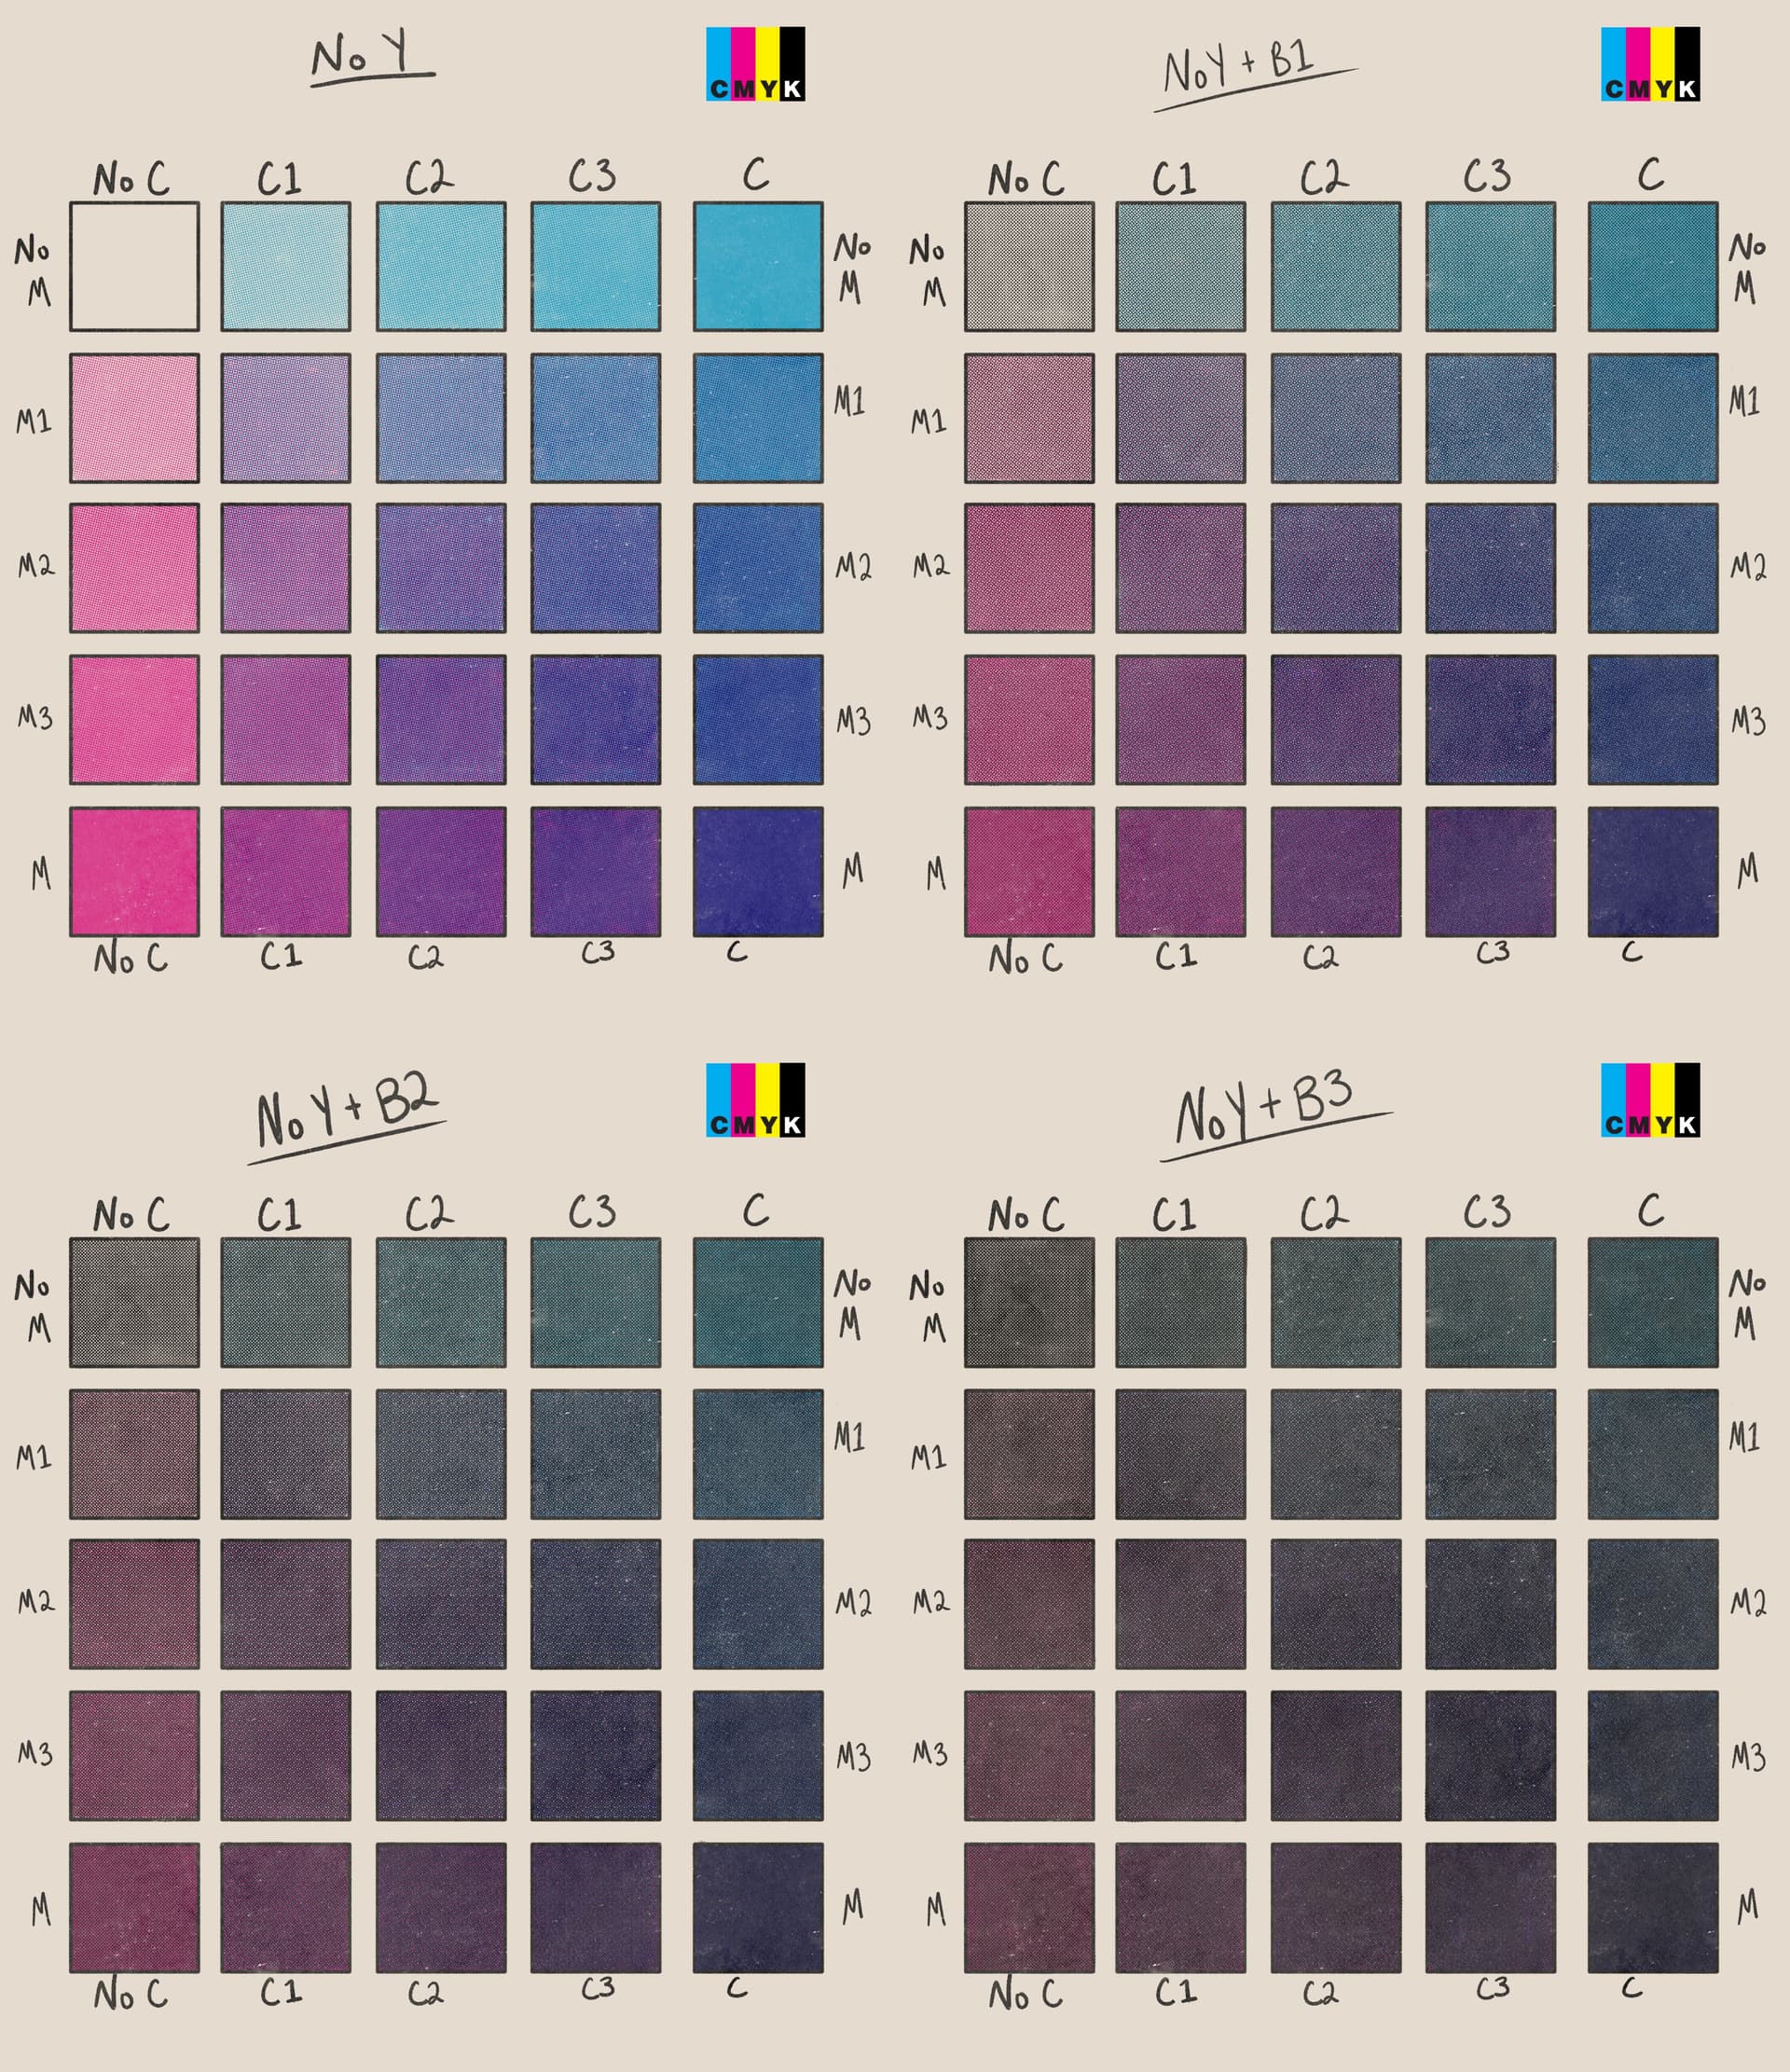
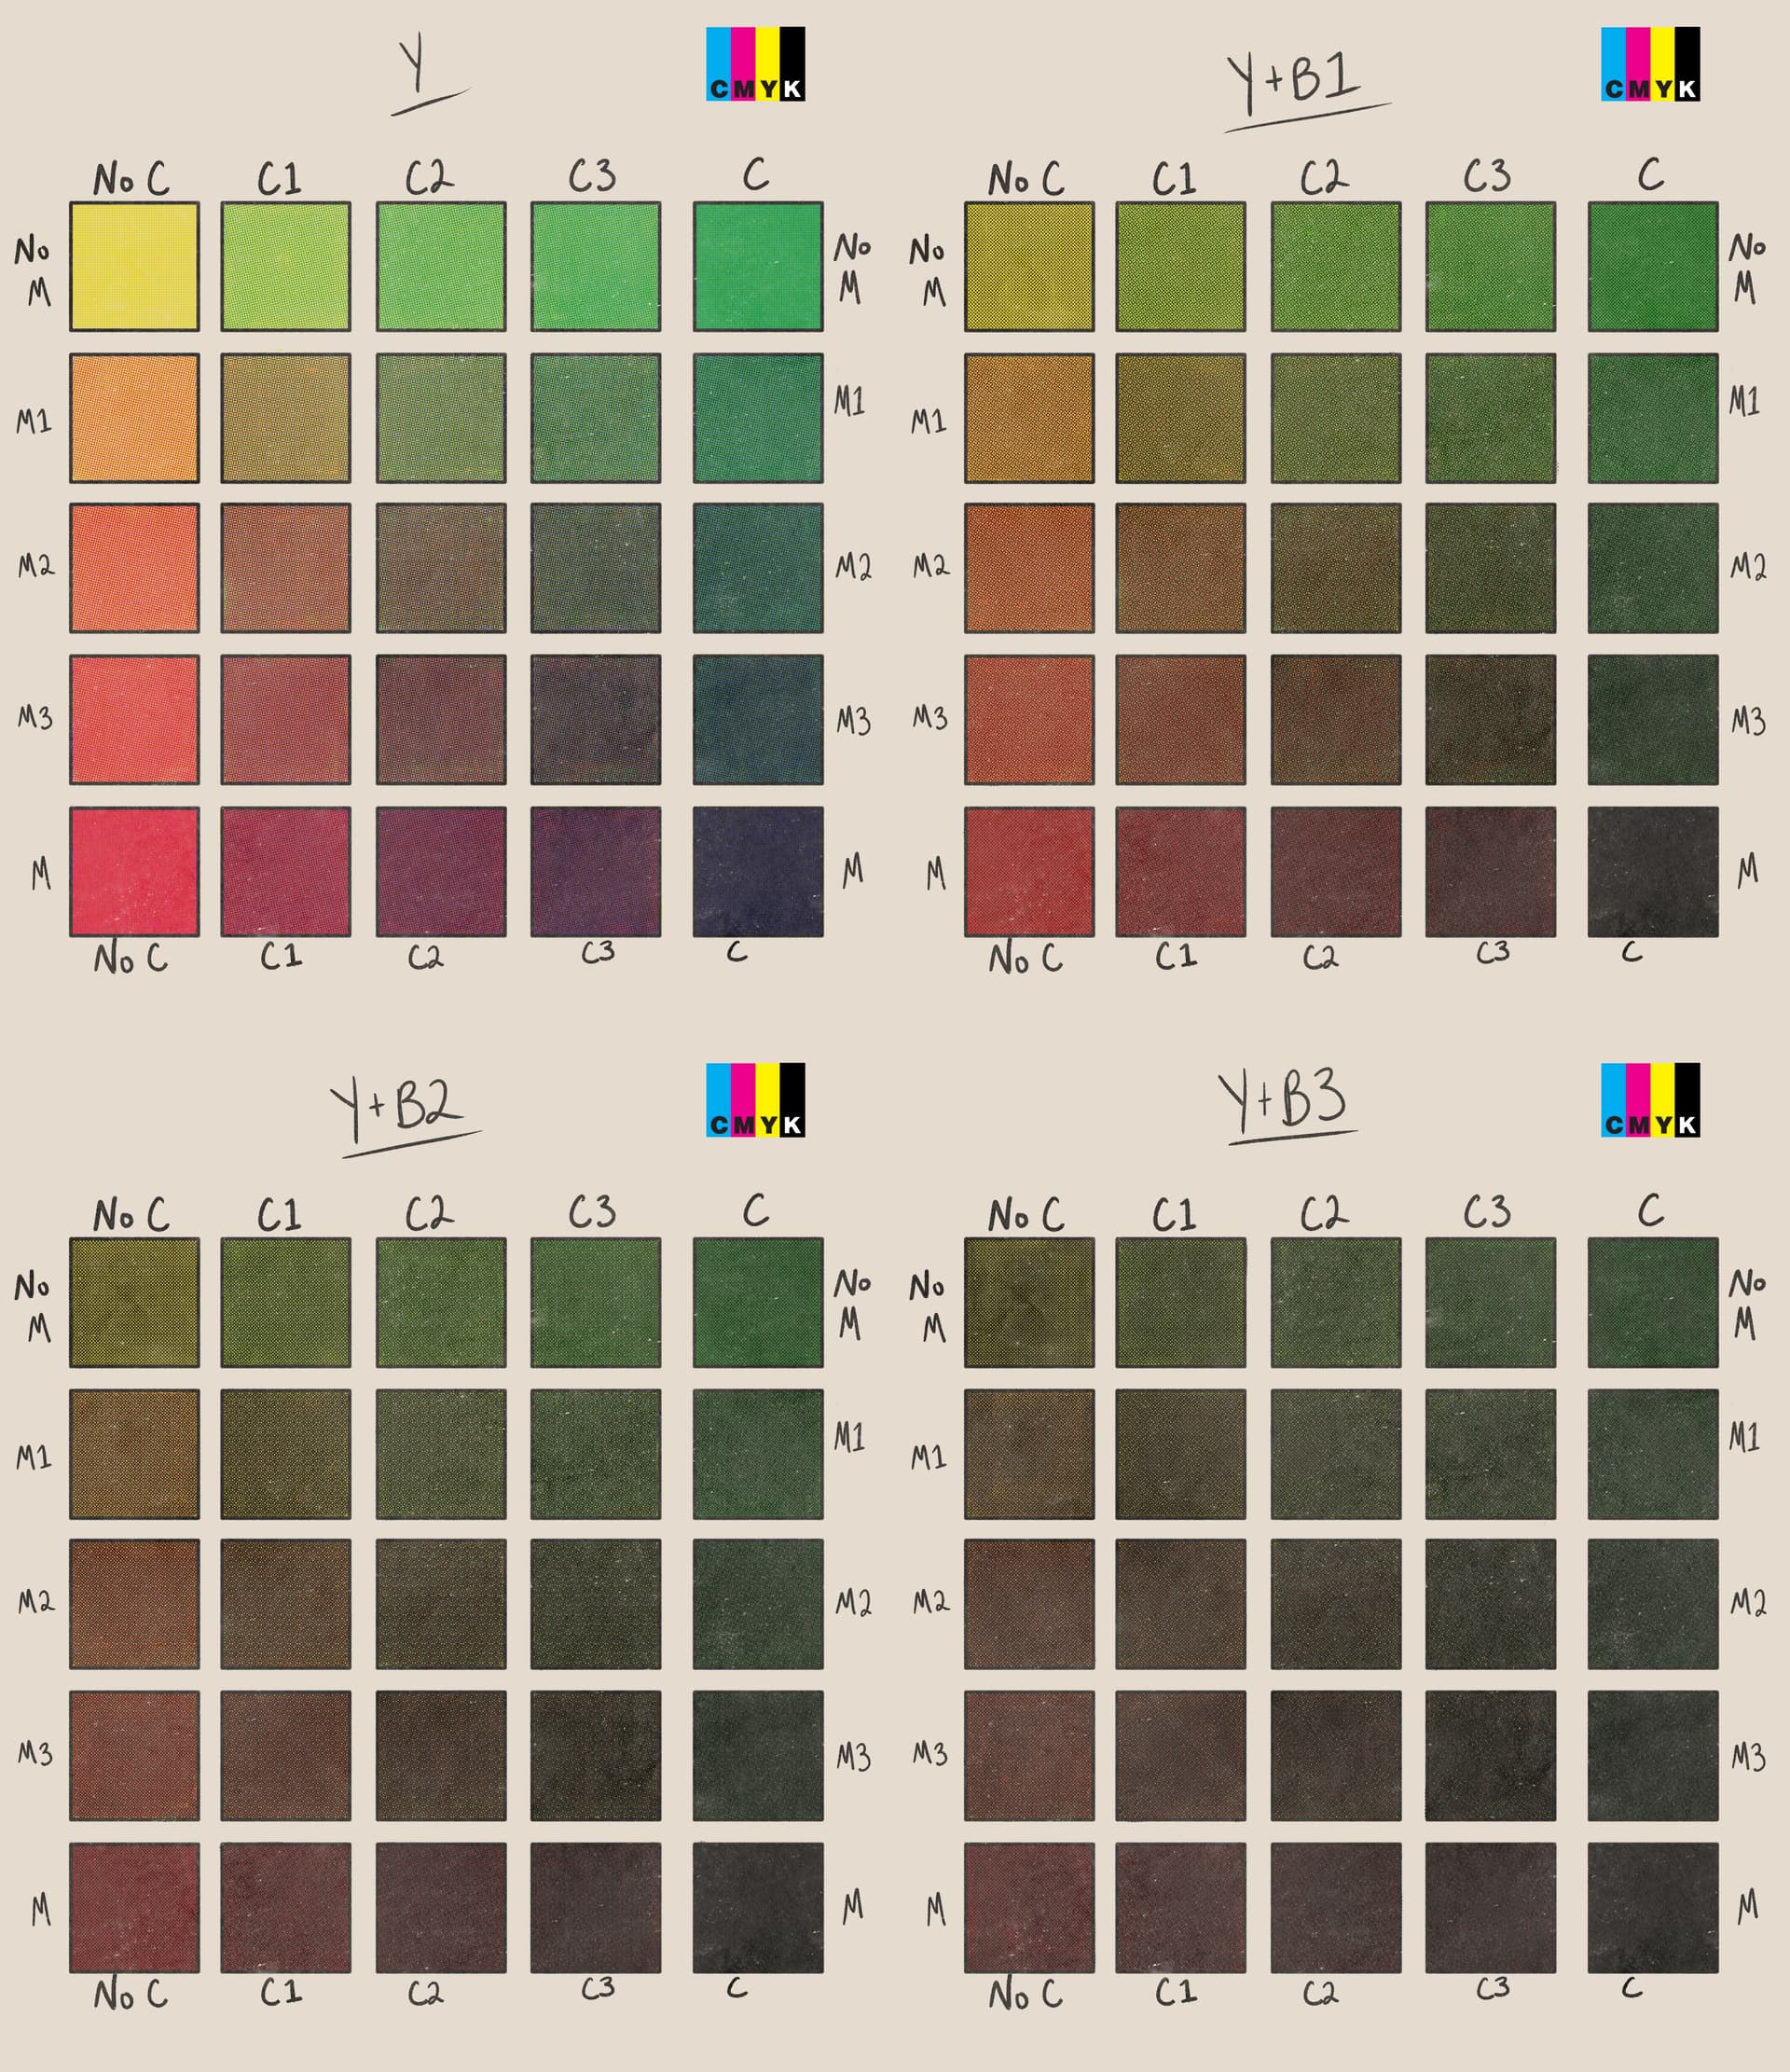
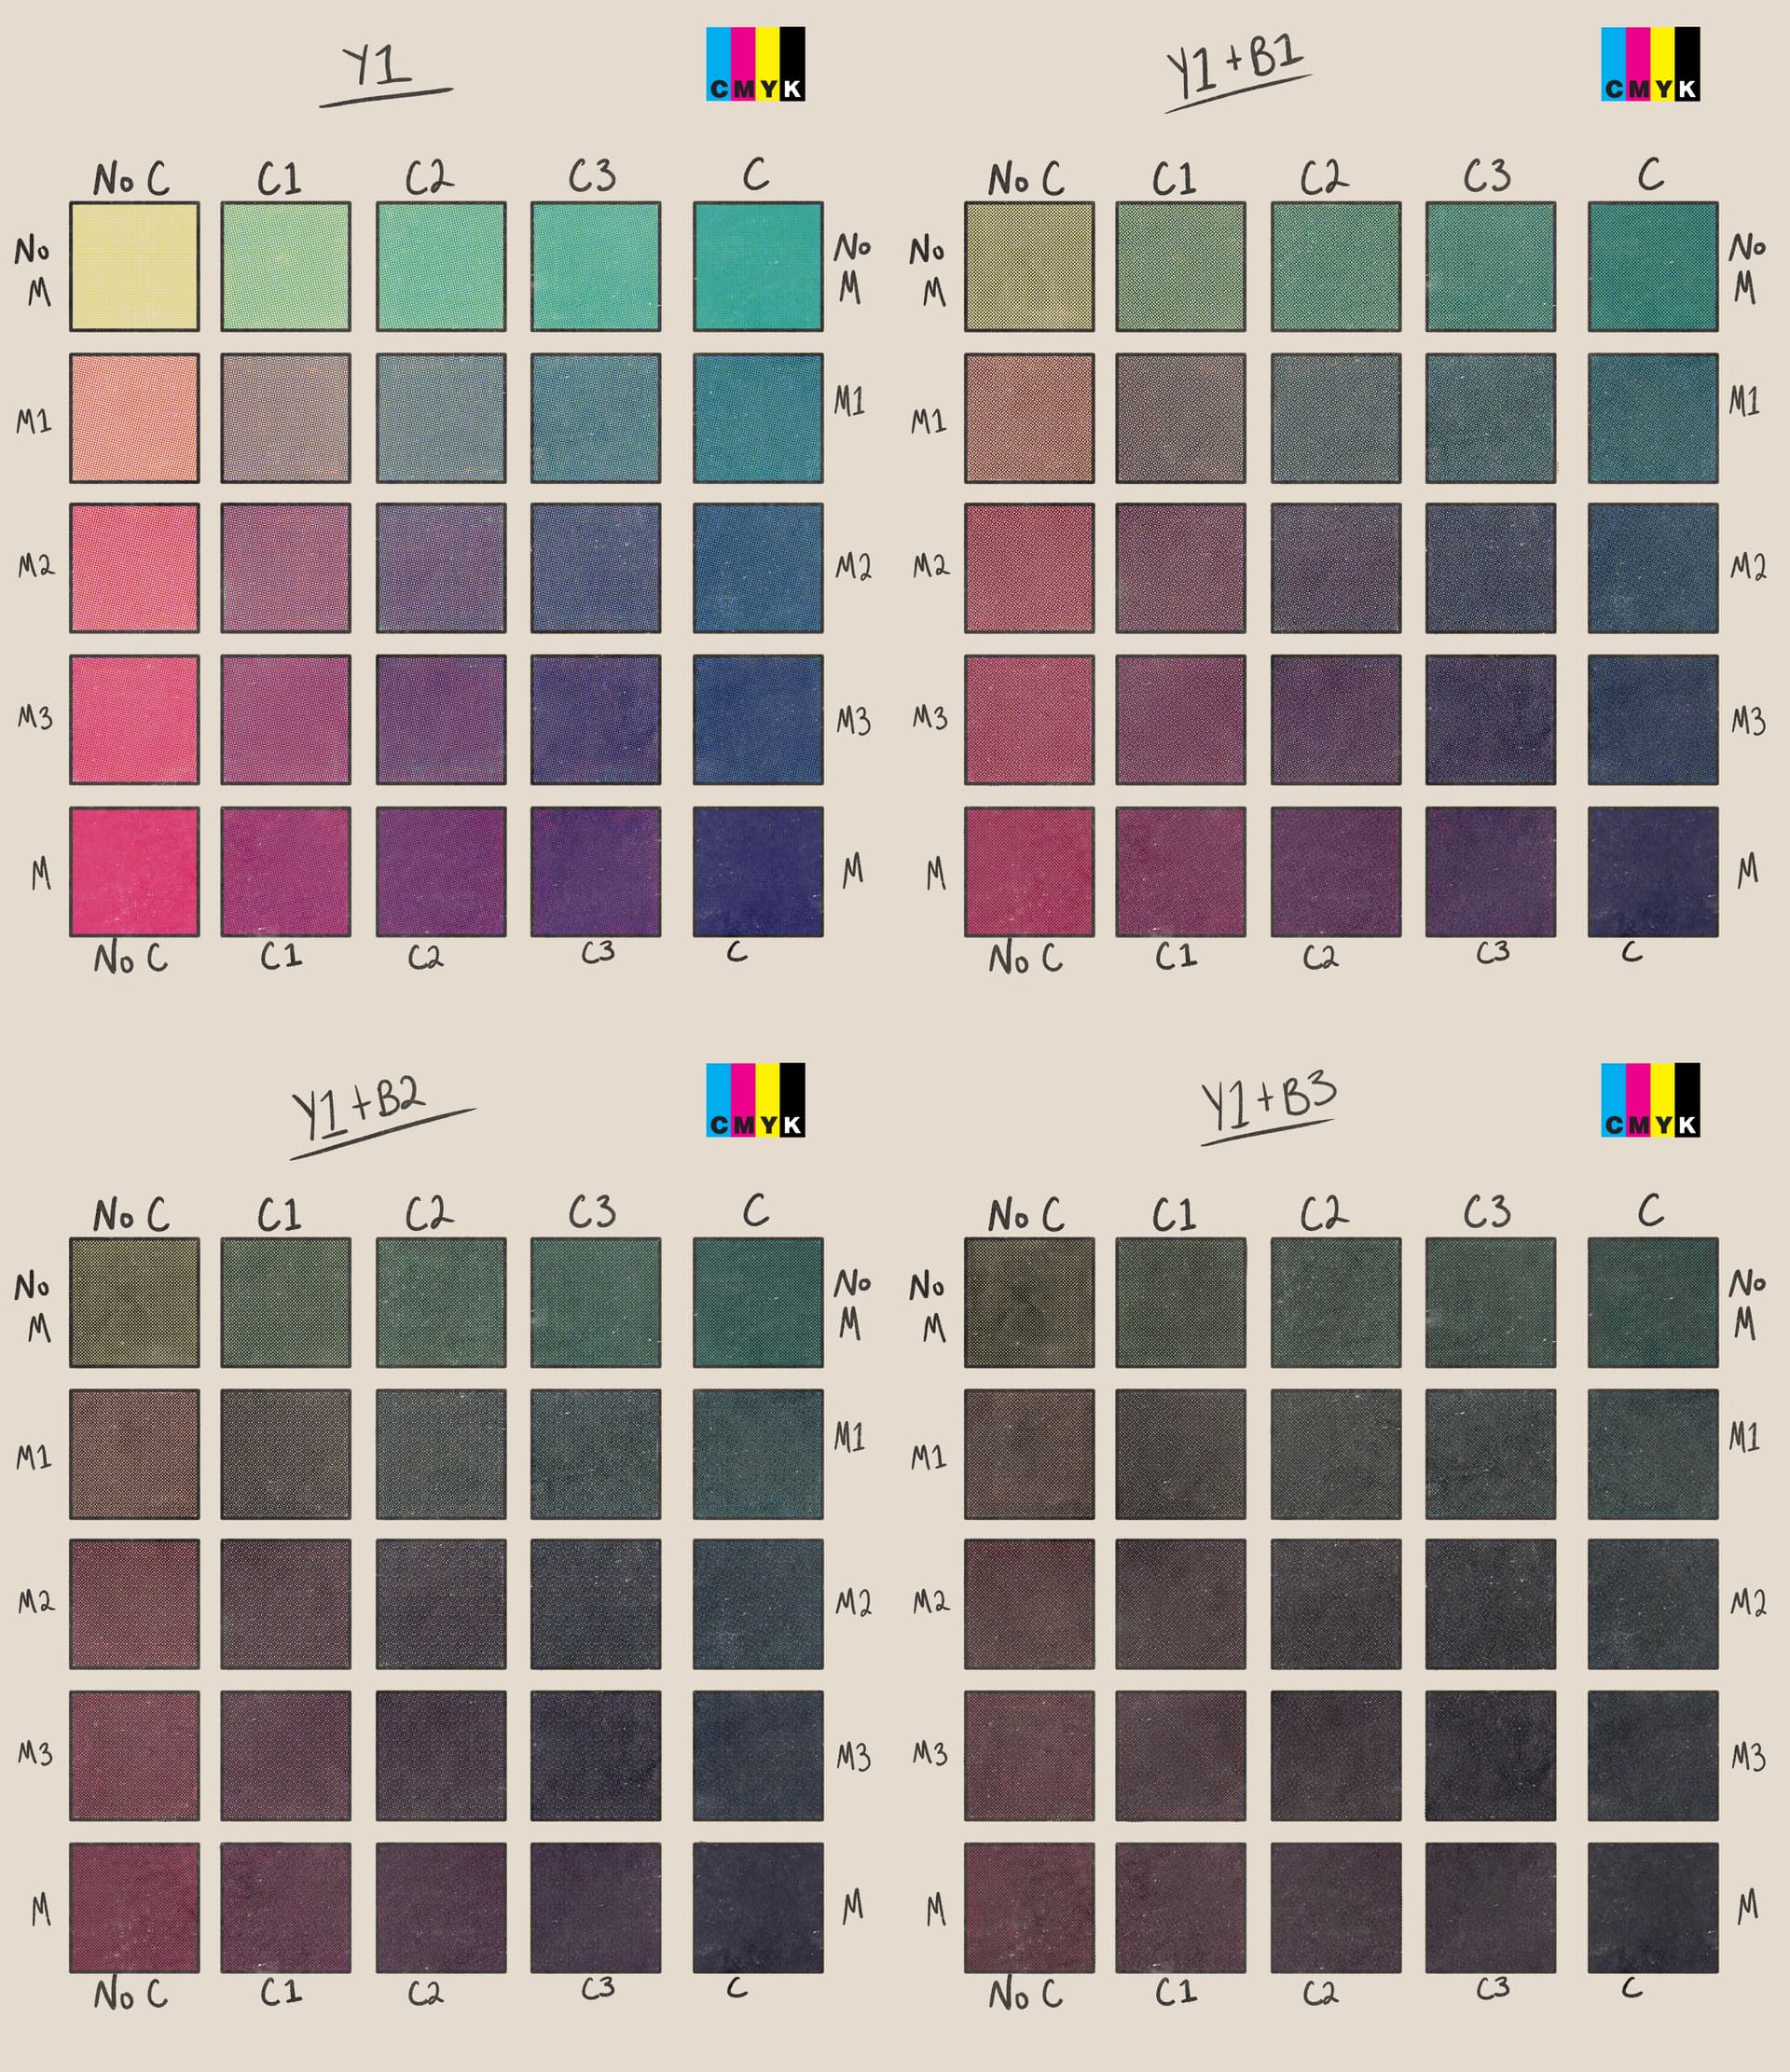
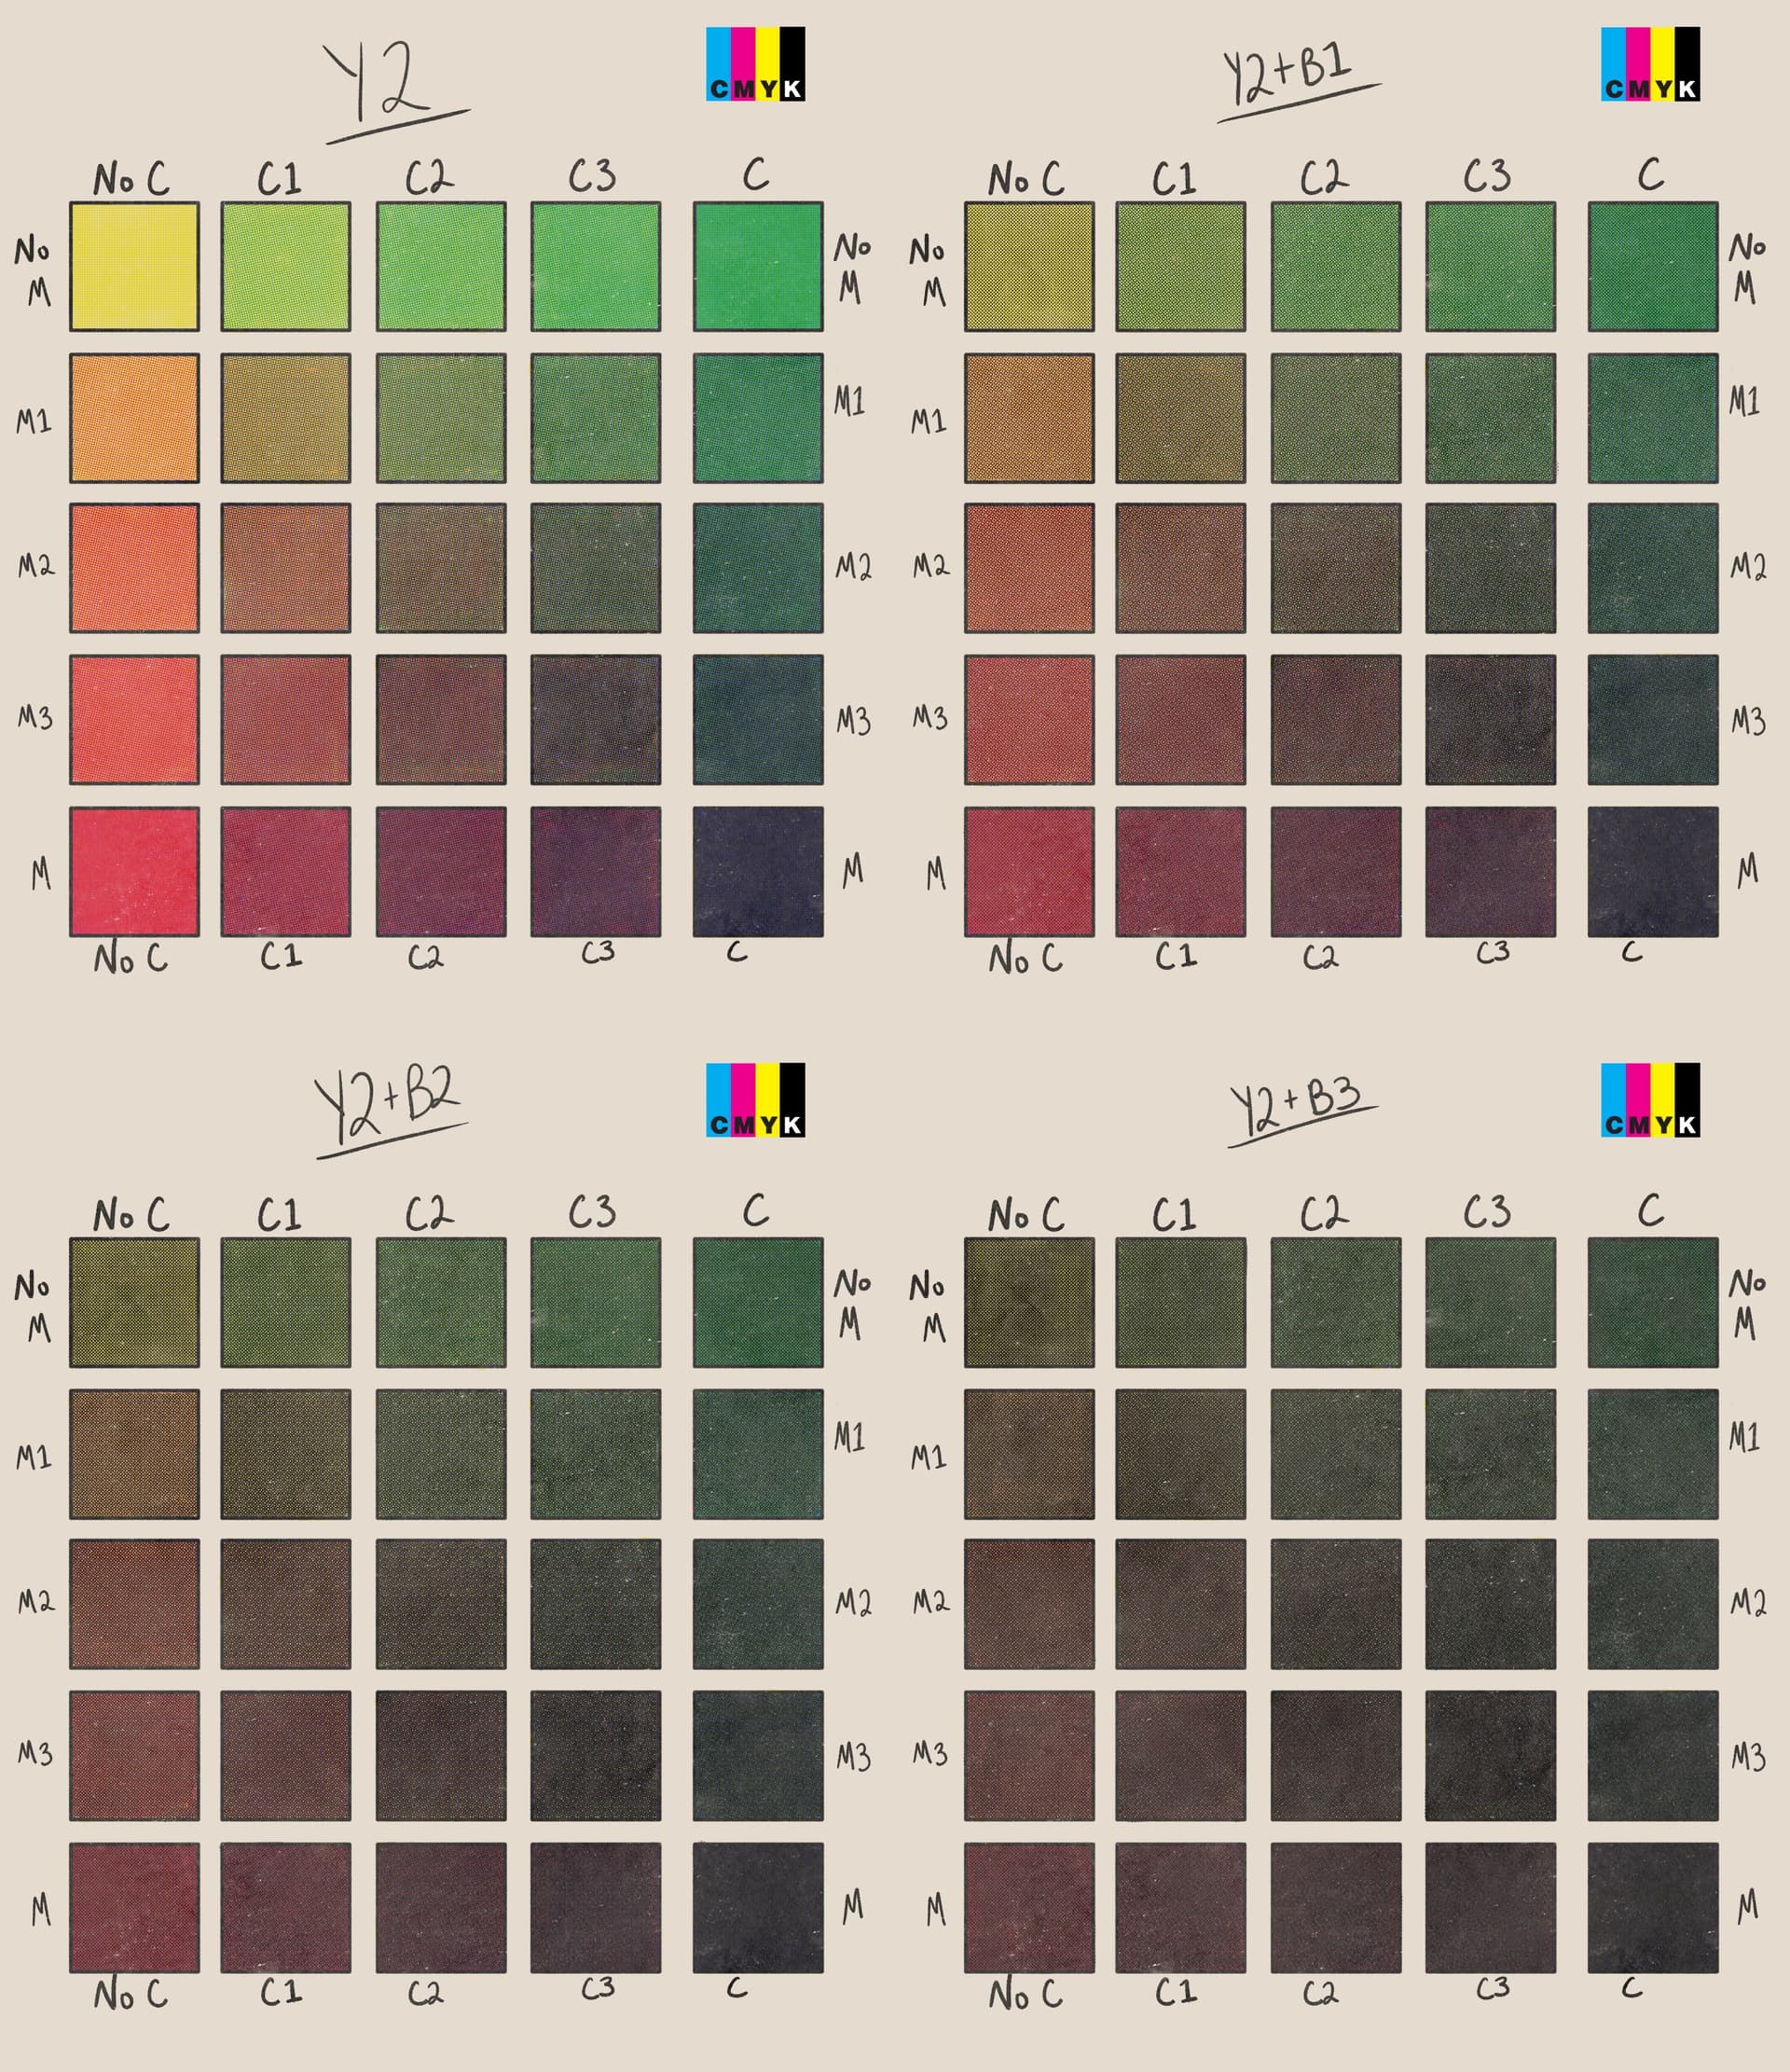
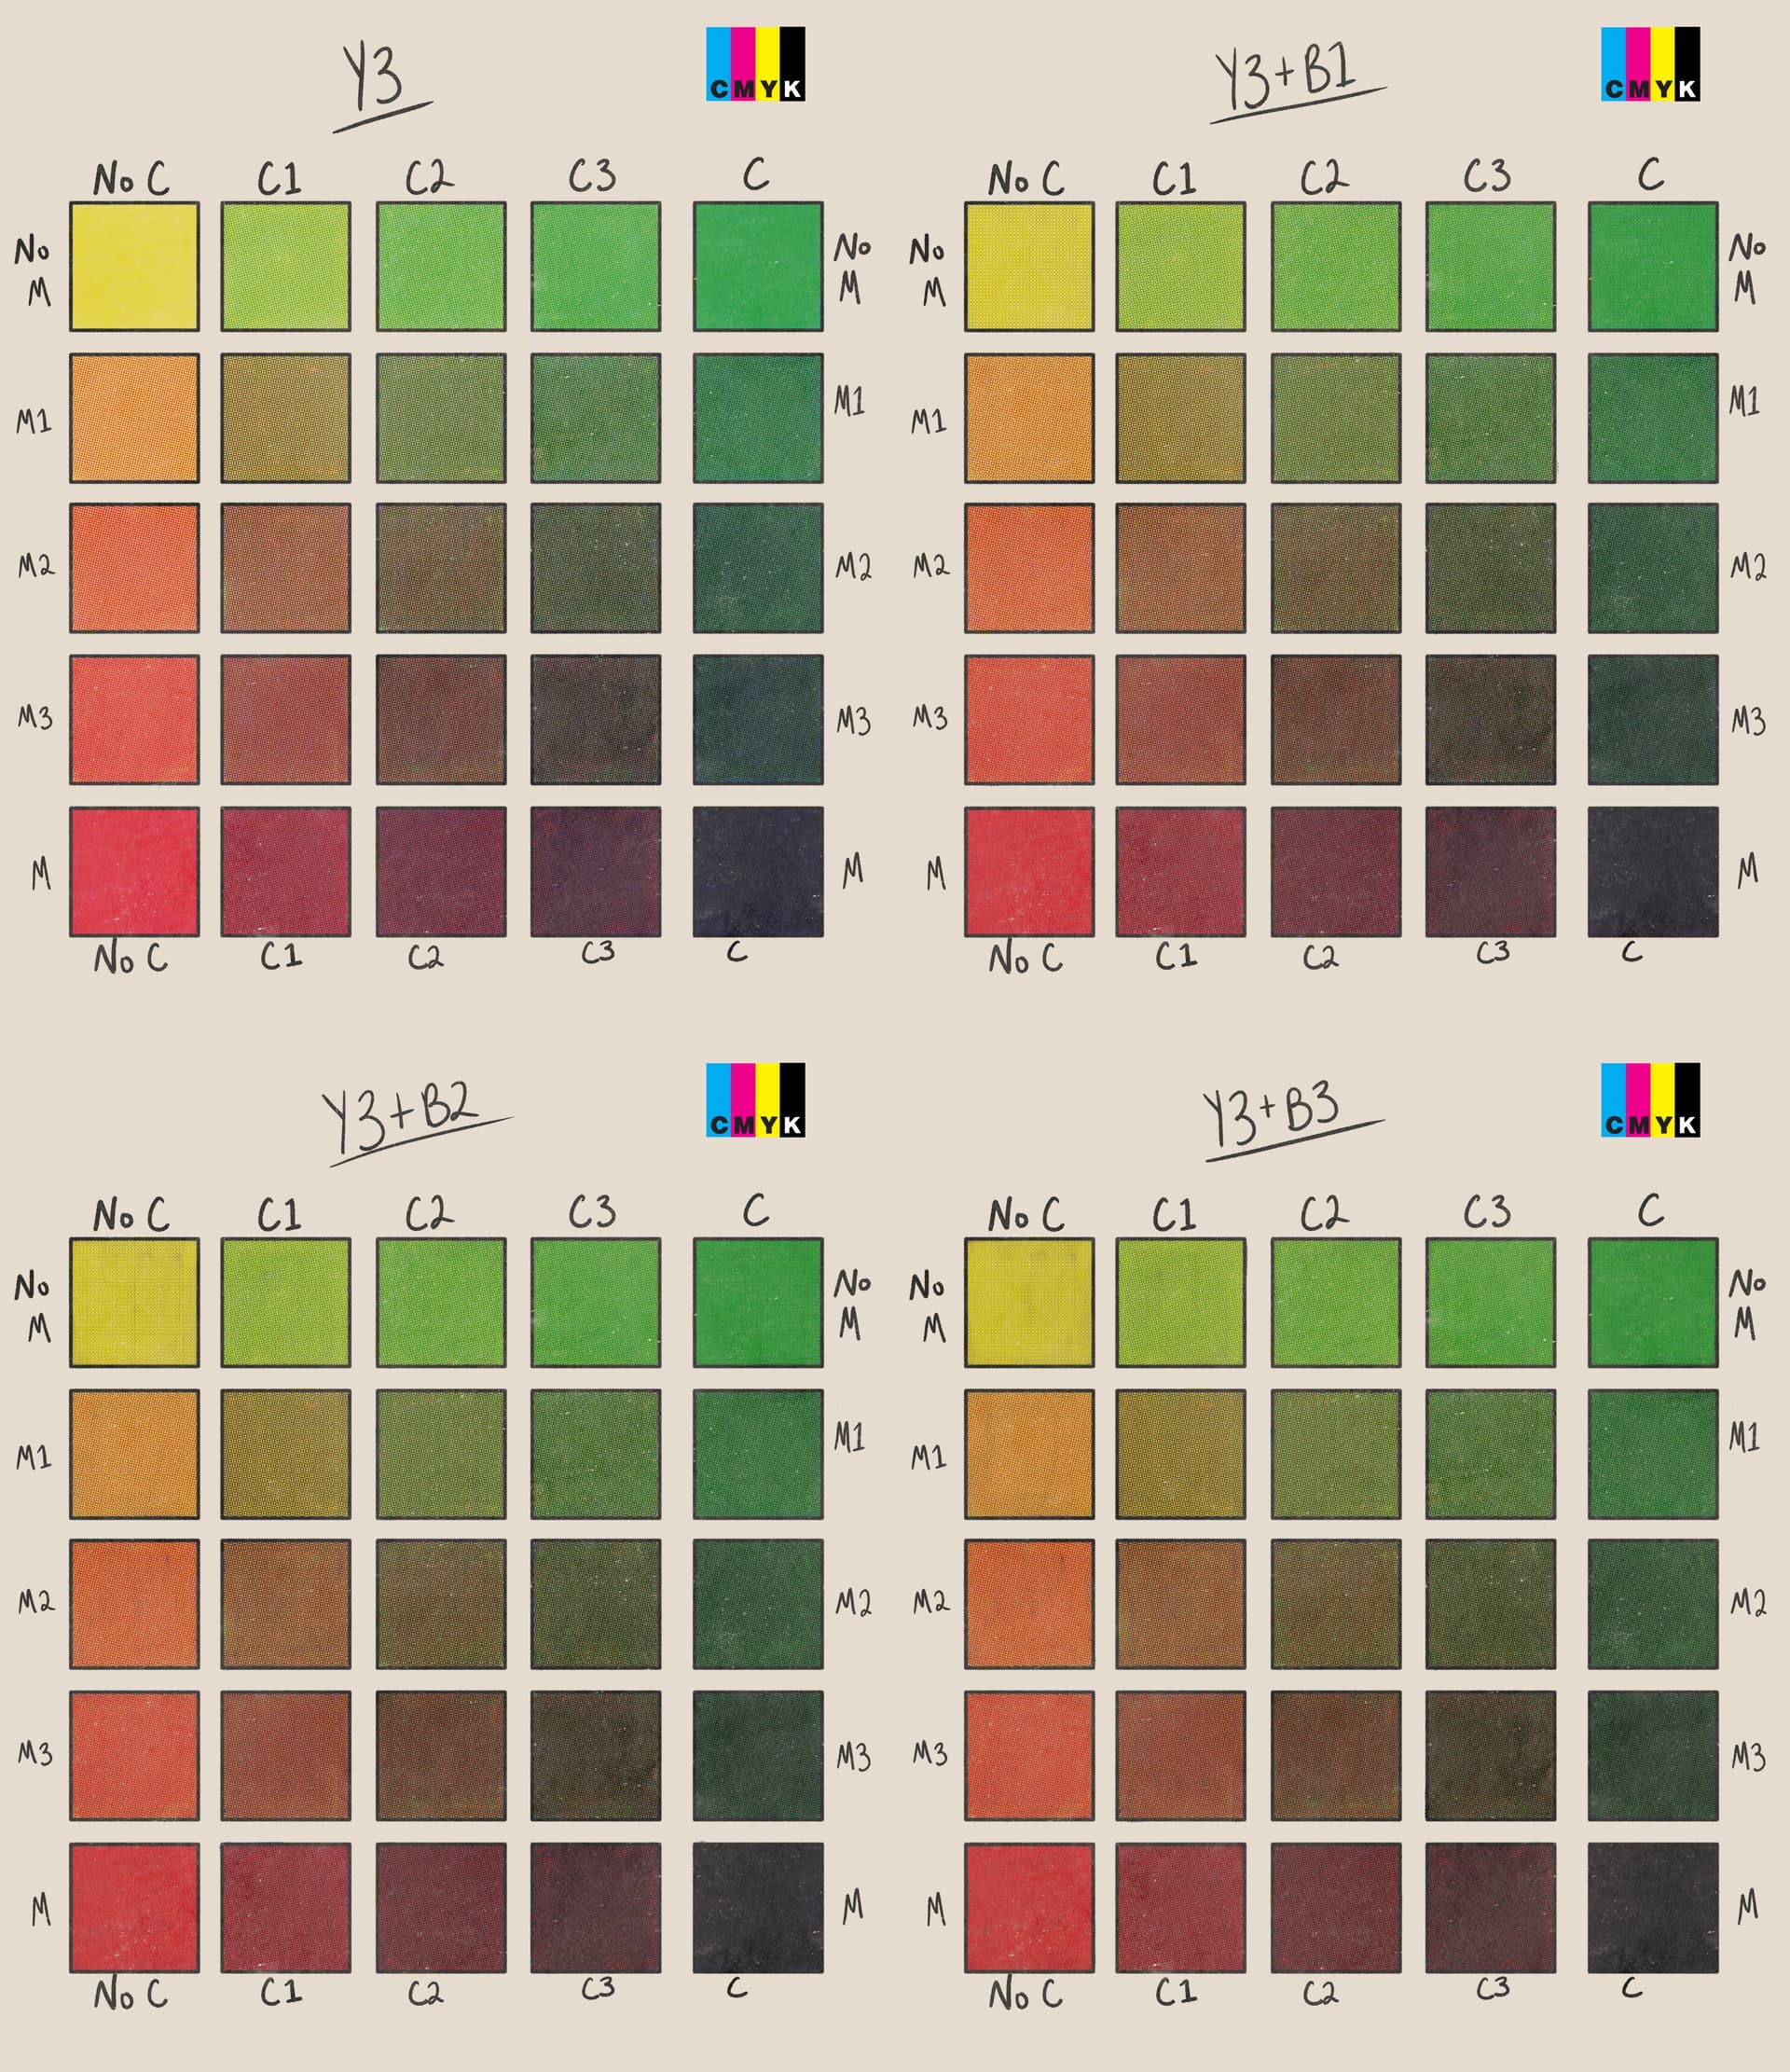
I feel that putting these through Canva ruined some of the colour subtleties (especially in Y3), but hopefully it is a good starting point. One thing that I feel I should note is that I modified the Y3 brush. As others have said, there does not seem to be much difference between the Y2 and Y3, so I adjusted the scale of the pattern so it looks a bit darker.
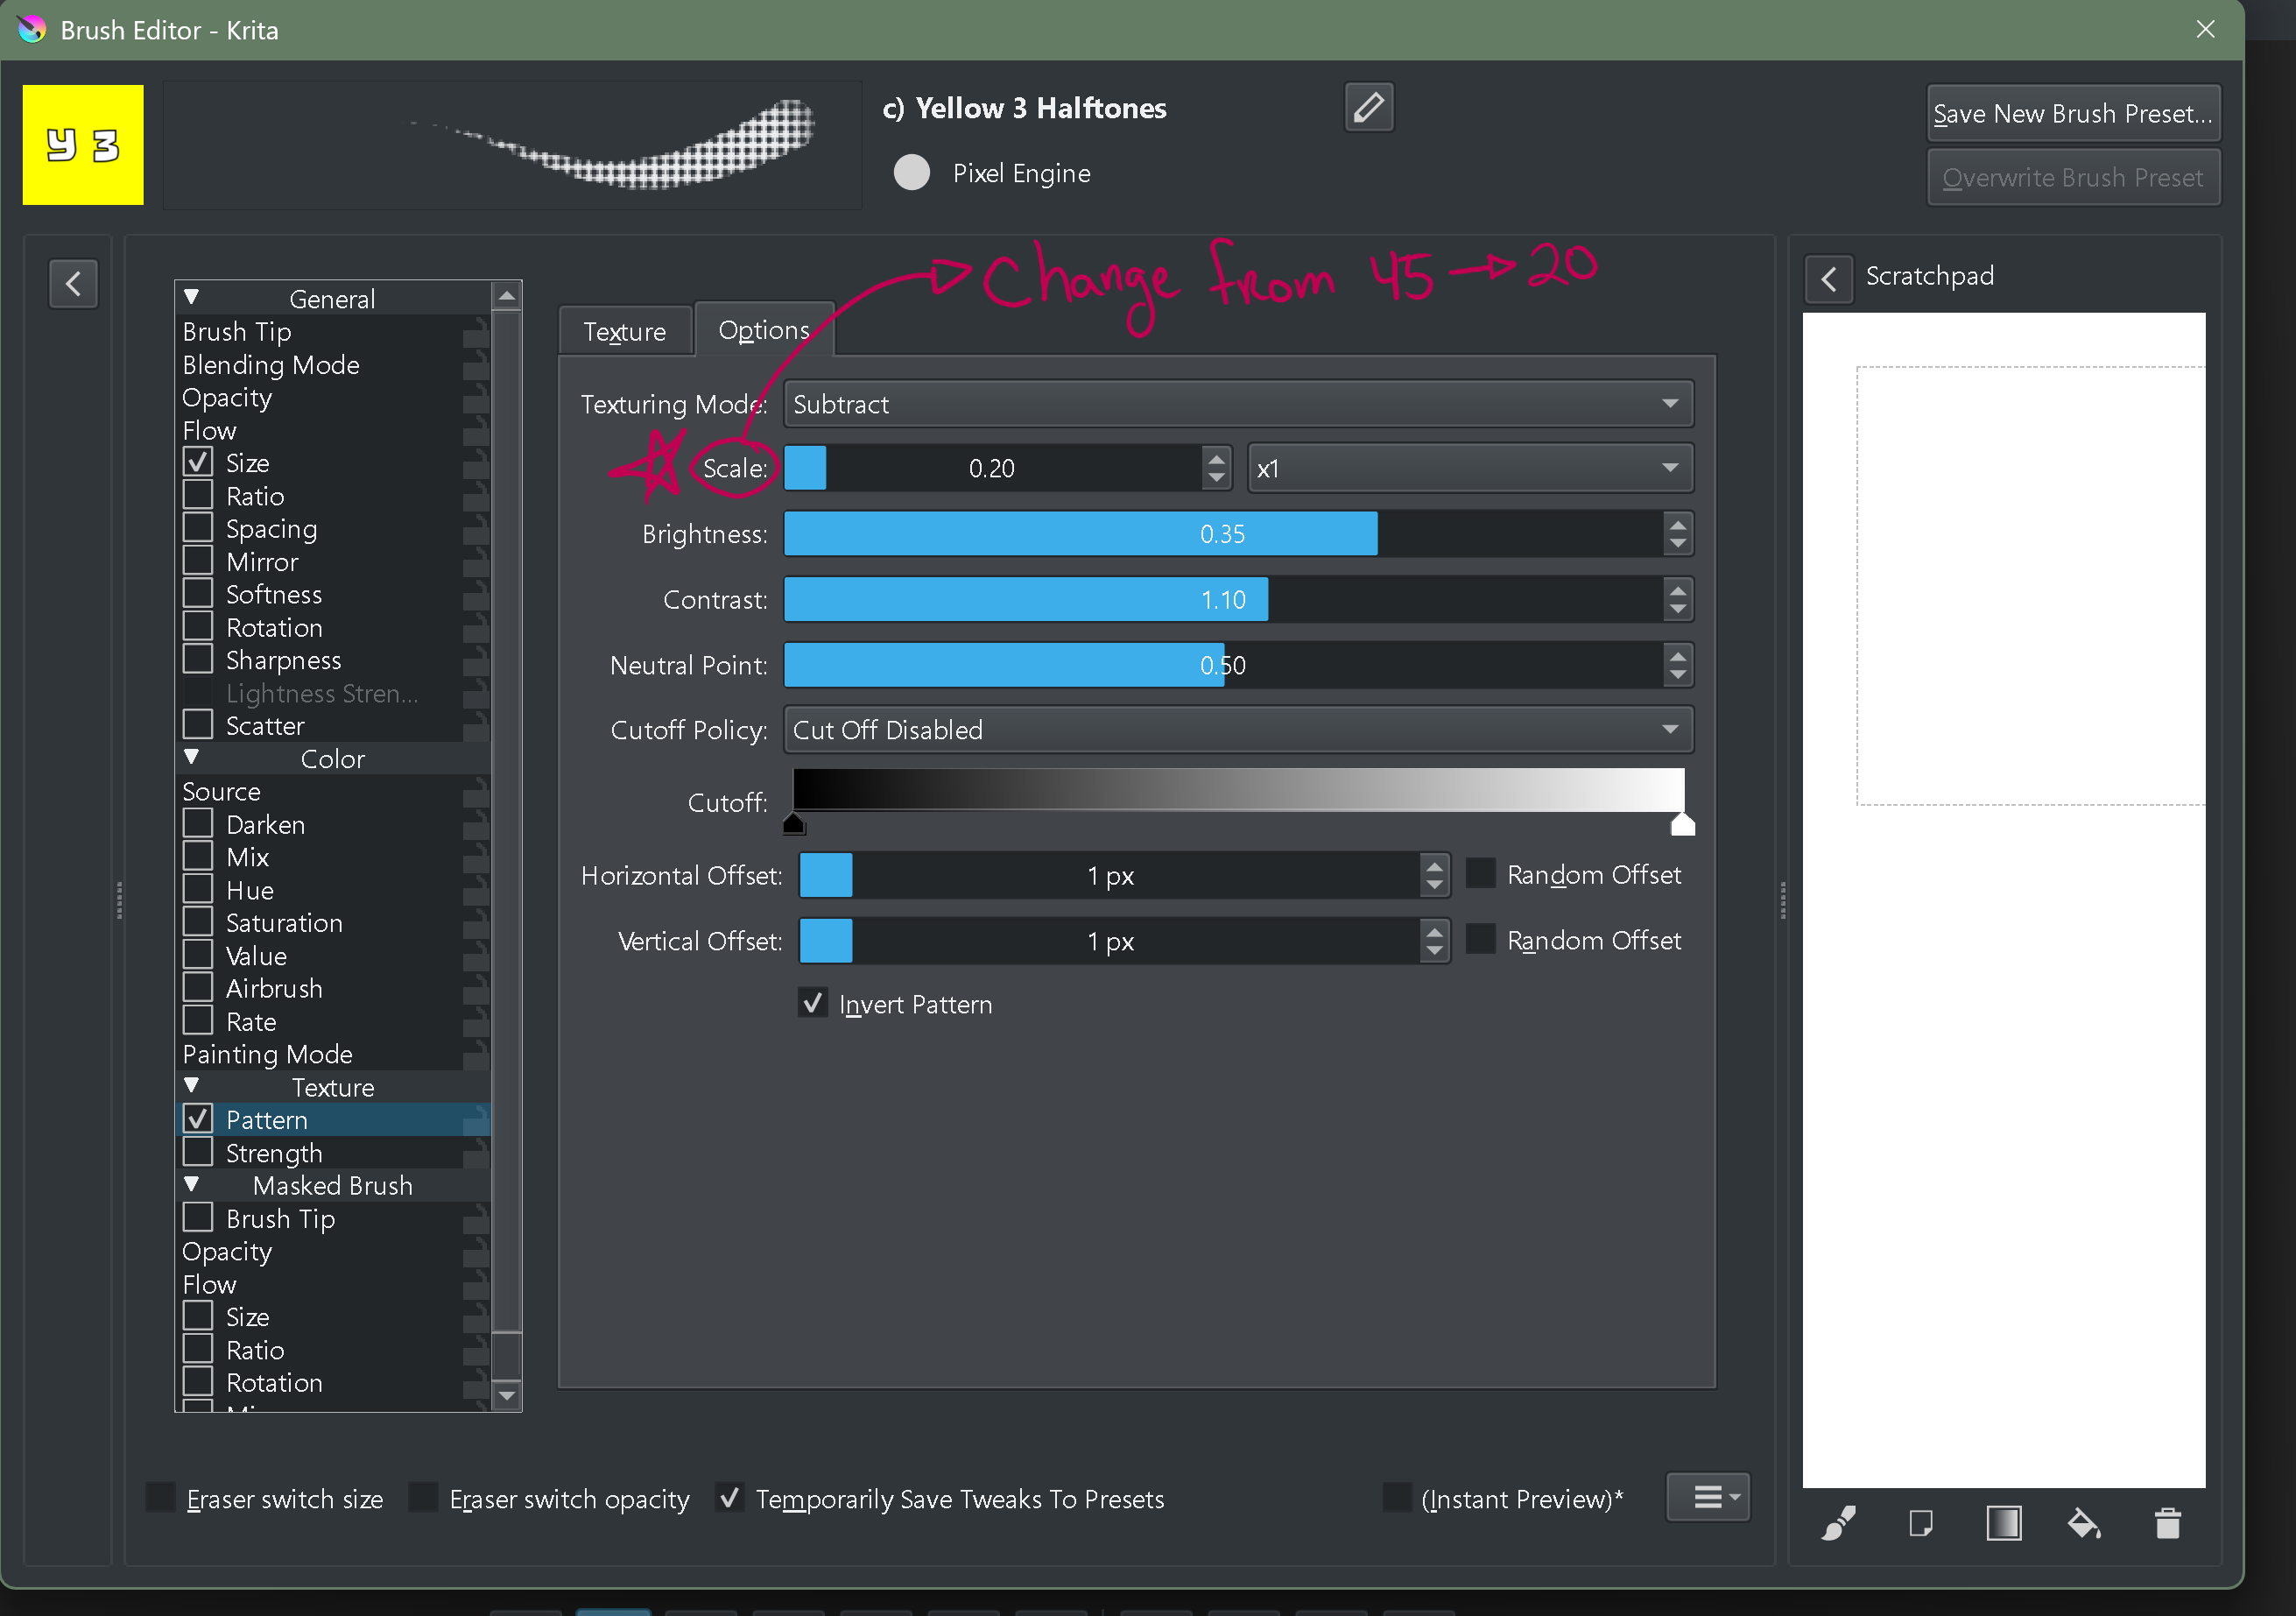
The only problem is the brush lags a little now… oh well ![]() .
.
I hope everyone has as much fun with this bundle as I undoubtedly will!
3 Likes
(Another update from me!)
Hi everyone. It’s me again. I found a easier way to make the vintage comic look effect personally, so I decided that I won’t be updating this brush bundle further, as I’m currently going through some real life mental health phases that I’m still recovering from, so I haven’t been drawing much in Krita these days, other than editing artworks and sketching. If anyone feels like it, you can fork the basis from the bundle, (as I lost the original files and settings, most of it was just guesswork from the remains I had saved in a separate machine), as I believe there are people more experienced with this sort of effect than my current knowledge lets me explore. The bundle is licensed under CC-BY-SA, so feel free to make adjustments and even tweak it as you’d like. ![]() For now, thank you so much for the support, and I’m glad everyone had fun with this bundle so far!
For now, thank you so much for the support, and I’m glad everyone had fun with this bundle so far!
4 Likes
Hi everyone, it’s me again! I recently played more with Krita, and discovered that it’s possible to color with real-time CMYK halftone filters, by converting the separate cyan, magenta, yellow and black layers, while still working in RGB colorspace in the whole artwork! I guess this bundle of mine isn’t that up-to-date anymore, as the method I just described it’s easier to do, and has more options, such as lined halftones. ![]() I hope you still enjoyed this bundle of mine anyway.
I hope you still enjoyed this bundle of mine anyway. ![]() Let me know if any of you have any questions! (Maybe I can make a separate forum post about this…?)
Let me know if any of you have any questions! (Maybe I can make a separate forum post about this…?)
6 Likes
I liked your bundle
A new post on your other technique (using different interlocking halftime patterns/ lines?) would be interesting ![]()
3 Likes
I know i might sound dumb for this question but how does the halftone thing work I been trying to figure it out sorry if it sounds dumb just curious
How do you get the halftone brush?
The halftone brushes are in this bundle, you have cyan magenta yellow/CMY & black/ K halftone brushes, 3 ea colour of varying density, you just select them like a normal brush & use on corresponding layer (make a layer for each colour, in multiply mode)
I might be misunderstanding you! But all info should be above in this thread unless bundle has become unavailable
Found it thanks
Hi again! Someone asked me about a quick demonstration of the real-time Krita CMYK halftone filters, so I recorded a small thing for you folks. ![]()
(Let me know if this little video can give you some insight of the process – I can always try to do a separate tutorial on it.
https://drive.google.com/drive/folders/1ooTy7-7PS2fVdRnBKFZ8VYMevgJF1dFq
2 Likes
Oh, fascinating! I think I got it somewhat working based on that video:


I noted that to get the “darker” stronger versions of the halftones, I had to not only use the colour channel but also the black channel. That is, to get 100% magenta, I had to use full magenta and full black. Would have to play around with common “breakpoints” to easily access useful percentages… Yellow also seems to need stronger black to be visible at all. Black needed full channels on all of them and even then it didn’t completely make a solid black, but then again, that’s not really something that’s typically needed - pure black is more the job of the inks.
Really fascinating, I’d never thought to set Krita up this way! Thank you for sharing, I’d love to see a full tutorial
1 Like
Cool bundle
1 Like
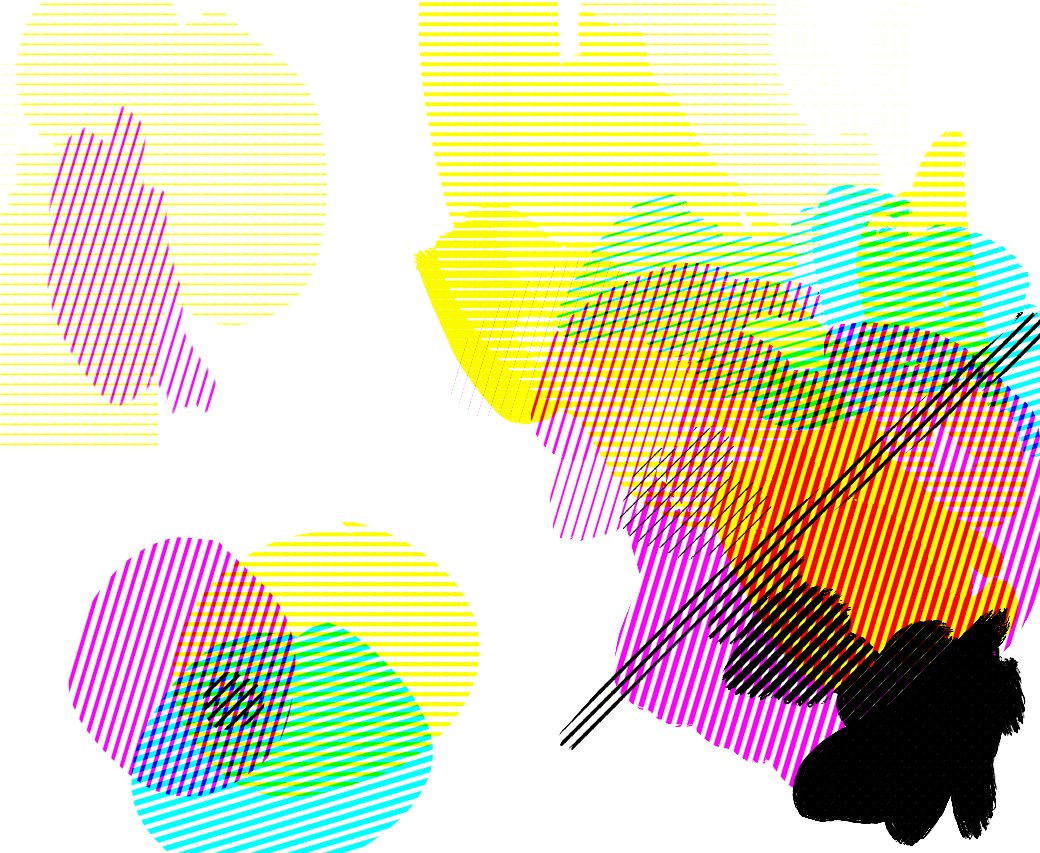
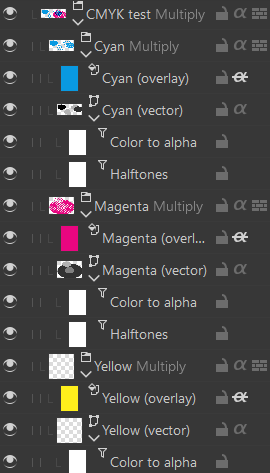
Hi! I’m here once more. After all, you can also use normal RGB layers in Krita with a little tweaks to the “intensity” black and white halftone mode option, with each cyan, magenta, yellow and black layer having their respective dot angles set up. Plus, you can also have custom colors with it! It works with both raster AND vector layers too! Here’s a demo:
And the layers set up:
You can use the 0/20/50/70/100 black shades in each layer in the color selector, to simulate the various vintage color percentages! ![]()
![]()
3 Likes
This is really cool, any chance we get a tutorial for the real time filters? Or a template? I’m struggling to understand from just the images
1 Like
I just used the default “Intensity” mode of the halftones, if you use certain shades of black/gray, it changes the halftones’ look in real time.
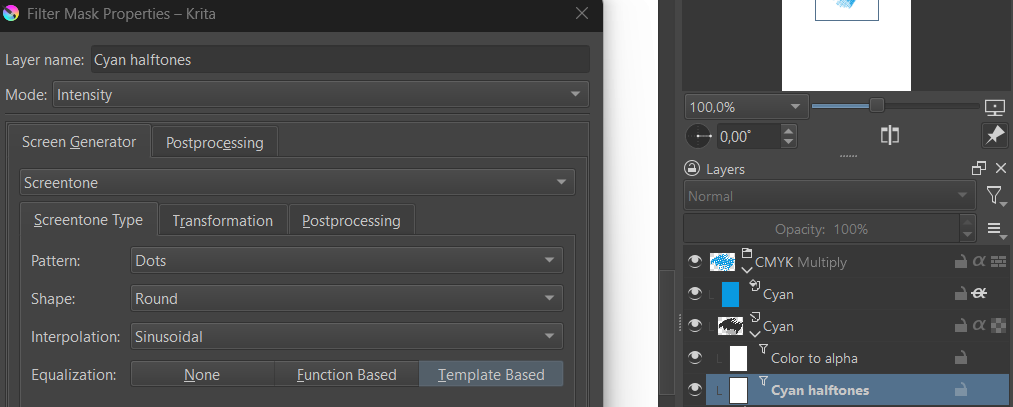
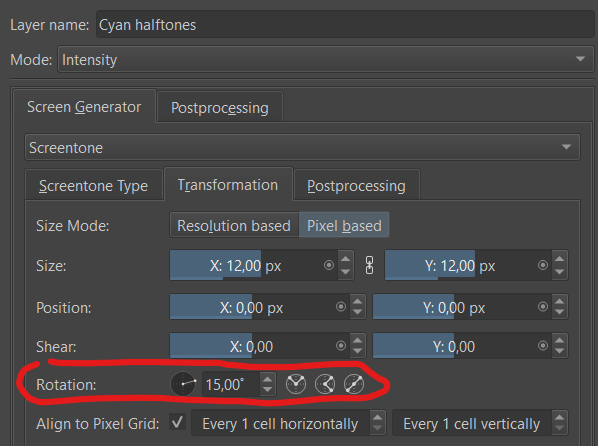
To make the different halftone angles, you can tweak them here. (I suggest looking up the non-American angles, if you want to mimic a different region, as older comics used to be different angles depending on certain countries like e.g Europe): ![]()
If you need more help, let me know!
2 Likes