Preamble
Welcome to my first tool overhaul post! I say ‘first’ because I would like to do the same for many tools in the future. I hope to bring some fresh ideas and unique discussions about each individual tool and where it can be improved and refined. While Krita has many great tools, I think it might be spread a bit thin with the sheer number of them, and no individual one is too ‘deep’ in their own functionality. These posts aim to change that, diving down into the basics of each tool and what their grand purpose truly is, and what they could potentially accomplish if really unleashed.
This isn’t a feature request (as reality was not consulted to come up with these ideas), but rather a discussion springboard! I am just one artist coming up with concepts I think would be useful and explaining them as best I can. I’m not saying I know better. I’m not saying I’m the first to come up with these ideas. I’m not saying devs haven’t already considered this stuff. No one else was consulted or really thought about when coming up with these ideas, so think of them more like random concept art or even UI fanart for Krita as a program. Spitballing, we call it.
Turning the concept into something everyone can find useful is where you come in, so be sure to chime up with your own ideas and how it’s beneficial/detrimental to your workflows! Maybe with a bit of collaboration among artists of different workflow, and some devs with an eye for what’s actually possible, parts of it can turn into an actual feature request.
What does the colorize mask accomplish?
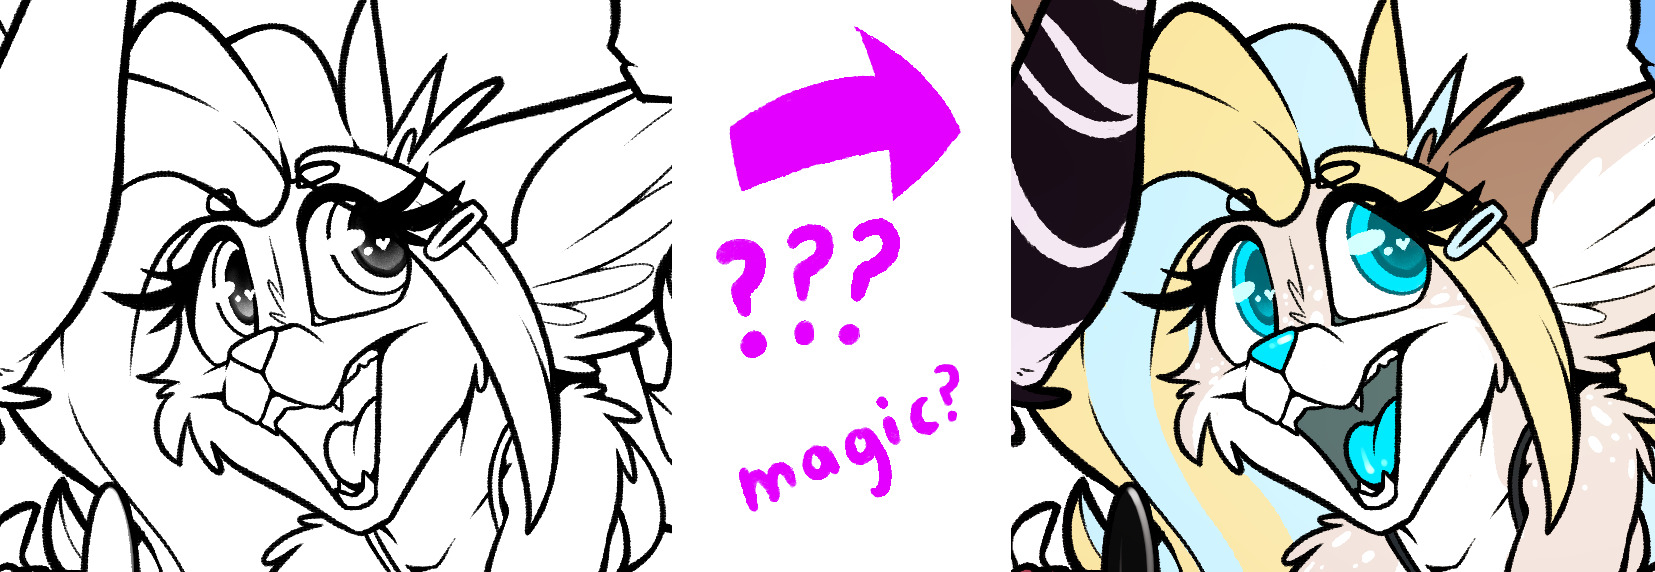
I personally see the colorize tool/mask as the answer to an age-old question in digital art. “How do I flat color lineart efficiently?” Other programs answer this with tricked-out fill and magic wand tools. And honestly, as someone who used those for years in CSP- they work pretty great. The option to automatically close gaps, or smartly bleed into the lineart a bit are essential for getting a crisp edge to your flat colors. Luckily there are currently talks for how to implement this into Krita for those that haven’t or can’t fully adopt the colorize mask themselves. Either because they just moved from another program, or because the colorize mask lacks crucial features they need.
But what does the colorize mask do, really? What does it offer above and beyond the competition? Right now, only one major thing: closing gaps. Once the wand or fill bucket get that down, it can be argued that the colorize mask offers no reason to use it. It can’t be animated, it can’t be edited easily afterwards, and it takes arguably longer to use. Let’s fix that.
But in order to fix that, we’d need to tear it down right to the core, and rethink the question of ‘how do I color between some lines’ from a whole new perspective.
Features or bugs I hope to address with this redesigned tool:
- Interactivity and readability
- Speed and reactiveness
- Animatability
- Current workflow limitations
- Workflow optimizations with shortcuts and modifiers
- Relative accessibility to artists who are moving from a paint-bucket focused program
Basics
Pre-processing, not post-processing.
The current programming workflow with the colorize mask is backwards. Users define the colors and where they go, and then massive amounts of processing is done afterwards to propagate the colors outwards. I understand this is a limitation currently with the way the mask is processed, but it breaks a personal rule I think most Krita tools should follow: Artists require immediate feedback to changes they make, especially if the tool is simplifying a normally very tedious or nuanced task.
To help fix this, I propose processing and storing details about the lineart layer in a beginning ‘initialization’ step. To be as fast as possible, I believe the method that’s implemented should be resilient to local changes, in that if the lineart layer is modified the entire layer does not need to be recalculated but only the affected area and any surrounding context needed. Easier said than done, I know.
How this initialization is done, stored, or processed, I’d leave up to actual programmers. But the main point of preprocessing is to make the features I’m about to talk to as instant as possible for artists, as that’s what truly matters. Artists can sit through a little processing first if it means no more processing later, or even worse, every time they make a change.
Ditch brushes, go point swatch based.
I’m not going to pretend that I know why the regular brush tool is currently used to define which part gets color. I’ve thought a lot about it, but the only thing I can come up with is that you can drag it across multiple areas and ensure each is filled. But brushes (and by extension bit maps) are complicated, and more importantly, they’re not efficient or easy to interpolate over time or organize.
My proposed solution? Use swatch points. Single X/Y coordinates with a given color.

What is the benefit? Well, when combined with the now pre-processed near-instant nature of the coloring workflow, several things!
- Because they have a defined position which is stored in an object, they are animatable and are allowed to maintain their individual object properties over time.
- They are mutable. Dragging them around is trivial. Deleting them is trivial. With the current colorize mask, I can never fully erase a mark and it always ends up messing up my final output.
- Changing their color can be trivial. Maybe a popup palette if one is clicked without being moved. Even mass-changes in color would be trivial, by simply selecting the color to change and changing it in the swatch grid in the colorize tool properties. Extra points for being able to easily change them over multiple frames in an animation.
- They read better on all backgrounds. Look at my poor boy Stygio up there, his skull coloring in the current method completely blends into the background. You can forget it if your drawing has something that’s near or perfectly white.
- They take up 99% less space, both in memory and files VS the current bit map method.
Instant previews
I want to know what my new swatch point affects. And if I place it and it affects the wrong area, I want to move it until it affects the area I want. these sorts of instant feedbacks are essential to the artistic eye, and help make the program feel like it’s working with you and not just for you.
While placing swatches, you have several options:
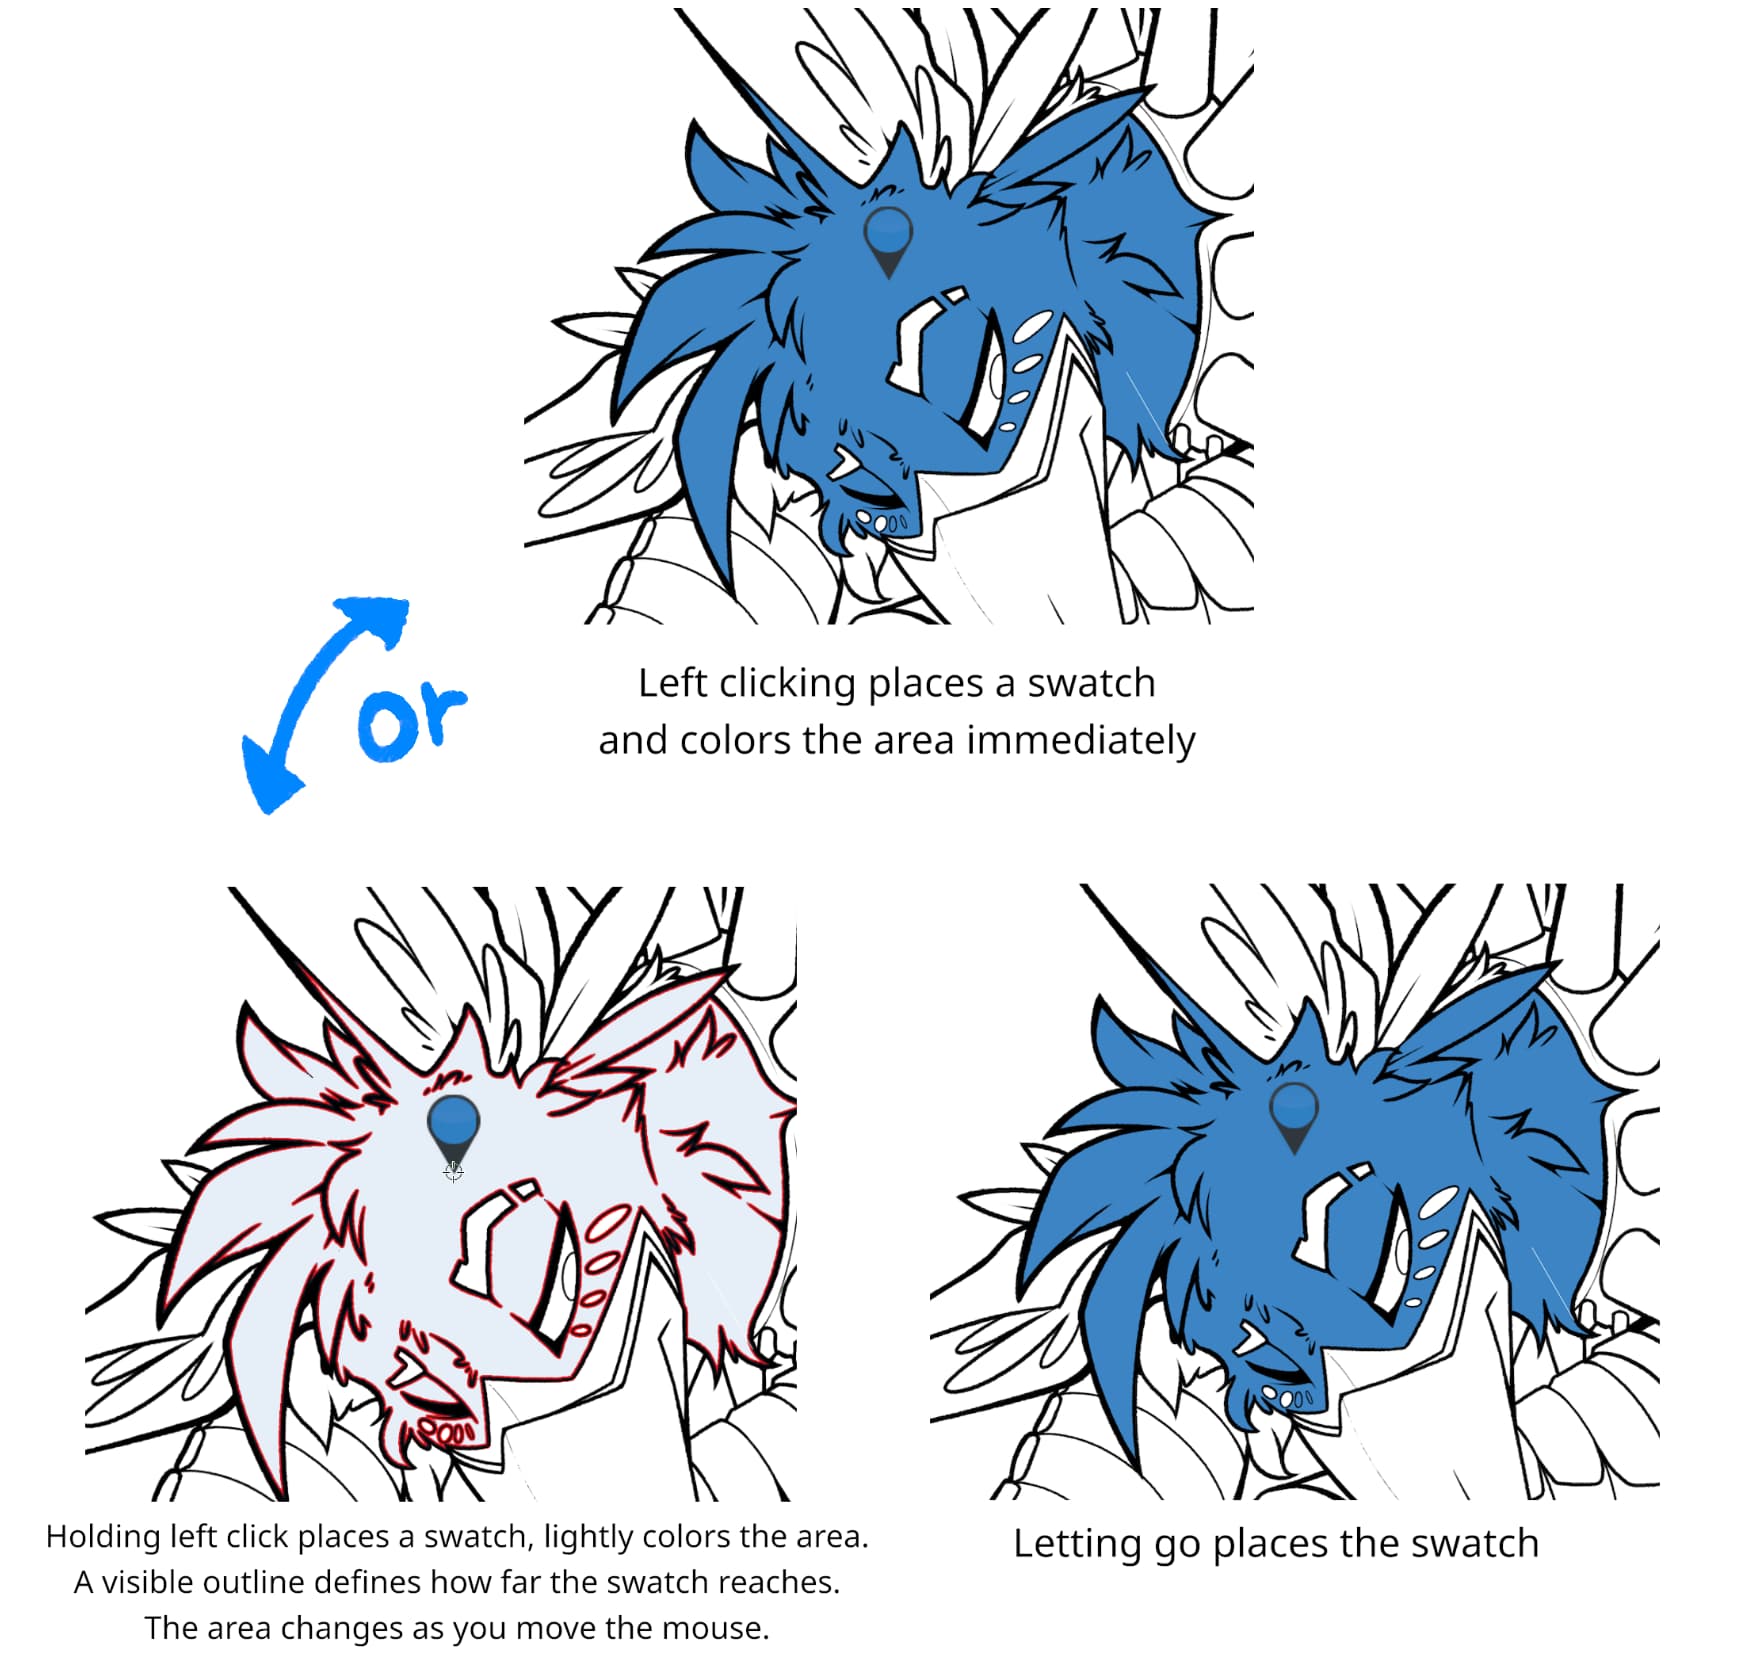
In this first example I show the two methods of adding a swatch to the colorize mask. The first is a simple click. If you have a color selected, you can click anywhere and that area will be instantly colored based on the pre-processing done to determine the regions. This will also add the swatch to the canvas.
The second method is to click and hold the mouse or pen. After 100ms or so, the area will become highlighted with a red outline. This will show the extent to which your swatch will affect. The area will also lightly be colored with your chosen color. While in this mode, you can keep your mouse held down. If you keep it held down and move it over another part of the image, it will highlight that part instead. This lets you choose where you want colored.
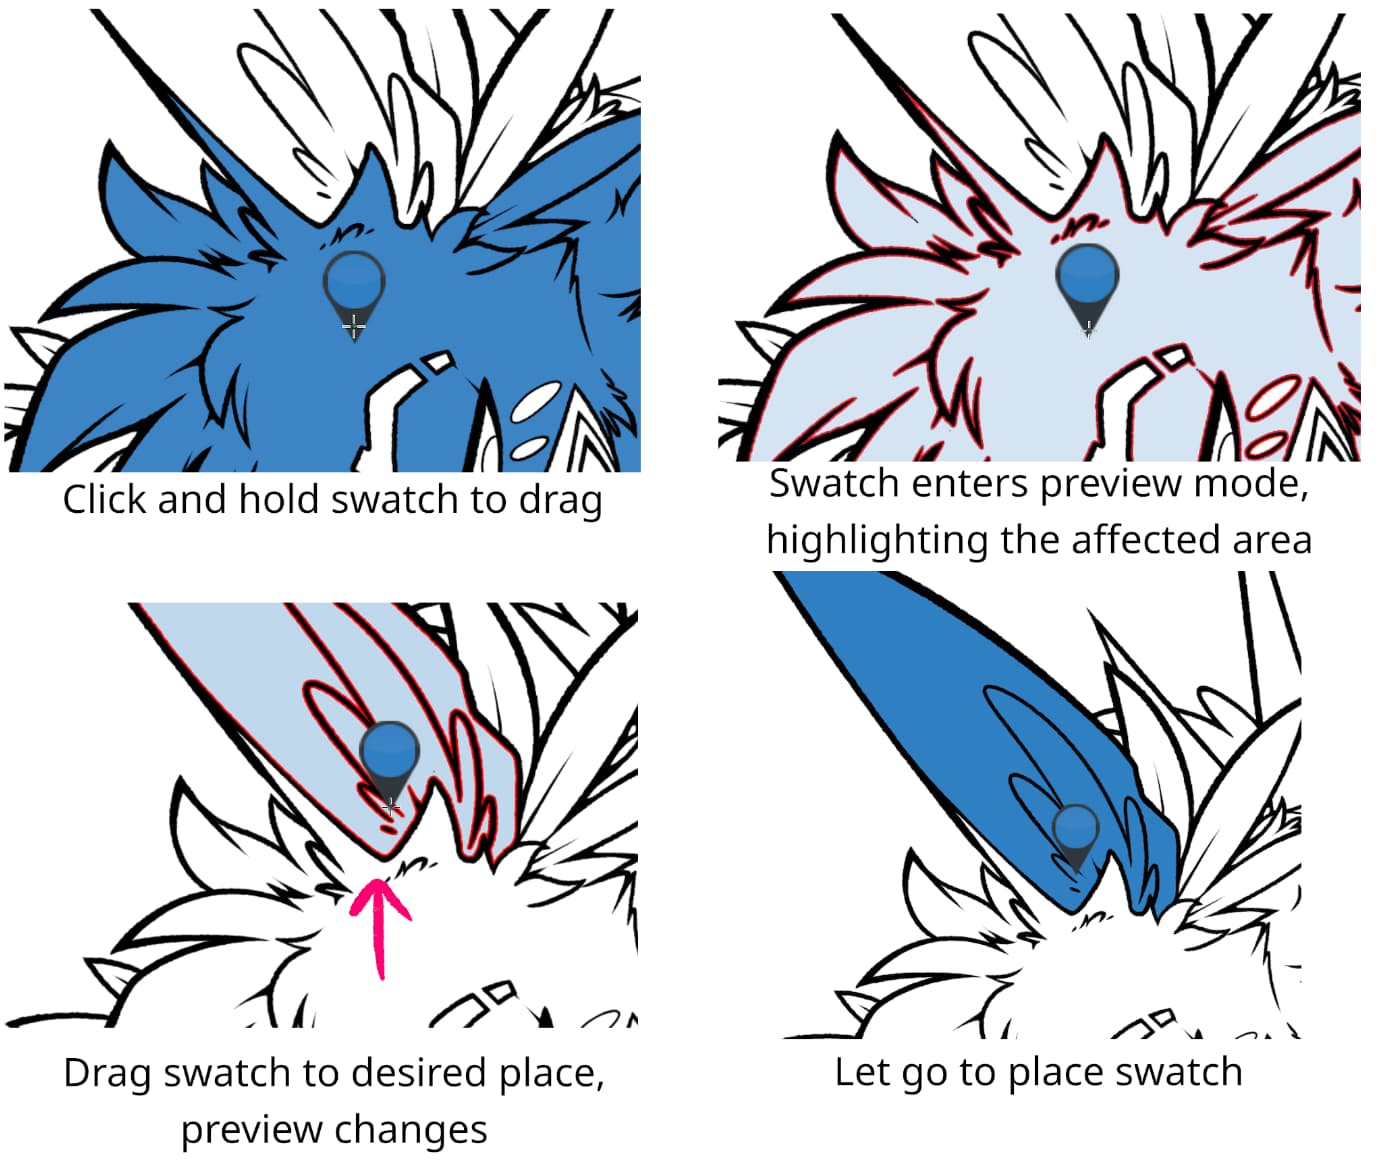
Dragging already created swatches should be similar:
Alt modes
All alt modes are selectable sub-tools, shown in the tool options docker in the same way that transformation subtools are.
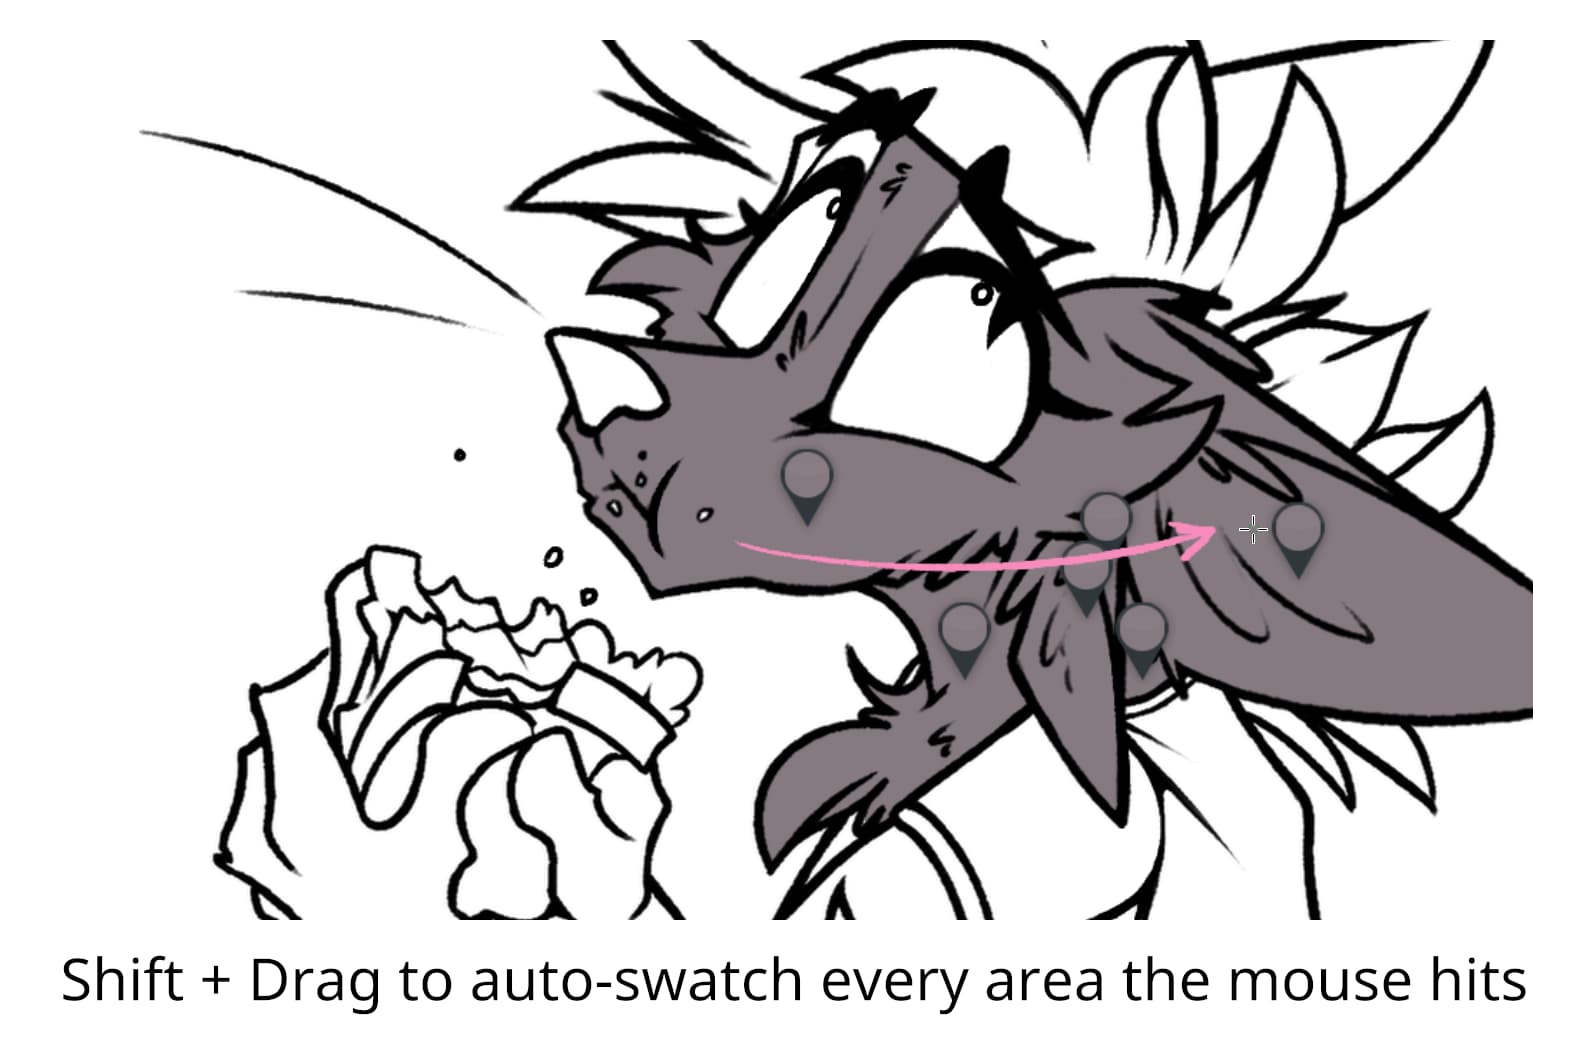
Shift + left click : Drag and add
Let’s blow up the one feature that brush has over swatch based: the ability to drag and fill multiple areas.
By holding shift and dragging with left click, you automatically place a swatch in every area your mouse hits. Much like the recent 5.1 drag-to-fill-multiple feature, this is the colorize tool implementation of it, and it’s used for quickly filling multiple areas.
Ctrl(cmd) + left click : Custom boundary
Now we’re gettin’ somewhere. I run into this a lot. A lot of characters of mine have fur patterns that are not usually defined by hard, black lineart. To get around this, I usually color my entire character as a single color, then I convert the colorize mask into a paint layer and actually color my characters. Well no more:
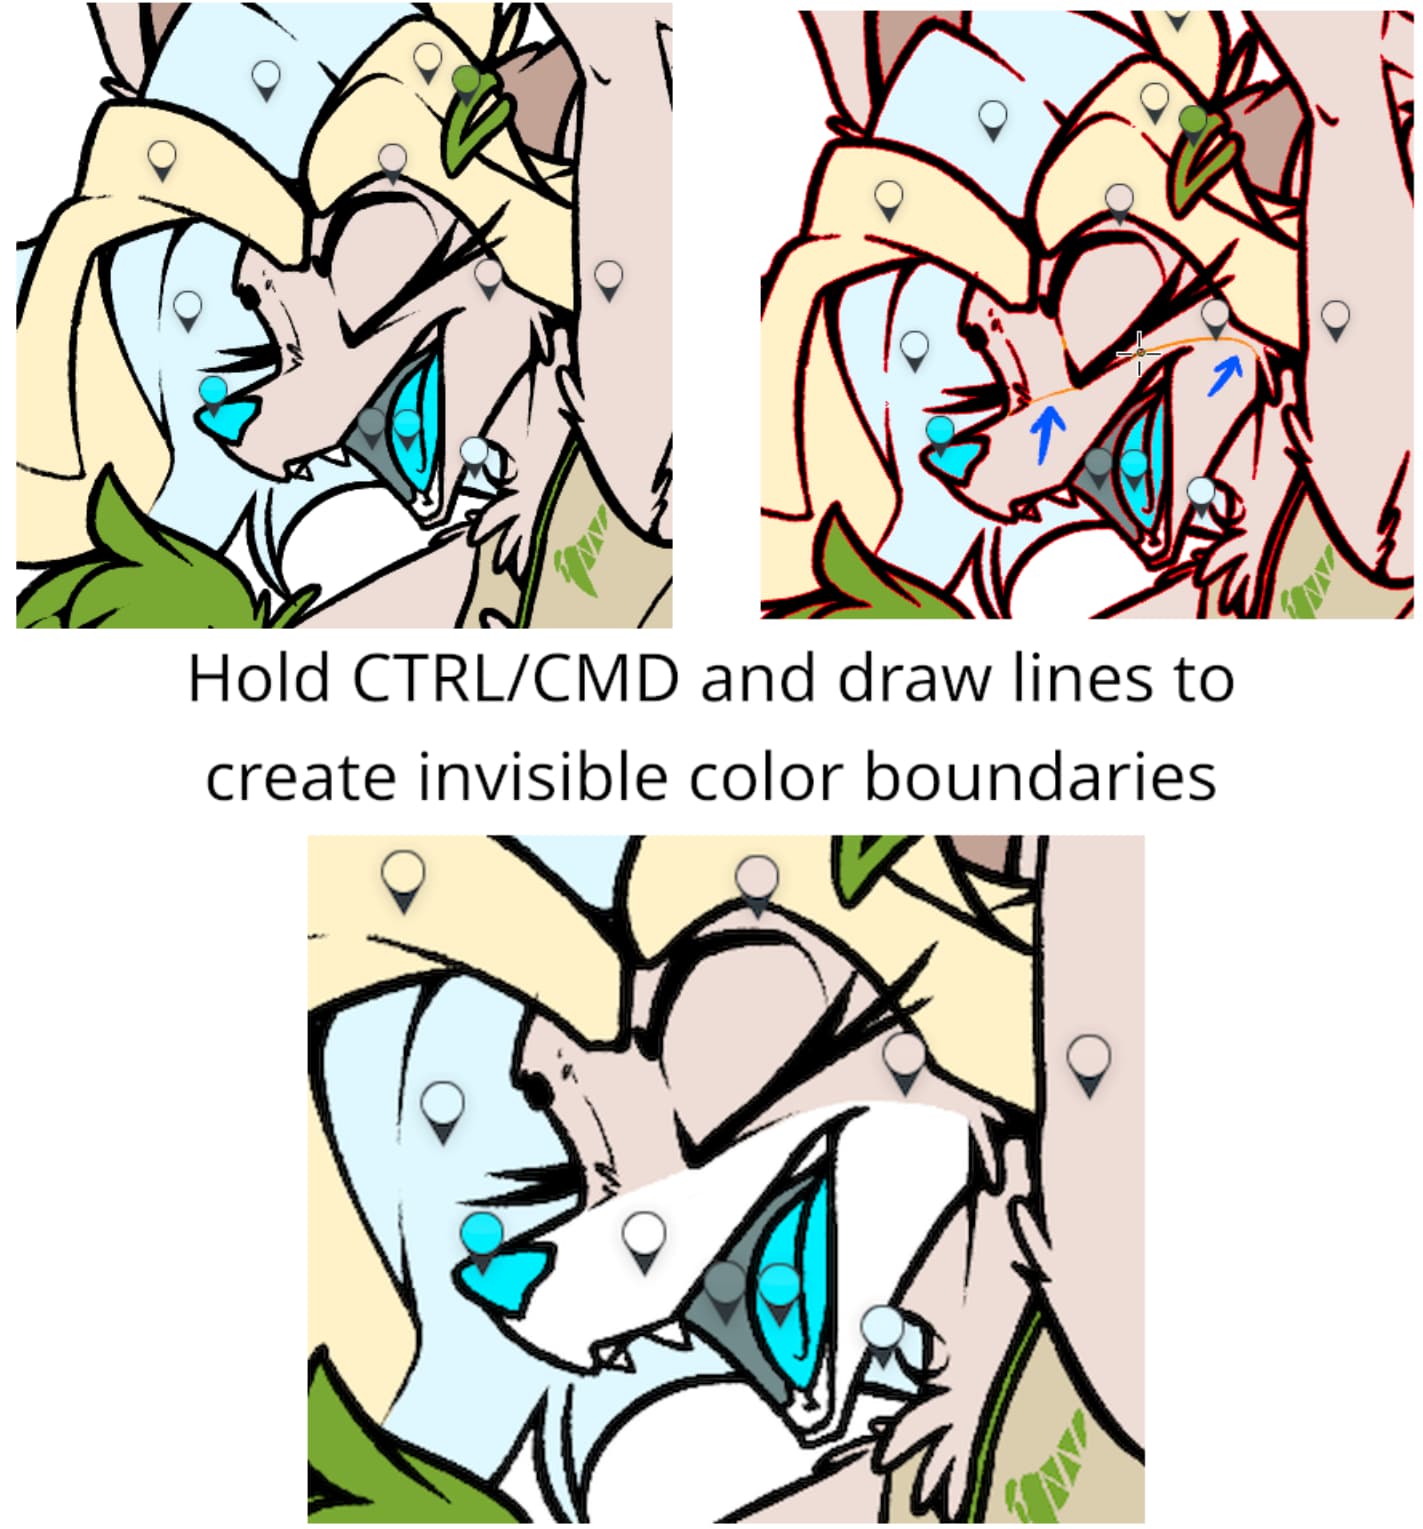
By holding ctrl + dragging with the colorize tool, you can create user-defined custom vector boundaries that divide up the preprocessed areas created by your lineart. This lets you create hard edges to colors without actually making a dividing line on your lineart layer.
Some notes about this feature:
- The start and end of the line are slightly (and customizably) magnetized to the already predefined lines, and other custom lines.
- The lines are 0-width, and do not affect the color other than cutting ‘areas’ into pieces.
- You can delete custom lines by clicking them while holding control
- The ‘gap close’ feature closes gaps with ‘custom lines’, so they can be deleted by the user if needed or they’re incorrectly placed. More on that later.
Alt + left click : Group areas
The usefulness of this will be better understood in the gradients section, but the concept is simple. Holding alt and clicking an area will highlight it in a random saturated color (to let you know it’s been added to that group). So long as you keep holding alt, you can keep clicking new areas. Each subsequent area ‘joins’ the areas together, so that a swatch (or multiple swatches in a gradient) will affect all areas as if they were a single zone, regardless of barriers between them.
Each group you create adds a color swatch to the ‘group’ section of the tool options docker under the colorize tool.
While holding alt, with no group selected in the docker:
- Clicking an ungrouped area will create a new group and automatically select it and add that area to the group.
- Clicking on an ungrouped area and dragging will add all areas you hit to a new group and select it.
While holding alt, with a group selected in the docker:
- Clicking a grouped area in the same group as the selected will remove it from the group
- Clicking a grouped area in a different group than the selected will remove it from the other group and add it to the selected one
- Clicking an ungrouped area will add it to the currently selected group
- Clicking and dragging will add all hit areas to the current selected group
In general:
- Groups will automatically be deleted if one or no areas are in it.
- Areas can only belong to one group
- Holding alt and hovering over a group will more boldly highlight ares of the same group
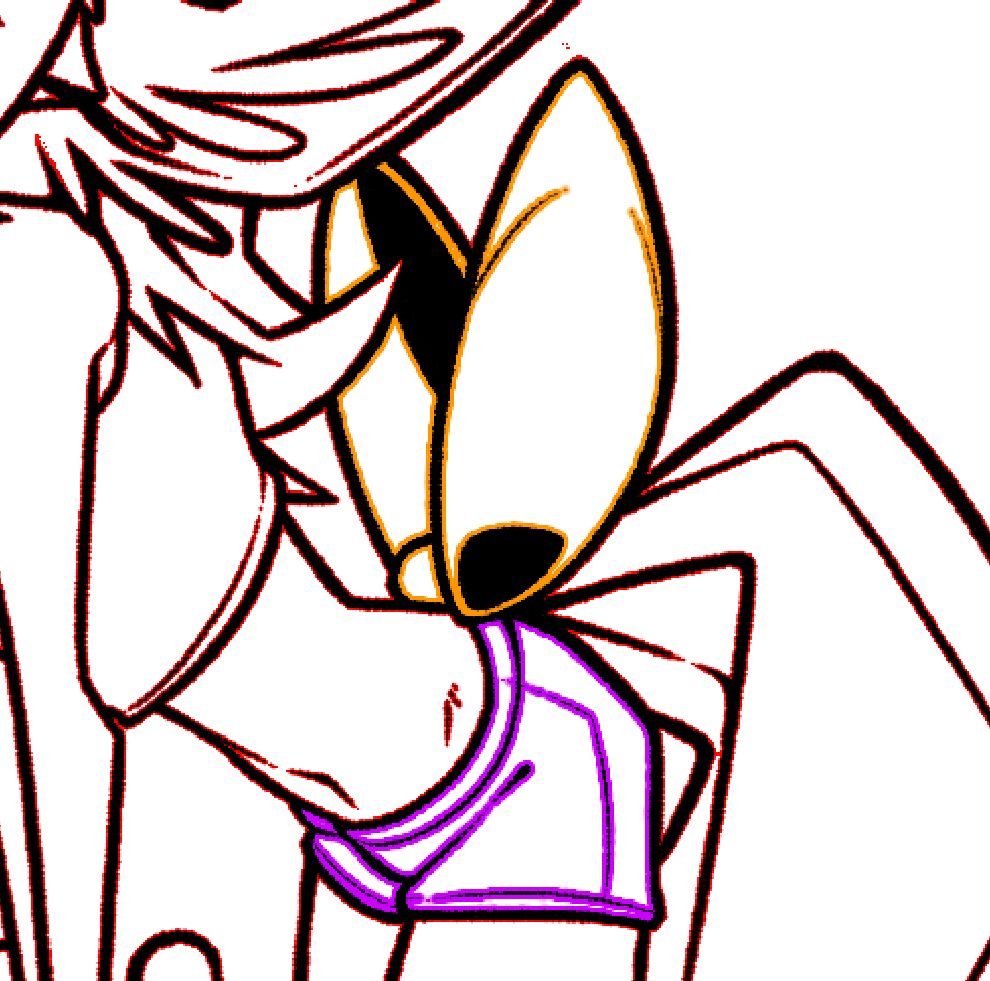
Example of some grouped areas, one being orange and one purple
Other features
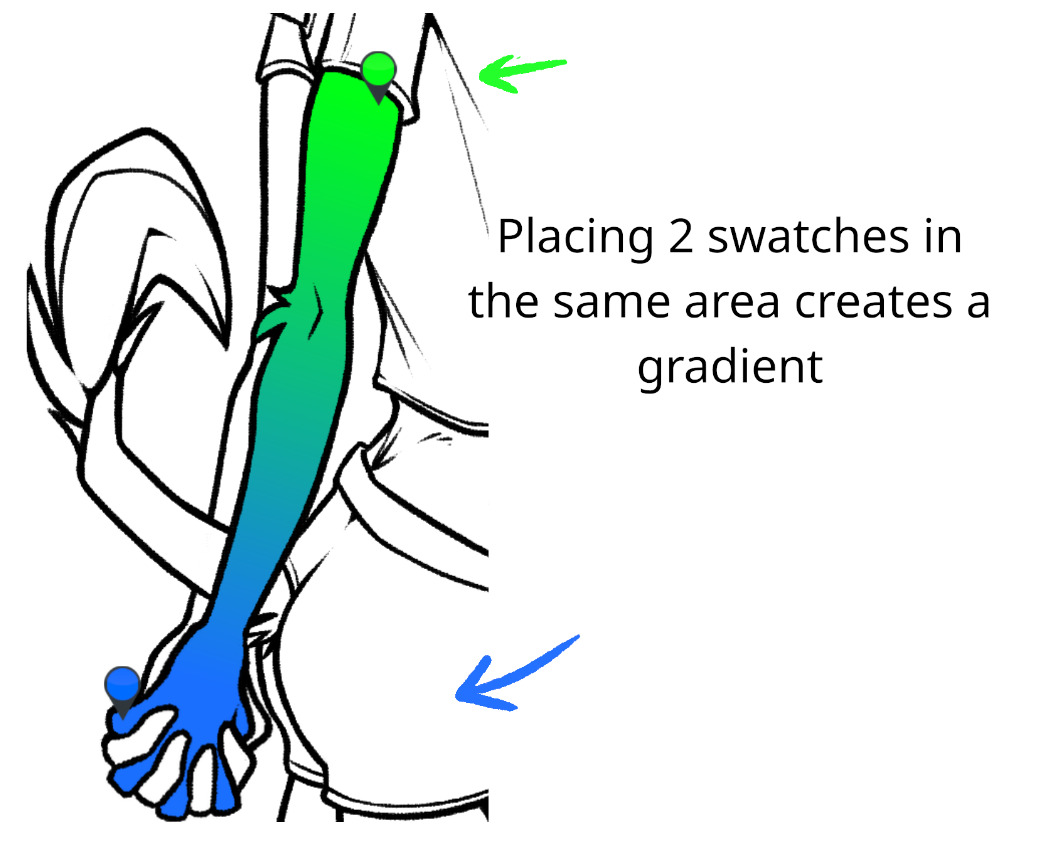
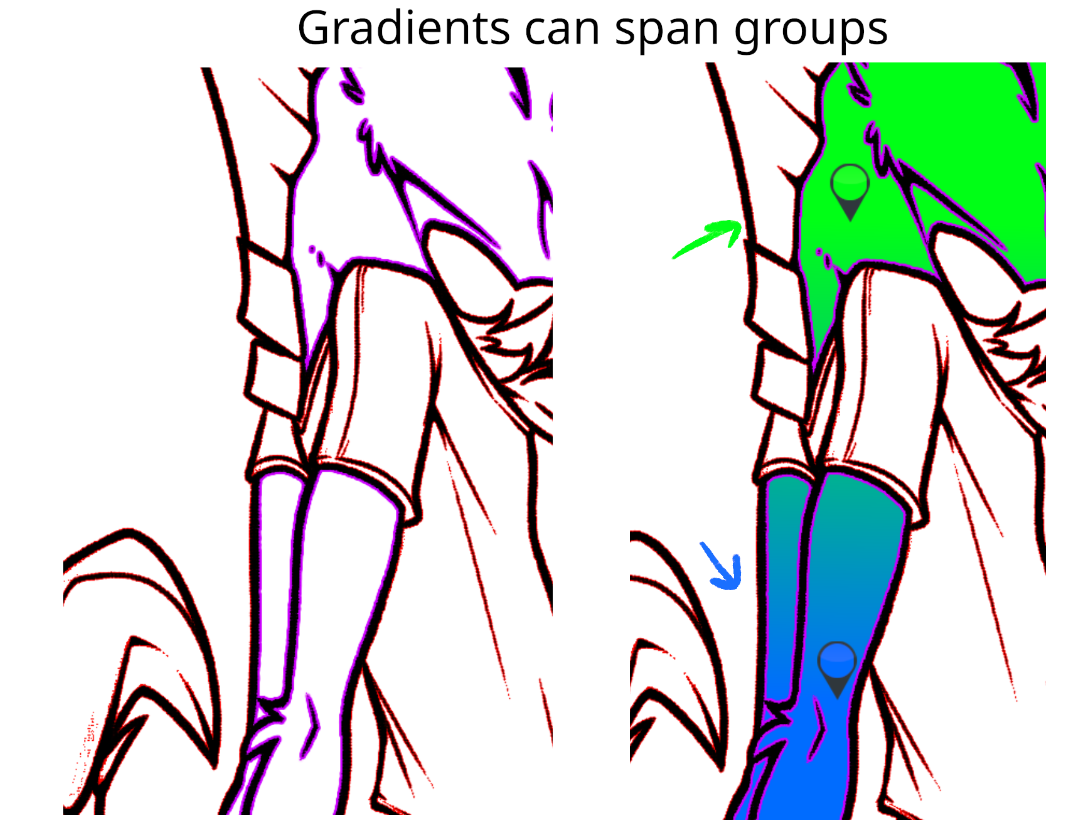
Gradients
Regardless of the distance or topography of the area that is filled, if 2 or more swatches are present in the same area, the resulting fill will be a smooth dithered linear gradient between the two colors. If the artist wants a hard line between the two colors, they can use the ‘custom boundary’ mode to draw it.
And now we understand the usefulness of groups:
Gap correction
As an option when generating the initial area map, ‘gap correction’ aims to bridge areas that are close together with each other. This allows for easier coloring for people with less defined or more loosely drawn linework. The sensitivity can be scaled as needed.
In order to fill the gaps, the algorithm still creates the initial lines the same way, then on top of that it creates ‘custom boundaries’ to bridge the gaps, which are the same thing that the user can create with ctrl+left click. This means a user can also delete them or make their own during the process, if they find an erroneously placed line or a gap not bridged (or bridged incorrectly). This puts less pressure on the algorithm to ‘get it perfect’ the first time, as fixes are a click or two away.
In conclusion
I use colorize masks for everything that I flat color. Yet there isn’t a single colorize mask saved in any of my hundreds of .KRA files. It’s an okay start to a full colorizing suite, and it’s about as good as the fill tool, but I will truly think the colorize tool has reached its full potential when I can one day create the colorize mask and not immediately convert it into a paint layer to fix colors/add colors/gradients/etc. When I can just leave the unrasterized mask there, and call the flat color step done, I think it’ll be beast to be reckoned with in the art program world.
If you have any comments, suggestions, objections, or anything on your mind please feel free to discuss it. Thanks!