Hi, I’ve read a lot about all the different icky-looking things that can happen if I make an image too small, and then view it larger than intended. Is the same true moving in the other direction? I’ve read the section in the manual about saving images for the web, resizing the image, etc., but it just made me more confused than I already was.
For example, if I were to make an image that is, say, 3000 x 5000, and then decide to use it in a blog post (which will obviously need to be viewed much smaller), will the quality of the image suffer from being scaled down? Besides the obvious file size issue, are there other reasons to scale down before uploading (do websites/browsers do a consistently decent job of scaling, or is it better to control that as much as possible pre-upload, even if file size is reasonable)?
Or should I do better planning ahead and decide how the image will be used before making it?
If scaling down is viable, what is the best approach? The ways that I know of are:
Crop the image similar to how I might crop a photograph.
Export the .kra to .png or .jpg, then change the size as needed in an external app.
Scale the image to a new image size in Krita before exporting.
I can’t wrap my head around the whole PPI thing; if DPI is only for printing, and PPI is going to display differently depending on the screen in use, why be concerned about it at all, if the image won’t be printed?
Related to that, the manual suggests lowering DPI to 72 for web images; If DPI is for printing, why would I change it for an image that will only be online? Is this just related to file size, or is there some other reason to do it?
If I will use an image on the web, but might want people to be able to print it from there, is there any benefit to setting DPI to 300, or will that get lost in the export to a web-based file format?
Why does the manual suggest flattening the layers before exporting? Wouldn’t the process of exporting to .png, .jpg, or .gif do that anyway?
What exactly does changing the size do? I assume that the Krita filters are different algorithms for how it smooshes the current number of color-populated pixels down, but how do I know which one to use? Is it just trial and error?
And finally, this should maybe be a different topic; please let me know if I should post separately: what if I plan to embed the image in a PDF? Does that change any of the decisions I would make regarding my other questions?
Subject is not simple because image size (width x height) and image file size (in bytes) are 2 different factors.
You can have 1000x1000 image that requires 4MB size while a 2000x2000 would require only 900KB.
Globally, you have to consider where you’ll upload your artwork, because rules won’t be the same everywhere:
On KA, maximum image size is 3840x2160 I think, for maximum 3.00MB file size
– File is resized and recompressed after upload
On Mastodon, by default (maybe instance will have different settings) maximum file size for images is 8.00MB (and 40.00MB for videos)
– Files are resized and recompressed after upload
On ArtStation, it will depend if you have premium account or no
Then it’s quite hard to give you an absolute answer for that.
On my side, I upload all my artworks as 2480x2507 JPEG files, and play with JPEG compression quality to not get file higher than 3.00MB
Concerning the best approach:
crop
– no, because if you crop, you modify the artwork composition (or crop only if you want to provide a zoom on a detail, but upload crop + resized artwork)
export and change size in an external software
– Krita allows you to do it, I’m not sure why you need to use another software
scale image
it what I do, but:
– flatten image before applying new scale
– test resizing algorithm according to your artwork
– if possible, keep maximum quality for export
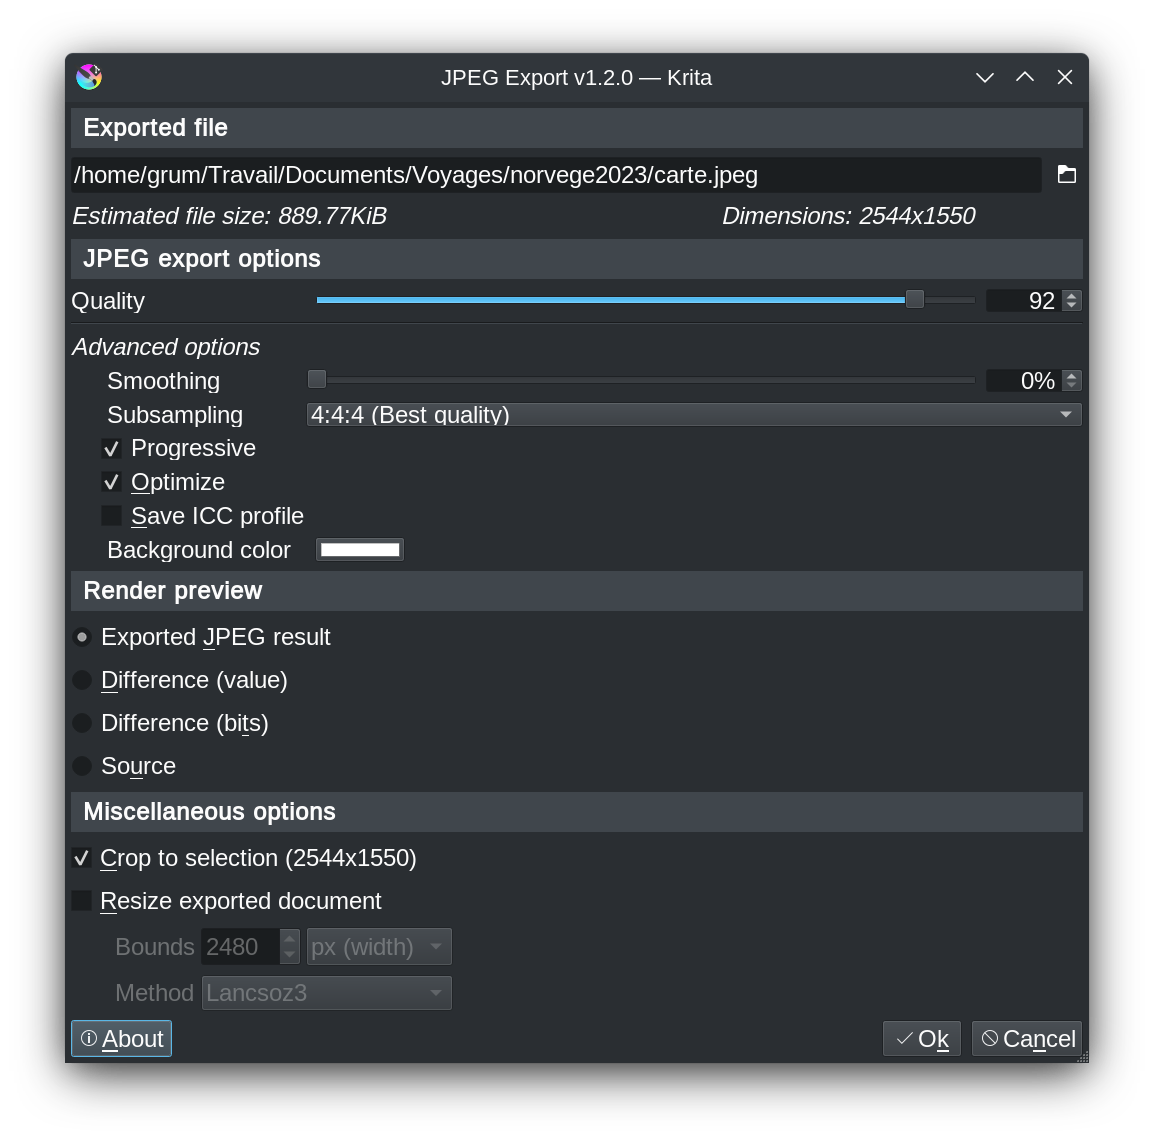
on my side, I use (my ) plugin JPEG Export that allows to set quickly and easily all export options with “real-time” (module computation time) result
Concerning the DPI, sincerely you don’t care about it.
The most import thing is pixel size.
DPI is just an information about how to convert pixel to real world unit (like centimeters or inches)
2000x2000 pixels document at 72DPI is exactly the same the 2000x2000 at 300DPI
The only difference will be the “required” paper size to print artwork for given resolution.
You can
If you want to provide a document “ready to print” it could be easier for some people to print a PDF rather than trying to find the right settings and software to print an artwork.
After, it will depend where you upload you document
@Grum999 Wow, this is a whole bunch of really helpful information. Thank you!
In particular, your recommendation to flatten the image before resizing. I would have guessed at the other way around - that I would want to resize first, so thank you for correcting my erroneous assumption!
There’s at least 2 reason to flatten and then resize:
Performances
– If you have 50 layers
— flatten + resize = 1 resize action
— resize + flatten = 50 resize action (need to resize all layer one by one)
Results
More important than performance is result
– If flatten + resize, you can be sure that in resized image, according to algorithm used (Lancsoz3 for example) the result will be properly resized: pixels colors will take in account all around pixels
– If resize + flatten, as each layer is resized independently, then on each layer you’ll have pixels for which color will only take in account pixels from layer AND alpha channel; addition of all layer won’t give you the same result than previous (and you might have problem related to alpha channel too especially if you use transparency masks)
@Grum999 This is very helpful! Thank you so much for the explanation.
You mentioned Lancsoz3 algorithm as an example; is that the filter you prefer for your type of artwork, or is that just an example? How do you decide which filter to use?
I use it I think 80% of time, but it’s more a matter of taste and according to artwork.
This algorithm for example will provide sharper edges than bicubic or bspline.
You can do tests on your side, or take a look to this post where I provide examples of difference between algorithm:
(click on 4:1 image to get it full size and really see differences)
In some image content situations, Lanczos3 can cause halo effects and ‘ringing’.
If it does then bicubic would probably be a better choice for that particular image content.
You can try them both and examine the differences.
@Grum999: I took a look at the thread you linked that shows the different output from different filters, and I bookmarked that, because it is such a great example of how different filters will process original.
I got myself overwhelmed, thinking I need to find out how each of those filters work, and I may do that some day, but you both have reminded me that it will be easier and more immediately helpful if I just experiment, and look at the results. Thank you both for that! I sure can get in my own way sometimes…