If there is enough people that wants to test on windows, he can make a package for that os as well. All this to tackle potential issues before the code gets merged. Otherwise the code will be merged and, as you know, those potential issues will become bugs, and so on.
Since there was no replies or comments, the tool got merged.
You will be able to test it on any platform using “Krita Next” uploaded April 21st onwards. Hopefully any issues you encounter will be solved before 5.1 is released.
I finally got to test the nightly since I’m on windows and it works good with no bugs so far, but I found the explanations are very confusing. (to beginners, hopefully…)
‘All region’ suggests it’s gonna fill literally all region that it selects, but it seems the contour detection is still working. And this proceeds to make it extremely difficult to understand the rest of ‘All region except~’ folks.
Probably for the same reason ‘Regions surrounded by~’ is difficult to understand how exactly it works.
‘Include contour regions’ sounds like it refers to the contour of the drawing, but it seems it means the ‘selected regions’ by the selection.
I’d suggest better wordings, but I’m yet to get my head around how it works…
++
There’s a glitch on the canvas(although I have no idea if it’s caused by this implementation or something else) while the filling is being completed, when I use the brush selection. But the tool does its job anyway and it seems like just a cosmetical issue so far.
The explanation of the tool goes like this: the tool is supposed to fill closed regions inside the enclosing region (those regions that are entirely inside the enclosing shape that the user makes). If one of the regions touches the boundary of the enclosing region, then it is not considered closed, and it is not filled.
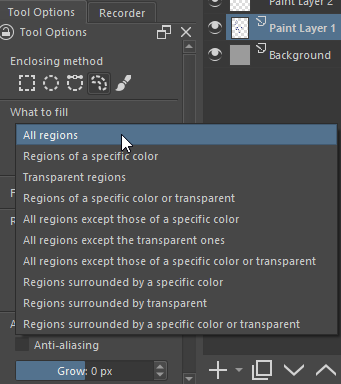
The different modes under the “what to fill” section are variants on that:
all regions: fills all the regions of any color that are entirelly inside the shape made by the user. It is supposed that the user don’t want to fill the regions that touch the boundary of the enclosing shape, otherwise everything would be filled.
regions of specific color / transparent / both: fills regions of that color that lie inside the enclosing shape. If the “include contour regions” option is selected then the regions of that color that touch the boundary of the enclosing shspe are also filled, it can be useful in some situations.
all regions except specific color / transparent / both: the same as the previous one but instead of selecting the regions of that color for filling, it selects the regions that are not of that color. Again, it selects only the regions that are entirely inside the enclosing shape, unless you select “include contour regions”.
regions surrounded by specific color / transparent / both: selects regions of any color that are inside the enclosing shape and that are surrounded by the selected color. If “include surrounding color” is selected then the shapes with the selected color that surround the other regions, are considered part of the shape that needs to be selected and filled.
The “transparent” and “specific color or transparent” variants are there to allow selecting transparent as the color and to mix transparent and a color, for example transparent and white seems convenient since those are the most common colors used for backgrounds in lineart.
I’m open to any suggestions for the text.
Please, tell me more about that glitch (a video showing it would be great).
It’s strange… I’ve seen it yesterday when I first tested it but I couldn’t reproduce it anymore when I tried again today. But the glitch showed once again after I switched the canvas renderer, and disappeared again after that.
At this point, for me it shows only once after switching the canvas renderer(OpenGL<->ANGLE).
Video recording :
ABOUT SUGGESTIONS :
I’d suggest (based on what I observed so far) :
Changing ‘Region extent’ to ‘Contour detection’. (which is much more intuitive from artist’s point of view, imo)
Imply users that the tool fills inside the detected contour by default, unless other options are ticked. Changing ‘What to fill’ to ‘What to fill inside’ would be enough I guess. (I strongly recommend this)
Changing ‘Include contour regions’ to ‘Include all selected areas’. (to avoid confusions)
Hopefully I’ll come up with better suggestions once I’m fully understand as a normie user how these methods were designed.
just downloaded the nightly to test. the tool seems very hand and i am still testing it but so far i saw some point that i can already comment on.
To start when i saw “all regions” I was expecting the same as acc4, that it would fill the whole region selected. However the behavior i expected happens when i invert all region , so “none regions” fills the whole region selected. that combined with the context provided by “what to fill” can be confusing to the user.
The other point is the long text in all the other options, while i understand that the text is trying to be descriptive of what they do, this amount of text makes very hard for me to understand what one specific option does as the whole text just jumbles together when reading. I assume it would be even worse for people with dyslexia (i dont have it so i can only assume it would be a problem) and be a bit intimidating to some users.
In my opinion dropdown menus should have very concise options. I dont know if its possible to have tooltips in dropdown menus (seems possible after a quick google search for QComboBox) but a suggestion would be putting this long description inside the tooltips for each item.
From what i understood from your explanation:
the tool objective is to detect completely closed regions/ closed shapes inside the selected area and fill them .
If the region/shapes inside the selected area have any gaps (are not completely closed) they are not filled.
If one of the regions/shapes touch the limits/boundary of the selected area, its considered not a closed shape/region and is not filled in.
Just rewording it so I can better understand it as the word region appears many times in different contexts and that was making it difficult for me to understand.
so for now i will go with these terms:
enclosing region = selected area. I feel selected area gives a better understanding of what it is as its already related to the selection tools.
closed region = closed shapes. I feel that the word shapes gives a better understanding of what the tool is looking after. However I also notice that region is a term carried from the fill tool so to keep consistency maybe its better to use region in the end.
Now for text suggestions:
all regions → closed shape/region detection (basic)
Tooltip:
Detects completely closed shapes/regions that are fully inside the selected area to fill. Invert: this will fill the whole selected area, behaving like the fill tool.
I also find interesting to mark this as the most basic option of the tool.
regions of specific color / transparent / both → limit (fill) to color/transparency/both
Tooltip:
Limits the valid selected are to regions/shapes with the color selected/transparency/both. Invert: will fill any shapes/regions inside the selected area except the color selected/transparency/both.
I am still unsure if limit fill would be better or if just limit to conveys the idea already
regions surrounded by specific color / transparent / both → surrounded by color/transparency/both
Tooltip:
Limits the regions/shapes to be filled to the ones that are surrounded by the color selected/transparency/both. Invert: will fill all the selected area except the part surrounded by the color selected/transparency/both.
include contour regions → paint selected area
Tooltip:
Check to use fill the intersection of the region/shape created by selected area and the specific color / transparent / both. Enabling this option will allow partial selection of shapes/regions to be filled.
To me contour regions doesn’t describe what the user will perceive
I really don’t see why its relevant to have the options “all regions except specific color / transparent / both” when invert seems to do exactly that, unless i am letting pass any detail it just seems to clutter the options.
For the surrounded areas some options combinations doesn’t seem to do anything.
regions surrounded by specific color or transparency + include surrounding regions doesn’t seem to do anything.
regions surrounded by transparency + inverting also doesn’t seem to do anything.
Unless i am misunderstanding how these are supposed to work.
Well this took forever to write hopefully it’s useful. the tool itself is really amazing
Regarding the glitch, I will have to talk about that with Dmitry.
Regarding the texts, I don’t have any problem changing them, but I think it requires more opinions from other users first. Some texts are like that to be consistent with the fill tool.
Regarding the last point, that happens because you are using thin smoothed lines. The tool uses the normal flood fill (like the fill tool) as a primitive to select the inner regions. Since you are using a low threshold, the pixels inside the line are treated as an independent region inside the enclosing shape. This may vary depending on what pixels are touching the boundary of the enclosing shape.
It’s not a bad thing to have smooth edges, but at least the stroke should be more consistent in all their parts. Or you can choose a higher threshold value.
Thanks for the comments. I’ll try to explain some things.
Well, that’s not what invert does. Invert takes the produced mask with the shapes to fill and inverts it, then intersects it with the enclosing shape, so that no region outside it is filled. If there is some closed regions then using invert will fill all except those, it won’t fill everything.
Invert does the same in all modes, so I think the tooltip should be the same.
This tooltip seems a bit confusing.
I don’t think “paint selected area” reflects what is done. This option also fills the regions that have the selected color and that touch the boundary of the enclosing shape, which are not filled by default.
Well, let’s say you have a bunch of shapes, some orange, some purple and some green in a transparent background. You want to fill all the shapes except the green ones. Then you choose this mode: only the orange and purple shapes will be filled, not green ones or the transparent background, since the transparent region touches the boundary of the enclosing shape and is nor considered closed.
This can not be achieved with the other mode + invert, since all the regions except the color would be selected, including the transparent one.
Now, what would be the same is this mode + “include contour regions”.
I included this mode to tackle this corner case mainly that can not be achieved with the other mode.
I admit it can be a bit confusing.
“Include surrounding regions” just includes the regions of the selected surrounding color as oart of the regions to be filled. If you don’t select that option only the regions inside the surrounding color are selected.
If you have some black shapes in a transparent bg, and you choose “regions surrounded by specific color or transparency + include surrounding regions” then the bg is also selected, and since the resulting shape is touching the boundary, it is not considered closed and is excluded.
For “regions surrounded by transparency + inverting also doesn’t seem to do anything”, I would have to know what you are selecting to give an answer.
In the end what is selected and how is very logical if you think twice, but maybe the texts are not that good and give some wrong spectations. Let’s see what others suggest.
I think it will be better if I make kind of a tutorial explaining the tool and the use of each mode first, so that people can give more suggestions with a better understanding of how and when to use it.
I also really want to know what CSP users think of it, since it is based on the tool that CSP has.
Thank you for the explanations as they do clarify a lot of stuff like how the exclude region works and how selecting a transparent area can be considered a open shape.
One thing that might have not be clear in my previous post is the the invert under the tooltip is actually part of the tooltip. Part of my suggestion is clarifying what invert does to each mode. As i think some of these logic operations might not be clear to all users. and sometimes the wording might misguide a user, as for example:
I have a circle on a transparent layer
I select to fill transparent regions.
If i select around the circle it will fill inside the circle, great that’s what I expected.
Now, lets check invert and select the same area:
The result is the inside of the circle is not filled, the outside area + the lines making the circle a filled.
Which by your explanation of how invert works by inverting the mask makes sense. However that only makes sense if you know a mask is being created under the hood, that’s completely invisible to the user. The tooltip for the invert checkbox also doesn’t mention anything of the sort it says “check this option to fill all regions except the selected ones”.
Going by that i would expect to fill the area around the circle but not the circle lines. It can also generate some semantic problems cause if you are inverting transparent regions some users might think it would select and fill the area that’s not transparent.
I know i might be stretching matters but as someone who has been directly answering people doubts about krita for i think 2 to 3 years, i know that some of this stuff will confuse a lot of the users. so even if the process under the hood is the same the result for the user will be different. Reason why i think its important such things are explained.
The invert checkbox would continue to have its tooltip unchanged. though might be good to change it to suggest a mask is being created for the fill.
That being said, one thing i believe is that tool tips should reflect what the user will perceive not what is happening under the hood especially for a program like krita. However i understand that not everyone might agree with this.
In this one in particular my intention was to show that it would fill the whole area but would respect boundaries like the fill tool does but maybe better wording would be good.
I agree the tooltip might be a bit confusing especially the first part, but what you are describing with:
is exactly what i meant to say in my tooltip. Though i guess i really messed up my wording.
I will say that paint selected area describes better what i am seeing happening than include contour regions. cause to me contour regions doesn’t convey much meaning to the user. but i would also like to see other users input as by no means i think any of these suggestions are perfect.
Haha , that explains a lot, thats exaclty what i was doing lol would be good to add that transparent layer areas and transparent areas not encloses are considered open.
testing here after understanding how the transparency of the layer can be understood as a open shape it does something. I was selecting a shape on a empty layer, after creating a boundary with color and selecting on top of this it did something.
indeed a tutorial would be super helpful.
as a CSP user i will say the only thing i am missing in this tool is a close gap detection, i do think that this tool offers out of the box things that in csp i had to download custom assets made by users. these ones 1759451, 1759448 and 1759450
Again amazing work you have been doing, and thank you for your work so far.
Yes, it is slower than csp. I didn’t try to optimize it yet. I n some places I think I can make it a bit faster; in others it’s bounded by the other functionality in krita (like floodfill).
The tool doesn’t treat the borders of the image into account to select the regions to be filled, which seems to be what csp does. I’m guessing that the lineart layer extends a bit outside the canvas limits and that could be what’s triggering that odd behavior. Can you share that image with me to make some tests?
@SchrodingerCat thanks. I tested the tool with your image. My guess is that you actually changed the mode, but I may be wrong.
If I use the “regions of specific color” with white as a color and make a enclosing region similar to the one in your videos, then everything inside the lines is filled. On the other hand, if I use the “regions surrounded by specific color” with black, then only some regions are selected.
The “issue” I think is that this tool doesn’t take the image borders as a boundary, like csp seems to do. This means that what is outside the image is considered transparent. If one uses “regions of specific color” then all the white regions are selected because they are inbetween the black lines and a transparent region that is outside the image but inside the enclosing shape, so they are considered closed. If one uses “regions surrounded by specific color” then some of the white shapes are not totally surrounded by black because they are next to transparent on the bottom, so they are not considered closed an they are not filled.
At least that’s what I think is happening.
So, my question to all of you is: should the tool in Krita behave like the one in csp and take into account the image borders? I didn’t do it that way because the layers’ contents can extend ouside the image bounds. But maybe here is better to have it like csp.
i would say if it improves performance, then yes. As i think in the end the most used case would be fill inside the canvas area, and i think making adjustments doesnt take too long in the case something wasnt filled cause it was outside before.