I feel like this is missing. Not sure so I’ll ask.
In Krita, what exactly is the equivalent of “texture each tip” if it exists.
If not, why Krita doesn’t have this option when CSP and Photoshop have it ?
Hi
What is “texture each tip” functionality?
I mean, I don’t have any other painting software than Krita&Gimp then maybe some people understand what you’re asking about but on my side I can’t help… ![]()
- Costs
- Time
- Not enough developers
- Nobody interested in functionality to implement it
- Developers not aware of this functionality in other softwares
- The fact that Krita is not a clone of CSP Photoshop
- …

Grum999
2 Likes
novames00 , this topic has been discussed other times in this forum, search for it. In short, Krita applies the texture to each tip individually. What it cannot do at the moment is texturing the whole stroke at once instead.
If the reasons that Grum999 gave you for that not being implemented are not enough, you can also look at the countless threads in this forum that discuss why feature X is not implemented yet to get more reasons. Maybe even you participated in some of them.
6 Likes
I think this is what you need:
GSoC/2022/Ideas - KDE Community Wiki
This is just an idea. I’m not sure how long it will take for someone to do it. It takes a lot of time, so it is difficult to realize it in the short term.
2 Likes
Thank you @Deif_Lou , @Grum999 , @TheTwo .
And especially, thank you @TheTwo for forwarding the link.
Looks like I don’t even need to make a feature request and the idea could come to life in a certain future from what I can see.
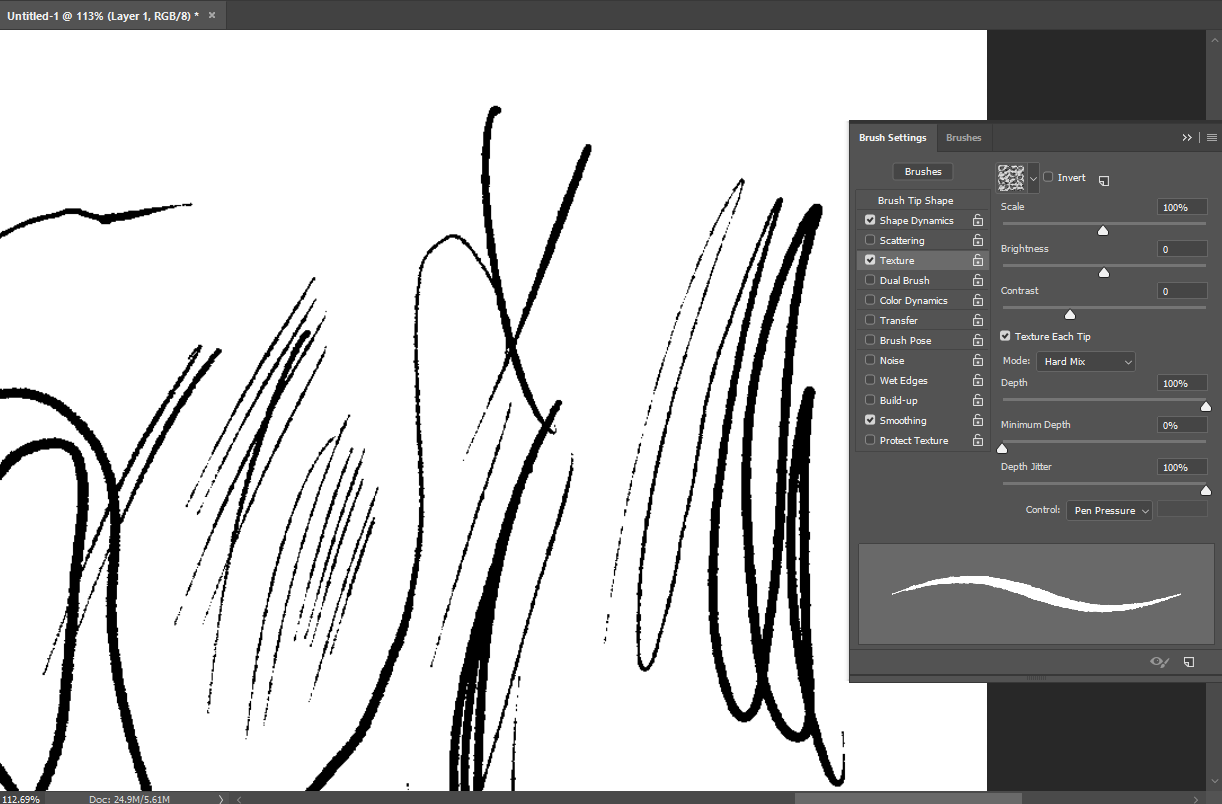
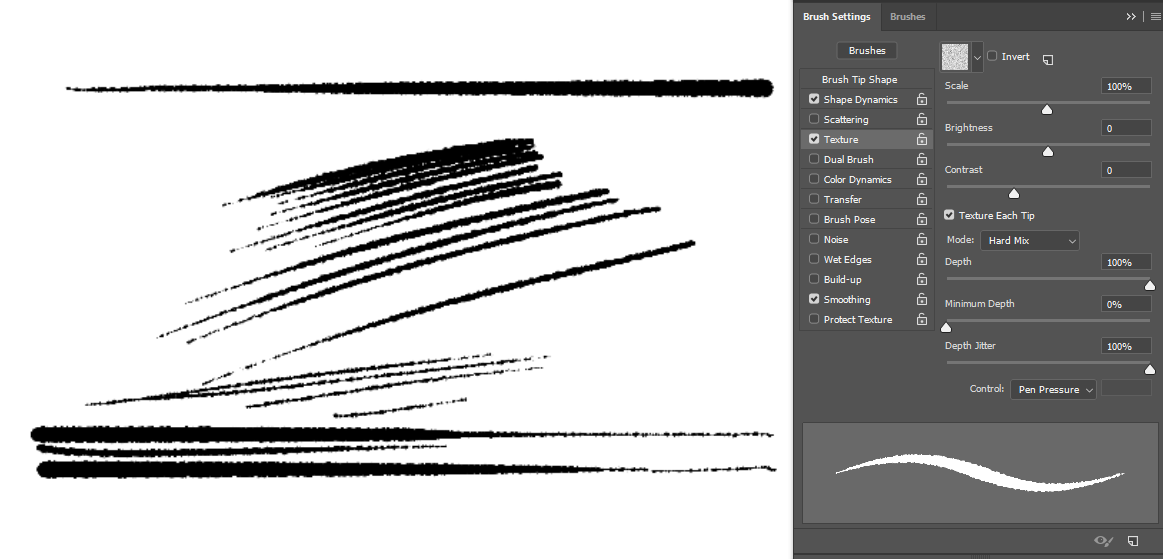
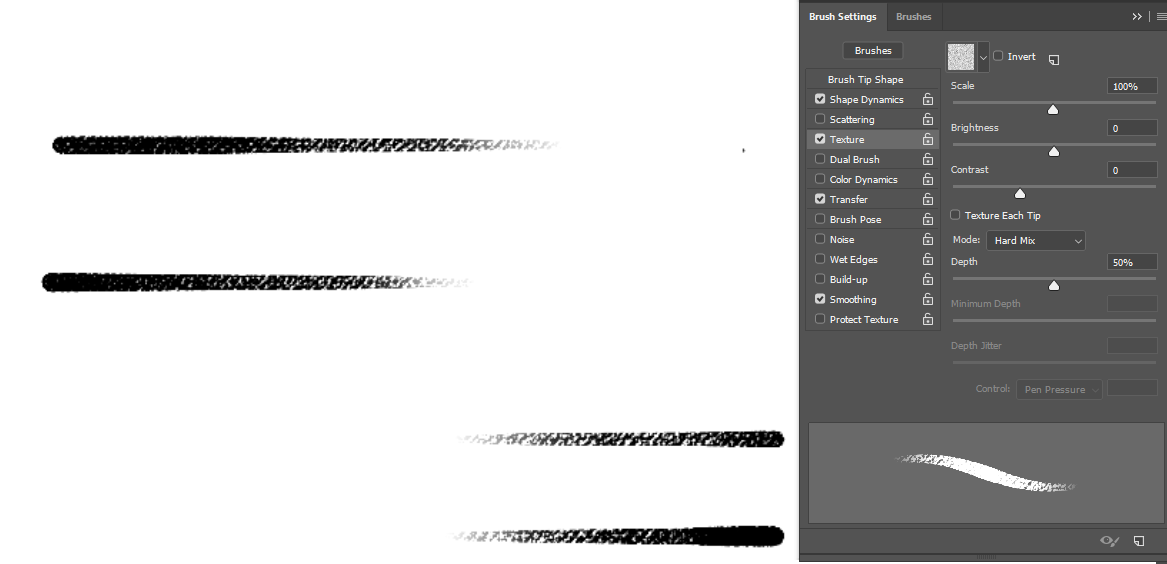
Yes, the reason I wrote this is because, well I reopened Photoshop and out of curiosity, I used a hard round brush, with opacity turned off. And just by checking the texture option, with application per tip enabled , hard mix blending mode and depth controlled by pen pressure, I directly obtained a very organic inking brush that almost behave like traditional inking pen, living a fading kind of noisy stroke when the pressure is very light, but purely opaque with textured edges when the pressure is full.
Except that something felt odd to me :
I had a 100% depth jitter with minimal depth at 0% and max depth at 100% in Photoshop.
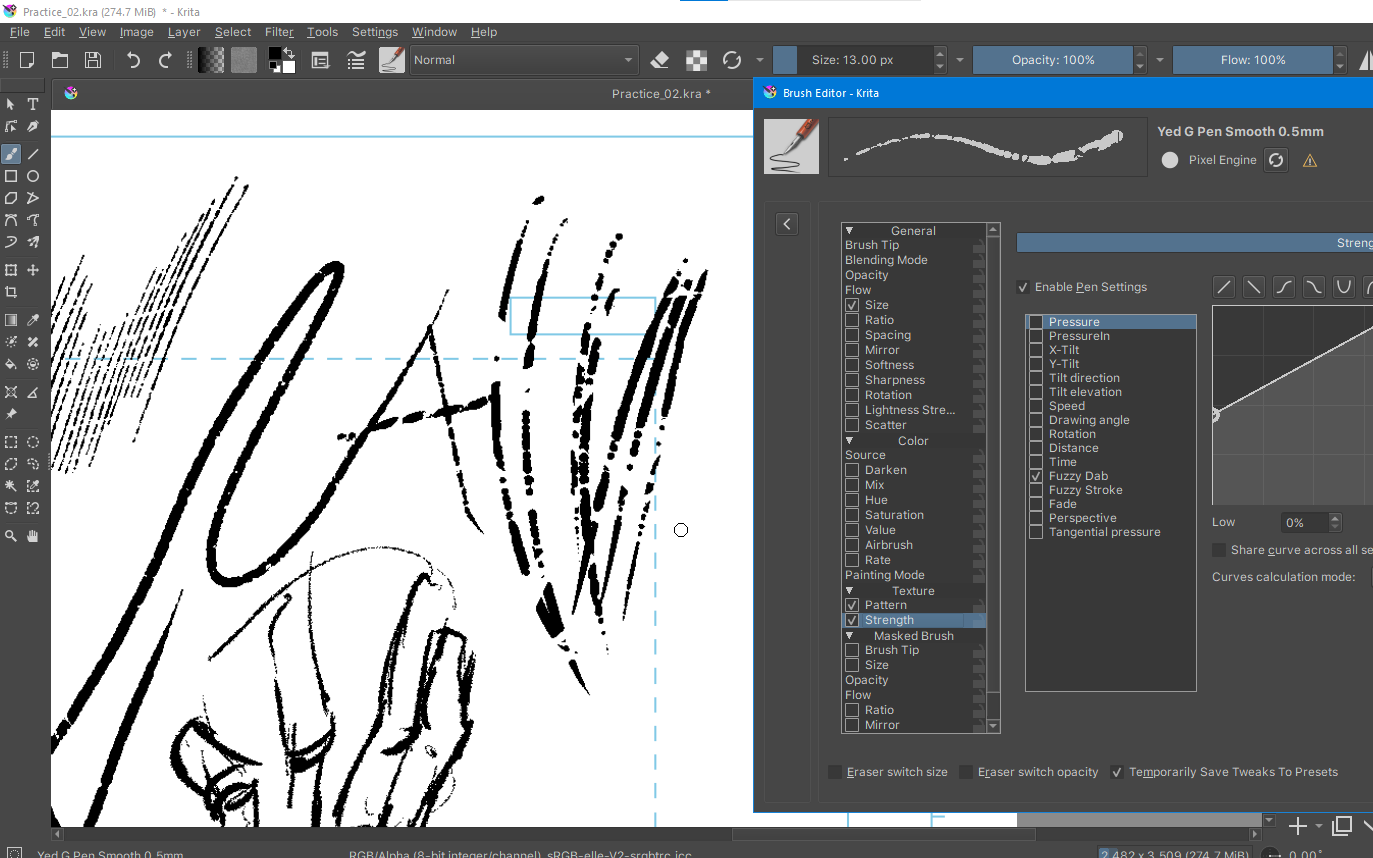
I assumed I could replicate that in Krita today, so in Krita I did the following :
pattern enabled; blending mode : hard mix(PS), strength modifier ON(fuzzy dab is supposedly the equivalent of depth jitter; so I used a 0 to 100% linear curve for it)
Now, I don’t know why, but Krita loves to show random stroke gaps with such setting.
And Photoshop doesn’t. So I’m wondering if it’s how it should be.
I’m not saying that this a problem but, it’s something I noticed and so it seemed odd to me.
Which is why I made the post.
Look at the pictures below yourselves :
Photoshop :
Krita :
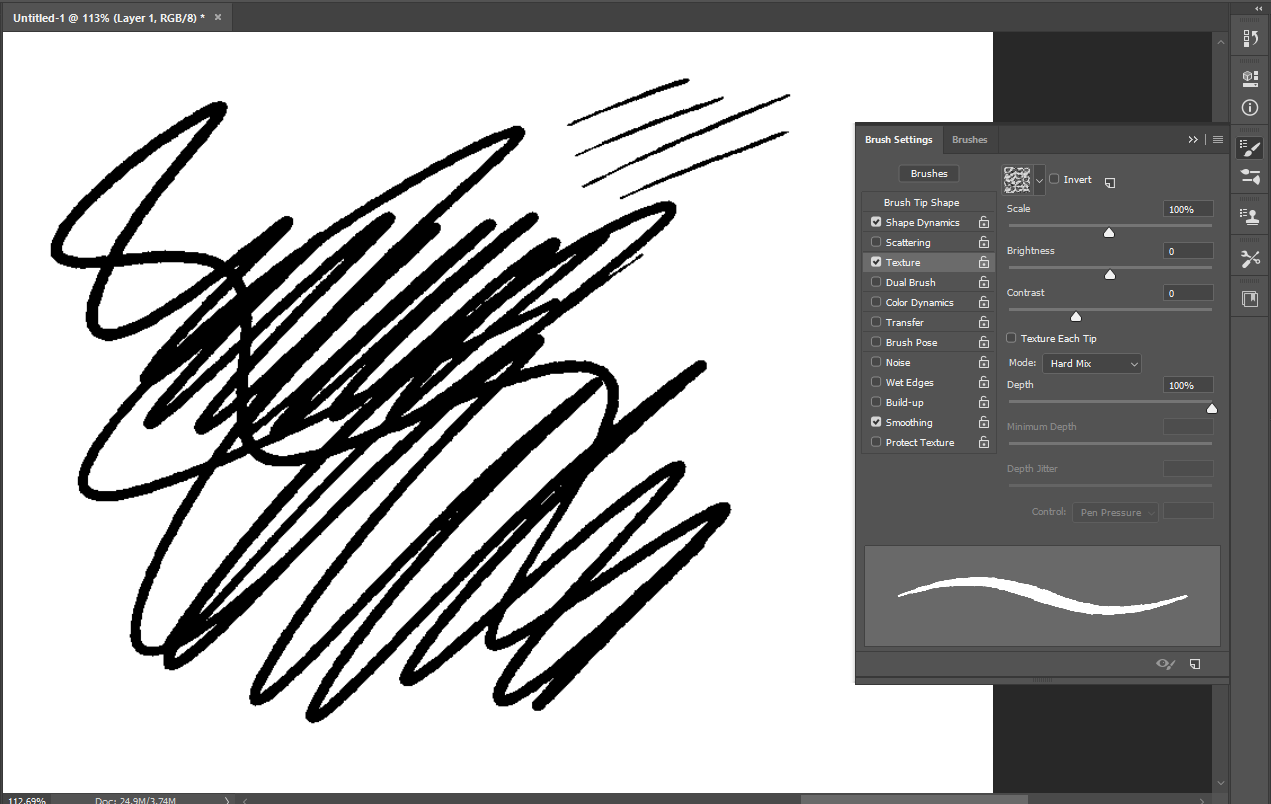
Photoshop 2 :
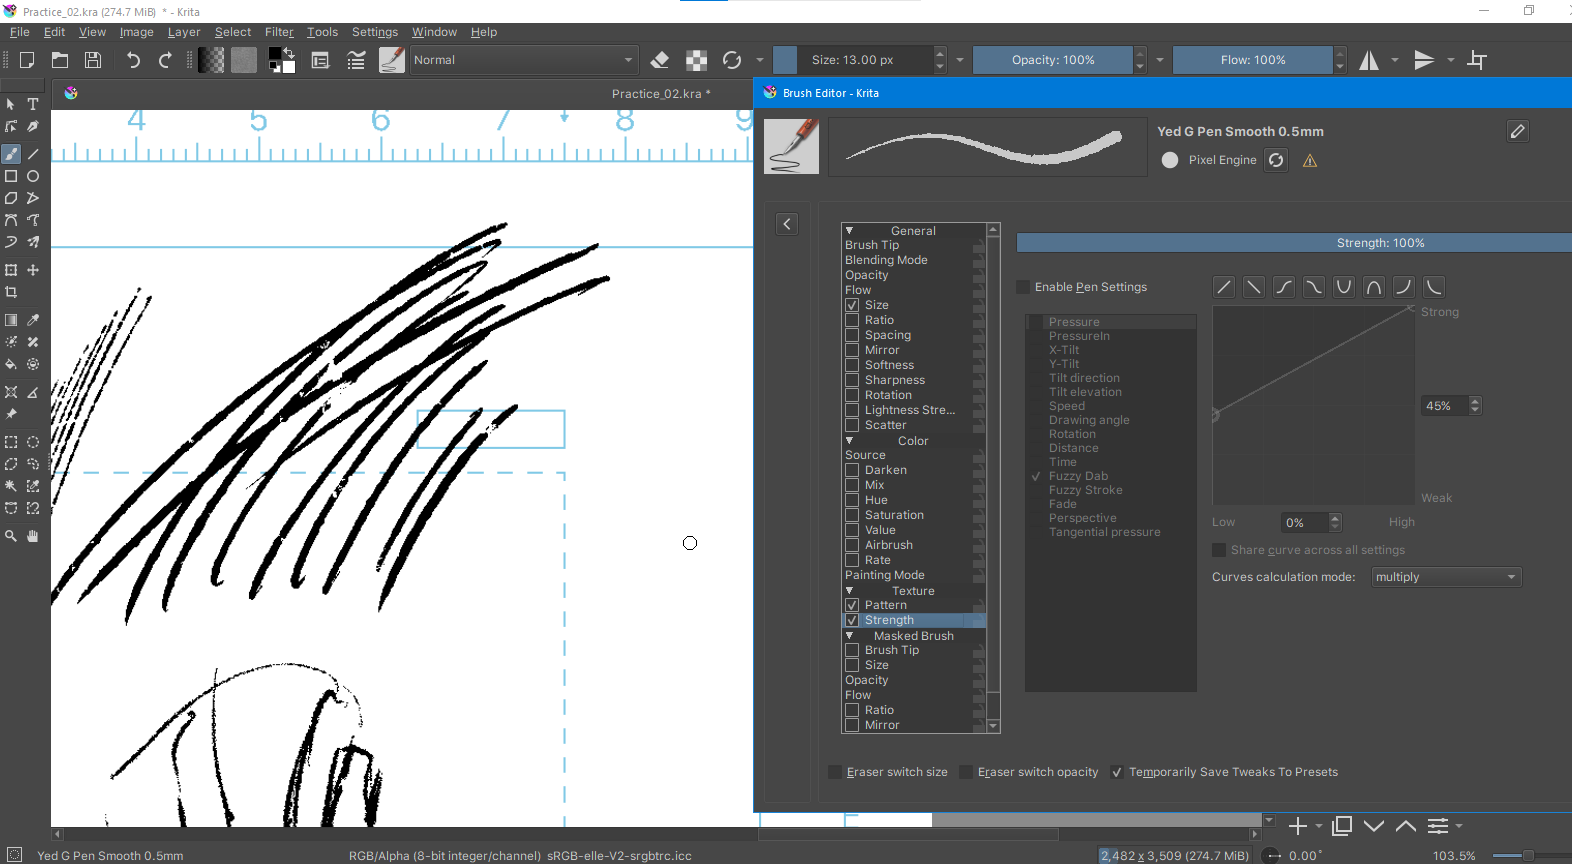
Krita 2 :
If in a certain future, replicating the setting just like in Photoshop is possible, this is my only wish.
But again, I’m not saying that it’s necessarily a problem.
Hello,
This was already discussed but the topic don’t have such a obvious title, so I will link it here: Make the texture engine not affect the brush opacity/flow behaviour
@novames00 I really recommend you give a read and you will realize that Krita in fact already has only 'Texture each tip". So that GSoC request bugs me a little. I don’t understand what they want to achieve. @Deif_Lou do you have a ‘two cents’ on this matter?
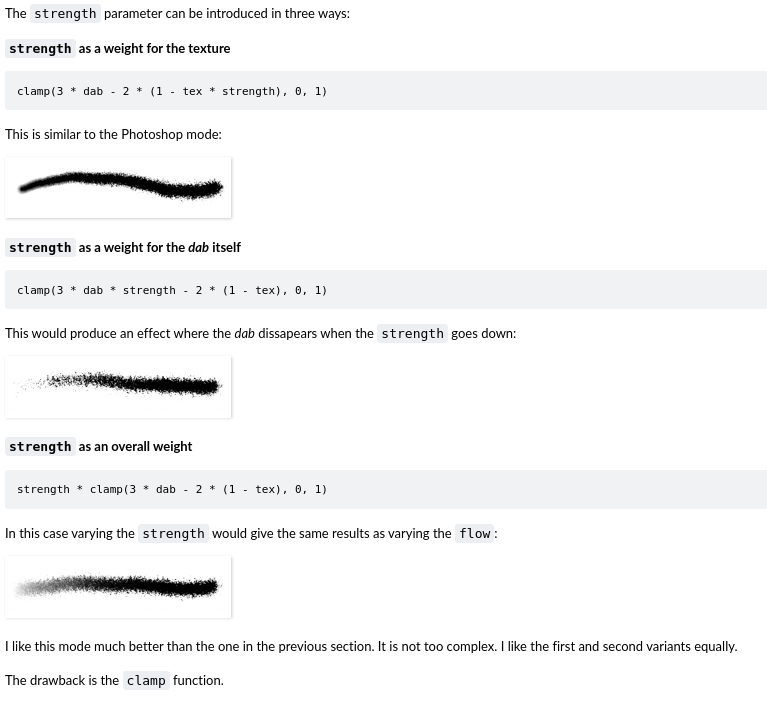
That GSoC may be a result of how Krita uses the Strength parameter when texturing dabs? As was noted both in the Phabricator texture page and in this comment from the post above:
Talking about your brush.
In photoshop, are you sure the pen pressure doesn’t affect the texturing only because the Depth Jitter is set to 100%?
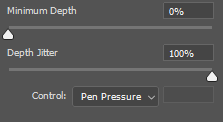
This part of the settings makes me think otherwise. So in Krita I think you should have both Pressure and Fuzzy Dab enabled. Just don’t forget that ‘depth’ and ‘strength’ works differently in PS and Krita, so maybe using independent curves for each parameter in Krita may be necessary.
Another thing: While PS is ‘saying’ the texture contrast is set to 0 ( ![]() ) the slide is off to the left
) the slide is off to the left
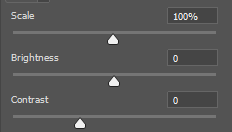
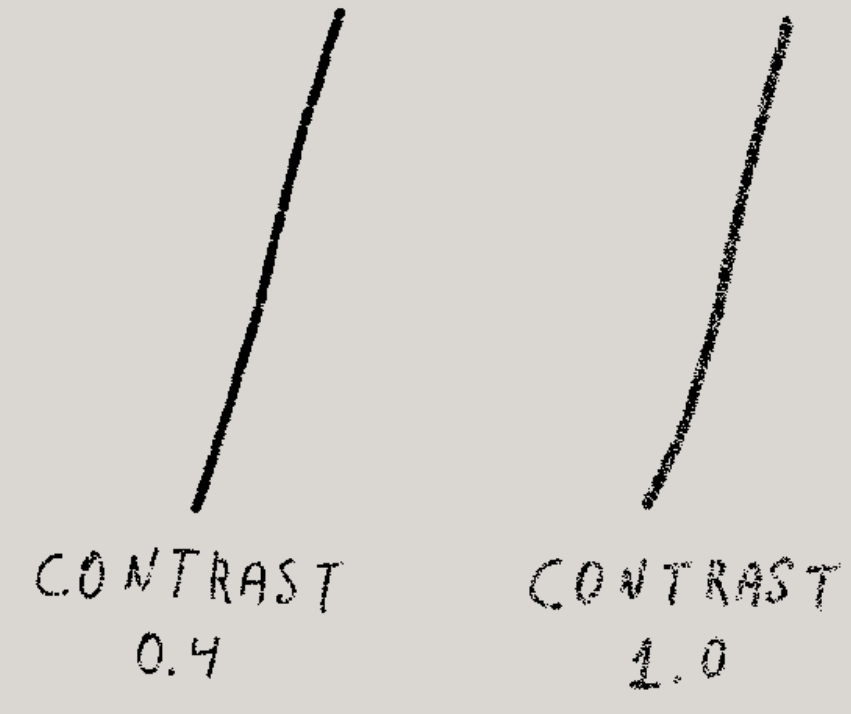
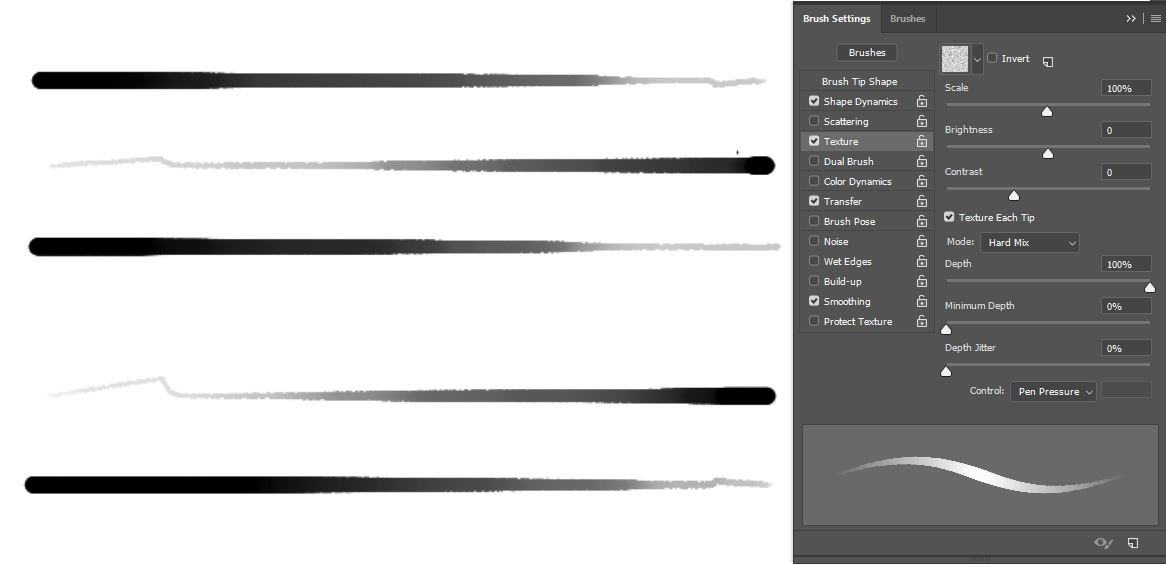
So mess with these settings in Krita also. Bellow a quick test I made with a brush using
- Round Brush
- Spacing 0.03
- Opacity and Flow Off
- Hard Mix (PS)
- Strength 100%
- Pressure
- Fuzzy Dab
Then I just changed the contrast of the texture.
Cheers.
Are you using the same texture? Probably yes, but I had to ask.
Also could you share the brush to investigate? Preferably with texture and brush tip if required (though if created in newer Krita it should work just as .kpp file).
The effects you see are a bit weird, in Photoshop without “Texture each tip” the texture seems to not have much effect at all, and looks somewhat useless, but maybe it’s because of the low resolution. In any case, I can’t really tell from the pictures what this feature actually does (mathematically).
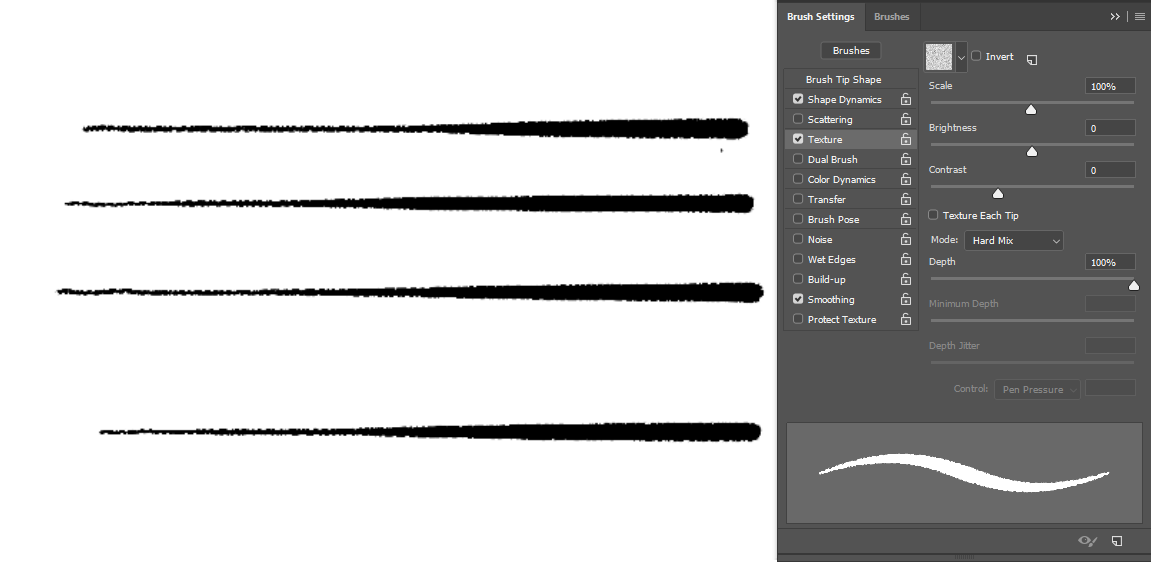
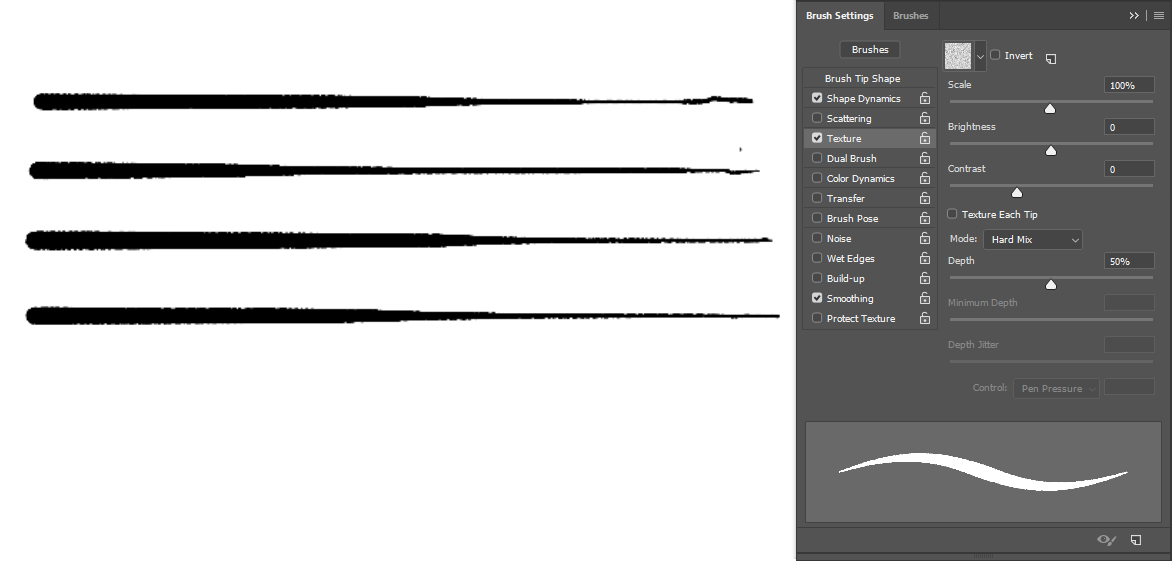
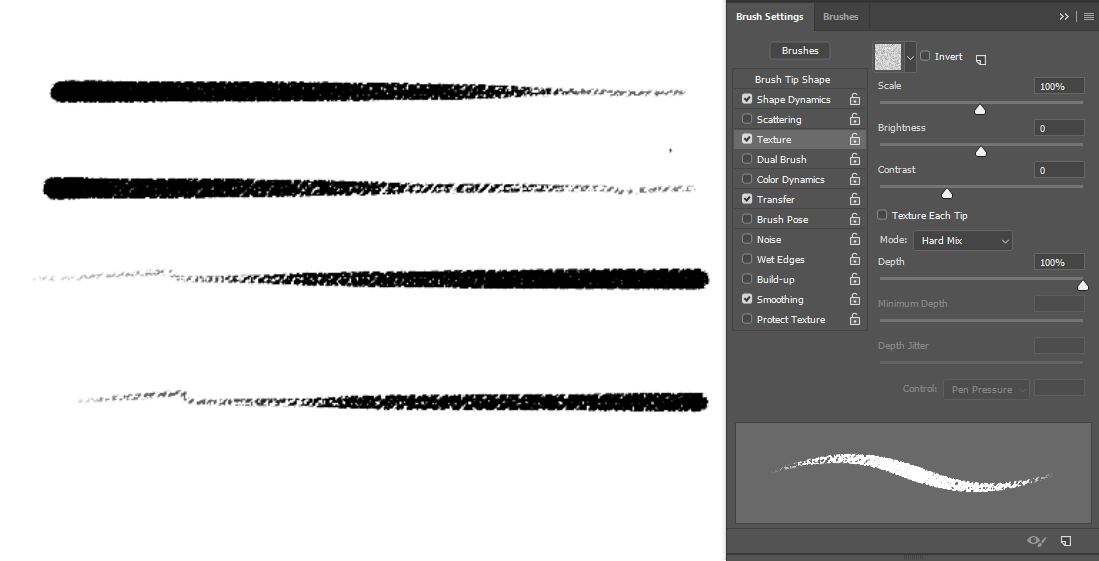
Could you please take a brush in Photoshop and cover a whole rectangle? In both modes, please. And it might be useful if you disable Depth jitter in the “Texture each tip” because that’s how it’s set up in the picture with “Texture each tip” disabled. And then maybe another two pictures with Depth on 50% to compare? (So four or five pictures, all with brush stroke covering a whole rectangle). A picture of the texture might help, too.
1 Like
I think this demonstrate quite well the difference between the Depth from PS and Strength from Krita. My guess is that by disabling “Texture each tip” Ps applied a texture depth randomly to the whole stroke (Because Depth Jitter was at max), and this show what happens with low Depth values.
The texture is barely applied and only the brush is shown, as ilustrated in the Phabricator page:
At least is what I think is happening. If I’m wrong @Deif_Lou will correct me I’m sure ![]()
1 Like
@Daishishi I almost cannot make sense of that task or the bug report it links. It seems people is confused with those concepts.
In the report it is said:
Textures are always multiplied or subtracted from a brush stroke. It gives a stencil-like effect that’s useful in some cases, but it makes it hard to give the brush a natural look. The main problem is that the texture gets applied evenly to the stroke, so the cutoff doesn’t solve the problem, even though it helps to improve results.
That’s why I’d like to suggest an new option to apply the texture to the brush dab instead of the strokes. This would allow the user to enrich the brush tip in a sense, and to create powerful combinations.
I expect it would also make it easier to use textures with the blending brushes, as it would make the stroke more opaque overall with the same spacing (with dabs stacking on top of one another). Currently, it’s hard to get good results with textures and the blending engine.
Here’s a picture to compare the same texture applied to the stroke and to each dab, with the multiply mode: http://i.imgur.com/BxvoORz.png
The most interesting part is how the texture shows through as you release the pressure and the flow gets lower. It’s similar to how the grain of the paper appears as you finish strokes.
I think that because of using subtract or multiply the result maybe looked more like the “texture each stroke” and that confused them. And reading this:
[…] it would make the stroke more opaque overall with the same spacing (with dabs stacking on top of one another) […]
I think that what they really wanted is the other texturing modes that achieve better coverage.
But who knows.
- Using a Soft round brush, no opacity/flow enabled, brush size = 83 px, spacing = 13%
-
Settings 1 :
-
Settings 2:
-
Settings 3:
-
Settings 4:

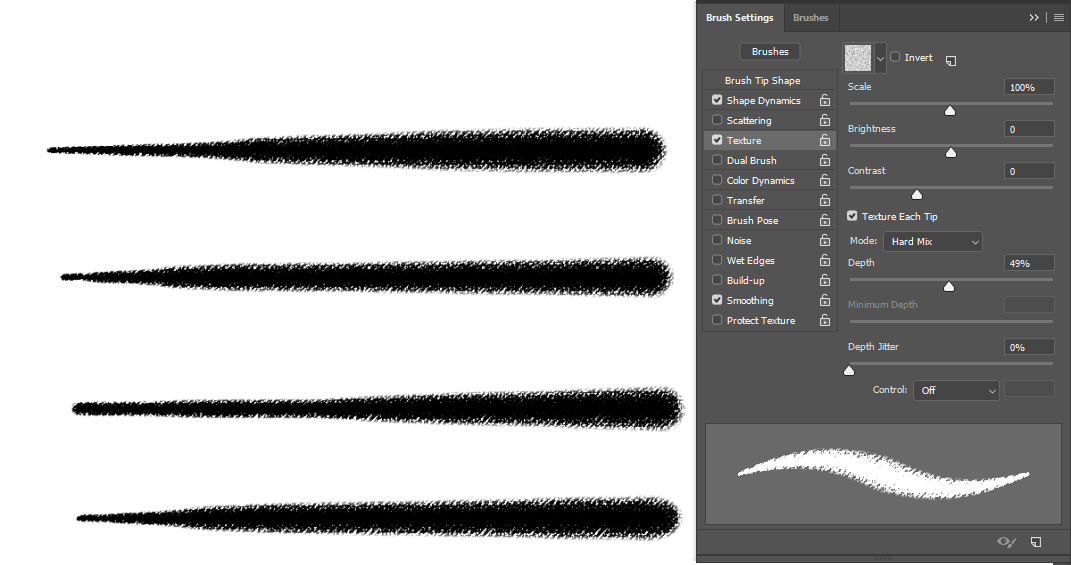
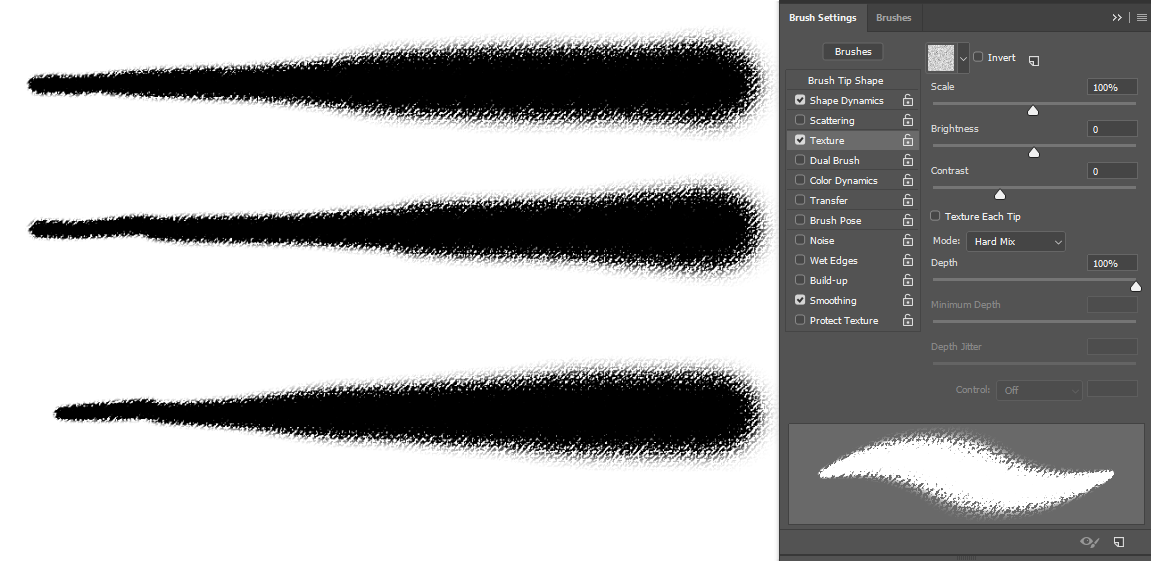
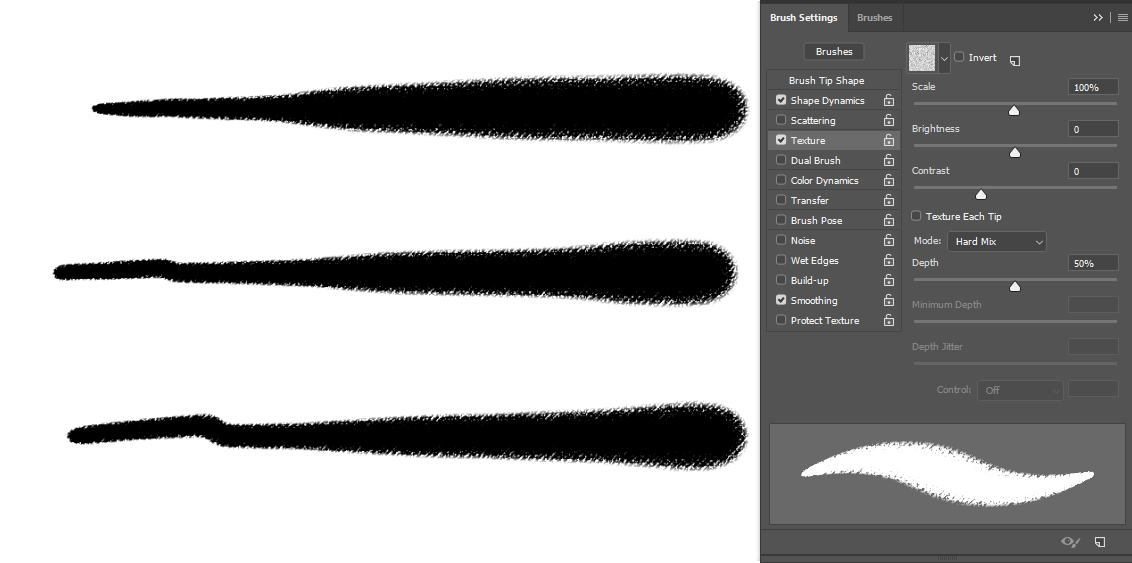
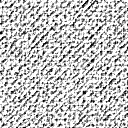
Image 3, texture for brush pattern :
- I have noticed :
If the brush size is small enough, you get the following results with the following settings :
Brush size = 14px, hard round brush with 100% hardness, spacing = 13%
-
Settings 1 :
Look carefully how the texture noise appears when the brush size is small enough. -
Settings 2 :
-
Settings 3 :
-
Settings 4 :

And then this is what can happen when opacity/flow is active:
- Hard round brush(100% hardness), brush size = 14px, opacity by pressure, spacing = 13%
-
Settings 1 :
-
Settings 2 :
-
Settings 3 :
-
Settings 4 :
Can be odd at some point. I don’t know.
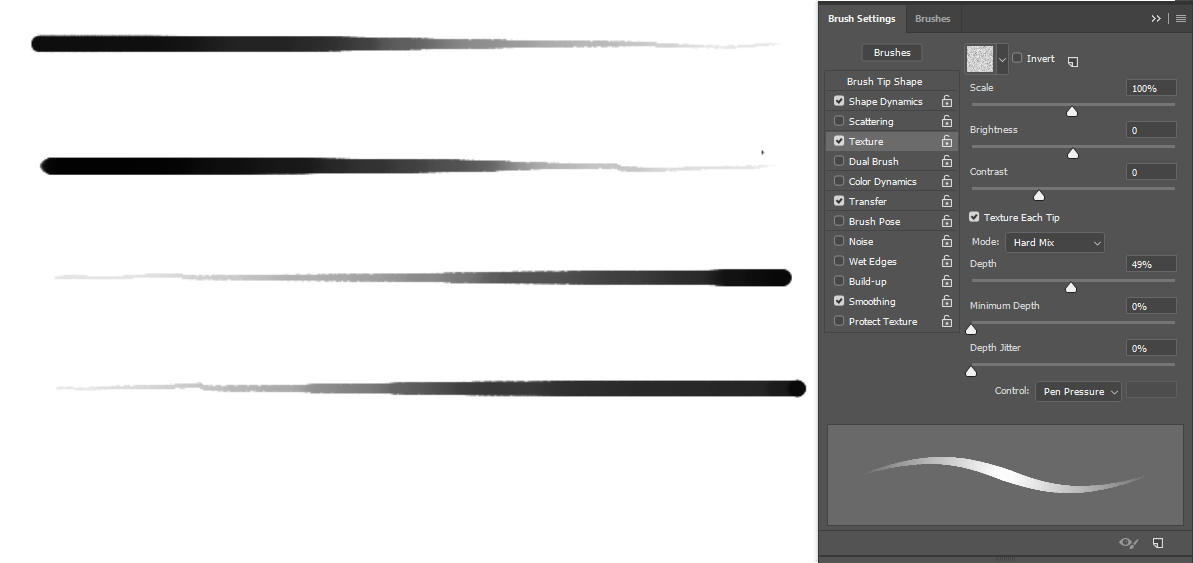
I was also confused, so I did some tests:
This sentence is true, what krita doesn’t have is ‘Texture each stroke’.
The difference between turning ‘Texture each tip’ on and off is like ‘build up’ and ‘wash’.
I think maybe the “depth” (density inCSP) option is what is needed.
In ps and csp, lowering the “depth” makes the dabs translucent, while under the action of ‘Texture each tip’ the strokes become opaque.
Maybe there is a way to combine them, like (dabstrength) + (texturedepth)? One scales btush tip, the other one scales the texture, maybe we can have both?
4 Likes
@TheTwo @tiar @Deif_Lou @Daishishi
If Krita is always in “texture application per tip” mode, I think with the Hard Mix mode and when there’s no opacity/flow, the strokes aren’t supposed to be fully transparent and invisible if the strength is completely null(0%),
And maybe it should also be the case for a few other blending modes…
Look at what I get when the strength is completely null :

Because of it, I’m realizing that strength = 0% is not the same as when the strength modifier is ticked off. Please is this normal ?
Krita also currently doesn’t give an option to switch “application of texture per tip” on or off.
But that’s good to know
Yeah, I’m just confused a bit about how Krita computes strength to work with pattern’s blending modes, and can’t think of the best outcome.
Seems like other than Texture Application Per Tip, the strength itself can have different computation modes but they’re not available as options in Krita… O_O
2 Likes
You are confused because you expect it to behave like photoshop. Please read the phabricator task that @Daishishi linked to see the difference.
Maybe we should implement the photoshop way also, and add a mode option to switch between kritra style and ps style.
1 Like
Yes, it is normal. Refer to this image I post again:
Let me try and explain in more detail. If you don’t understand just say so and I will try to explain differently.
Referencing the image above. The Strength goes from 0 to 100.
- It is photoshop and CSP. Look how at zero strength the texture is not visible, but you have a round stroke at the beginning.
- It is Krita. At zero strength the brush disappear, it is intended this way, but the texture is more prominent throughout the stroke. This means zero strength is different than turning off the Texture
- Theoretical It is a way that could be possible to implement texture to a stroke. Is not implemented in any mode.
When making the new modes the second option was chosen for most (if not all) blend modes. So the stroke disappear in most blends mode if Zero Strength. If you want to visually see the difference this makes go to the Phabricator page.
Hello Deif,
I was always in favor of this, just because it low key double the texture capabilities of krita. Also it help users of other programs to replicate certain brushes.
Cheers
6 Likes
Oh, I understand a little better now.
Wow ! This is mind blowing! :o
And I’m also in favor of this new implementation coming in the future.
Along with ticking “texture per tip” on or off.
Very informative, thank you all for this discussion.
I was painfully trying to replicate a feeling I had from Photoshop brushes using the texture blending modes and was wondering why it’s not exactly the same, this explains everything.
1 Like
This would be the same as Texture per Stroke, which is a bigger request and Deif didn’t quite get how to tackle this issue at the time.
@Deif_Lou the difficulty in Texture per Stroke is a mathematical or a coding problem (maybe both)? I thinking of trying to solving this issue, who knows, may be that I could success in this endeavor.
Cheers.
3 Likes
Texturing each tip is relatively straightforward. At some point in the stroke generation pipeline a new dab is produced and the texture is applied to it. Very localized in terms of code. Each dab is textured once.
Texturing the whole stroke needs a totally different approach. My intuition is that the untextured stroke needs to be maintained (think of a stroke as an image, “paint device” in krita code, with the current dabs painted on it). Then, every time a dab is added to it, a new stroke is made by copying the current untextured one and it is textured, and that new stroke is what is displayed when drawing and at the end painted on the layer. If a new dab needs to be added to the stroke, then this textured stroke is discarded and the dab is painted on the untextured stroke, which is then copied and the copy textured and so on. The process repeats until the user stops painting, which is when the textured stroke is painted on the layer.
That’s what I think it should do in general, but it is better ask dmitry in the irc channel.
Stroke painting is multithreaded, so you can imagine that the process I described will not look so straightforward in code and probably the changes will be more scattered.
Edit:
Then, there are possible optimizations like applying the process only on the part of the stroke that was updated (where the last dab was painted). The texturing is a pixel-wise operation so I think this optimization is easy and a must. It would improve performance a lot.
I would say the difficulty is in how to structure everything. It is not mathematical, since the code for the actual texturing of the stroke would be pretty much the same as in the texture each dab.
Edit 2:
Also things like dual brush may get in the way in texture per stroke, which you don’t have to even think about in the case of texturing a single dab.
5 Likes
Knowledge really is something. Not gonna lie. I’m wondering how you guys even manage to code stuff like this. For instance, what would you say if I asked how long it took you to be at your current level in graphic programming, @Deif_Lou ? And what resources helped you along the way ?
Well, I’m trained as an artist. I have an university degree in fine arts. So, I became interested in computer science in my late teen years as a hobby just because I was curious how photoshop, games, and computer graphics and image processing worked under the hood. And through the years I jusk keep learning by my own. I’m almost 40 now so maybe 20 years of that took me to get to my current level. As I said, just as a hobby, nothing near full time. If you study computer science or take it more seriously I imagine you can learn faster. But always my interest is computer graphics, image processing and a bit of computer vision. Other areas I don’t really spend time learning unless they are related in some way to the former. As I learn by my own, the resources I use are all scattered through the web. When I’m interested on something I just search the web and try to find papers related to the subject.
2 Likes
Awesomeness.