Honestly I doubt that this is intended. But I felt that I had to post this in the forum first before writing a bug report, since it touches one of the core features.
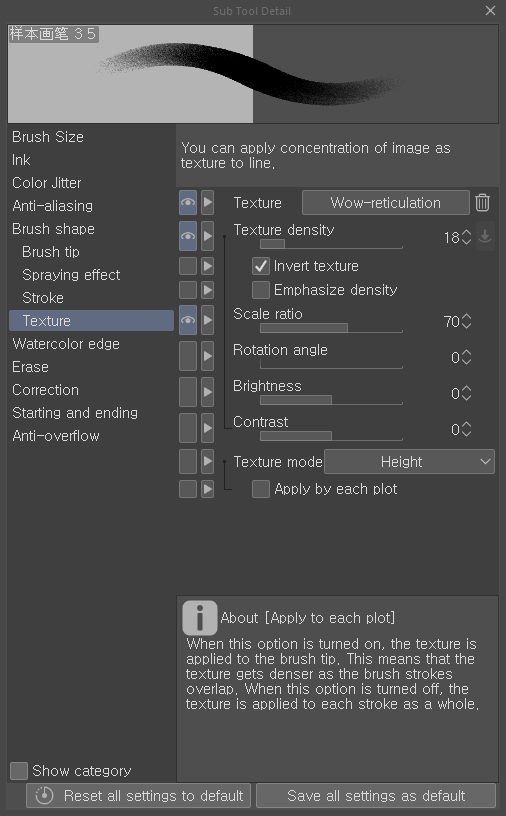
As far as I’ve observed, getting any texture makes the brush-tip-overlapping(I couldn’t come up with a better word, sorry) behave like it’s in flow mode.
Wouldn’t it be better to make the brush not being affected by texture like that? This way(described on the right side in the picture) would be far more easy for users to understand and I believe it would also benefit the brush creation with texture.
P.S
It seems to me that the ‘flow mode behaviour’ is actually better when it’s achieved with texture engine instead of the flow option itself. It’s very subtle so it’s hard to provide a demo, but it’s more comfortable to blend colors and values. Could you maybe look into the algorithm to see if it behaves exactly the same? Maybe it’s just me, although I don’t think so.
In the phabricator task I show 3 different ways that the strength could be applied. The second one was chosen where the strength is applyied to the dab and then that is mixed with the texture.
In your image I don’t see the texture anywhere, so it is kind of confussing.
If your texture is black (transparent since it acts as a mask) then the effect is that the dab is multiplied with the strength (in most modes, but not all) which is similar as using flow. But that is like not using a texture.
If you use a texture with different gray values then you can see the difference by using flow with pen settings enabled and disabling the pen settings in the texture strength or by disabling pen settings in flow and enabling them in the texture strength.
Maybe I shoulda wrote: using ‘texture engine’, instead of ‘texture’ I guess. I used plain texture to show the behaviour.
I think this is probably related to this post. And I think now I understand it may be impossible to separate texture behaviour like I originally suggested.
I’m not sure you will make it so that both ‘per stroke’ ‘per tip’ are avaliable in the texture engine in the future, but it would be the ultimate solution to all these including emulating other brushes used in other programs.
In the original task I was going to include that feature as well but in the end I thought it was too much. But it is in my todo list. Hopefully ready for 5.0.
@acc4
I know it is the third post I talk about this, so at this point it is more likely that I’m wrong, and too narrow minded to understand others request. If so please enlighten me.
However for me Krita already has the ability to apply texture per stroke. Originally Krita had only this capability, no? As implicit on this David Revoy blog post of the mockup of texture brush, and later implementation on Krita 2.5.
Texture per Stroke. To achieve this do:
Activate pattern
On the strength parameter, turn OFFEnable Pen Settings
Set a strength to apply a desired grain texture to the whole stroke
I know that the result is a stroke with a constant and uniform texture. Visually it is equal to disabling Texture Each Tip from Photoshop, as I demonstrate here.
Deif_Lou you said it was in your plan to include this before. There is some other behavior or visual result that differs from the method above?
Sorry if I’m being stubborn with this, just want to know if I’m wrong when thinking about texture per stroke.
The difference would be very visible when using opacity or flow. If the texture is applied per dab then it only takes into account the alpha values of the tip and then the dab is rendered, possibly semi-transparently. If the texture is applied per stroke, first all the dabs are rendered (possibly with different opacity/flow values) and then the texture is applyed to that, taking into account the dabs/stroke modified by the opacity/flow.
Although I’m not sure the result will be the same. There’s still the possibility that the height mode in CSP is too different. It would be great if you could try the gradient test.
Basically you have a horizontal gradient in one image and a vertical one in another, both from black to white. Then those are combined with a blending mode. If the images are 256x256px and the gradients contain all the values from 0 to 255 then the result contains all the possible combinations of values for the mode.
In this case you would have to set the first image as a brush tip and the second as texture. Disable any other variable feature (opacity, flow, size, etc,) and set the brush size to 256. Then you select the height mode for texturing and make a single mark in the canvas, adjusted to the top left corner and with the mouse.
If I may chime in, the reason why the texture strength seemingly affect the flow of the brush stroke is because texture strength behaves a bit differently than those in clip studio in photoshop.
Krita’s texture strength supposedly equivalent to texture density in clip studio and depth in photoshop. However, texture density and depth of both programs behave differently than that of Krita since the lower they are the more ‘opaque’ the brush is. In @Deif_Lou 's linked phabricator task, I believe the first strength behavior is the one used in Clip’s and Photoshop’s texture density and depth.(at least photoshop is mentioned to have that behavior). Since Krita uses the second option, where the dab disappears when strength is 0, its effects is similar to having flow enabled.
I think this behavior was discussed in another thread to be included as an choice that can be toggled for texture strength behavior in Krita. This behavior was agreed as a potential feature since it can mimic certain pastel behavior that the harder you press, the less the texture of the paper will be visible.
It might not be related to the texture per tip discussion but I think this can be an explanation to @acc4 's initial question.
Yes, the strength (depth) in krita scales the brush tip and in PS it scales the texture.
Although In PS the classic modes behave differently, the height modes work like in krita, the strength affects the brush tip in the formula. But I think PS does some tweaks to make look things better with brushes in some places, like using a soft Hard Mix, the way the dual brush is mixed (discussed in another thread), making the height mode different in essence than the others, and maybe some more. I don’t know.
I can’t say how CSP works, never played with it.
@Deif_Lou
Isn’t it that the first behavior C2CL indicated is the ‘texture per stroke’ and the second behavior is the ‘texture per tip’? Or is it an another seperate factor of how the texture engine is designed? Sorry for being kinda confused between 2 concepts.
No, you can see the difference in the task I made (⚓ T14345 New texture blending modes for the brushes) The photoshop way of using the strength is like if you have 2 layers, the bottom one is the dab and the top one is the texture and then you choose a blending mode and use the opacity slider on it to go make it more transparent or opaque. But it still applies the texture per dab. And the height modes behave the same in krita and ps, they are the other blend modes that work like that.
Are you using the “texture per dab” option?
The first one is related to whether the texture is applied per dab or per stroke. This is a good explanation for texture per tip in this link, just scroll down to the ‘texture each tip’ sub heading:Photoshop Brushes - Texture Options
The second one was the strength of the texture, in Krita it is called depth and in photoshop it is called depth.(There is explanation for depth on the same article.)
What I was talking about was the second factor, which is texture strength in krita, known as depth in photoshop and texture density in csp. I think the texture strength was the explanation for your main question in this thread.
On the other hand the “texture each tip/stroke” is more related to this post and this post.
Actually most custom photoshop brushes have texture each tip enabled for painting since it is easier to control the opaqueness of the brush, although there should be option to switch between the two as some people may need the texture each stroke feature.
I think the same thing regarding texture strength in that there should be option to toggle between two modes mentioned in the phabricator. The two options can be added later down the line with feedback from the community but so far as for the blend modes, I personally enjoy painting with them as they allow more chalky and pastel behaviour. Thank you @Deif_Lou for the blend modes,really hoping that it will be merged soon along with the new smudge engine.
I think it becomes easier to differentiate texture per stroke/dab and strength/depth over blend modes simplifying the steps of each one. If I make some mistake I’m sure @Deif_Lou or @C2CL can correct me.
First Texture per stroke vs per dab
This is related to how the order of operation occurs in the formula of each blend mode. Each blend mode can be oversimplified in 2 steps.
On Texture per Dab
Blend the brush tip and texture. Resulting in a textured dab.
Apply opacity and/or flow to the textured dab.
On Texture per Stroke
Apply the flow and/or opacity to the brush tip. Resulting in modified dab.
Blend the modified dab and texture.
Second, Krita/CSP vs Photoshop texture’s strength/depth
Again, this is related on how the formula is calculated, and how the strength is incorporated in it.
On Krita
The formula is simplified as: (dab*strength) + texture
This means that it is the Brush Tip that gets more or less opaque with, say, pen pressure. The texture remains untouched regardless of any option changed. This is way when you have a texture with ‘white spots’ they will be present even with high strength values. Because white texture always remains white.
On Photoshop
The formula is: dab + (texture*strength)
Here the texture is the one being modified. The result is a very opaque texture with high pen pressure (for example), and a almost transparent texture with low pressure. I think a good show of this is your last image on this post @acc4. The texture get less opaque and the whites ‘less white’, which result in the Brush tip showing through. The result are spots that were white becoming grays.
Again, correct me if wrong.
Other thing, wouldn’t be good posting the last acc4’s image that I reference on the main topic? So people visually see how changing the Depth/strength on the formula interact with the resulting stroke.
Edit1: At first I made the assumption Photoshop had the same Texture-to-strength relationship as Krita, and CSP had it differently. This also lead me to make a wrong statement, which is now written in the crossed text. Edited my post to correct this.
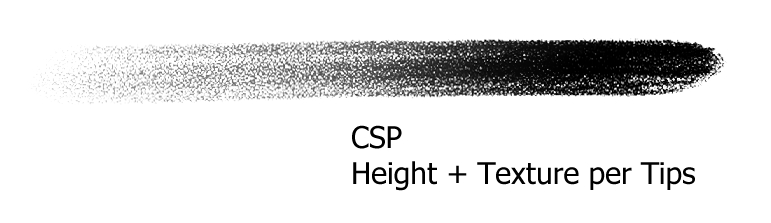
Sorry for not speaking with detailed technicalities, but in that very case in the given explanations, I think the original brush in this thread can be pertty perfectly achieved by using Texture Per Stroke + Height mode in Krita. Because those by definition seem to be used for this brush in CSP. (Height mode in CSP also seem using a similar fomula to Krita, which means the dab dissapears when the parameter level goes down.)
And I was able to reproduce the same texture behaviour to Krita in CSP by using Height + Texture Per Tips(done by checking ‘Apply by each plot’ in CSP)
At this point I think I’m not gonna have anything left to say after Texture Per Stroke is implemented because of 2 things :
1 The way Strength Depth is applied doesn’t seem to be 1 general rule in the engine that determines every modes, but varies from mode to mode. (It seemed like it in your phabricator post, correct me if I’m wrong.)
2 My purpose was to emulate the specific feeling of the brush I wanted.
@Daishishi
As for the picture, sure it’s ok for any usage but I’m still not sure my version of simplified texture behaviour descriptions are correctly done… Anyway here’s a new one in case you need.
The “texture per dab” is correct, The “texture per stroke” is almost correct. In the second point, if you blend the dab and the texture you are still applying the texture per dab.
Maybe it’s better to imagine that there in an intermediate stroke image where the dabs are painted. Like another layer on top of the current layer. When one is painting that layer is shown on top of the current layer and when one stops painting (a stroke is finished) it is merged with the current layer. This is a simplification as well, but helps visualizing the process. Then:
If apply texture per dab is used:
create a dab image using the pen tip and modifying it (size, rotation, color options, etc.)
create the texture image modifying it with the scale, brightness and so on
mix the dab with the texture image using the selected blend mode and strength
paint the dab in the “stroke image” (possibly with different rules depending on opacity, flow, paint mode, etc.)
repeat steps 1 to 4 while a stroke is being painted. That intermediate stroke image is also painted on canvas to see the painting progress in real time, but it is not merged yet with the current layer.
when the stroke is finished, blend the “stroke image” with the current layer.
If apply texture per stroke is used (this is my proposal):
create a dab image using the pen tip and modifying it (size, rotation, color options, etc.)
paint the dab in the “stroke image” (possibly with different rules depending on opacity, flow, paint mode, etc.)
create the texture image modifying it with the scale, brightness and so on
mix the stroke image with the texture image using the selected blend mode and strength. A new intermediate “textured stroke image” may be needed, since we’ll have to paint new dabs in the “untextured stroke image”, but we also need a textured version to show while painting.
repeat steps 1 to 4 while a stroke is being painted
when the stroke is finished, blend the “textured stroke image” with the current layer.
I think that’s how it works, but tomorrow I’ll check with Dmitry.
I also think the same, but this “texture per stroke” requires more drastic changes to the system than the adding of new modes (since there were already other modes, the main machinery was already there). As I explained earlier, ir may need a new intermediate paint device (the “textured stroke image”), so things like performance need to be carefully studied.
@acc4 You can try using the halftone filter to emulate the texture per stroke mode and see if it’s similar, although the mode used by it to apply the texture is a variant of overlay. Paint black on white with different opacities and put the halftone with the pattern generator and your texture as a filter mask on the layer. Just as an experiment.