Sorry if this has been asked before but I cannot find this topic anywhere.
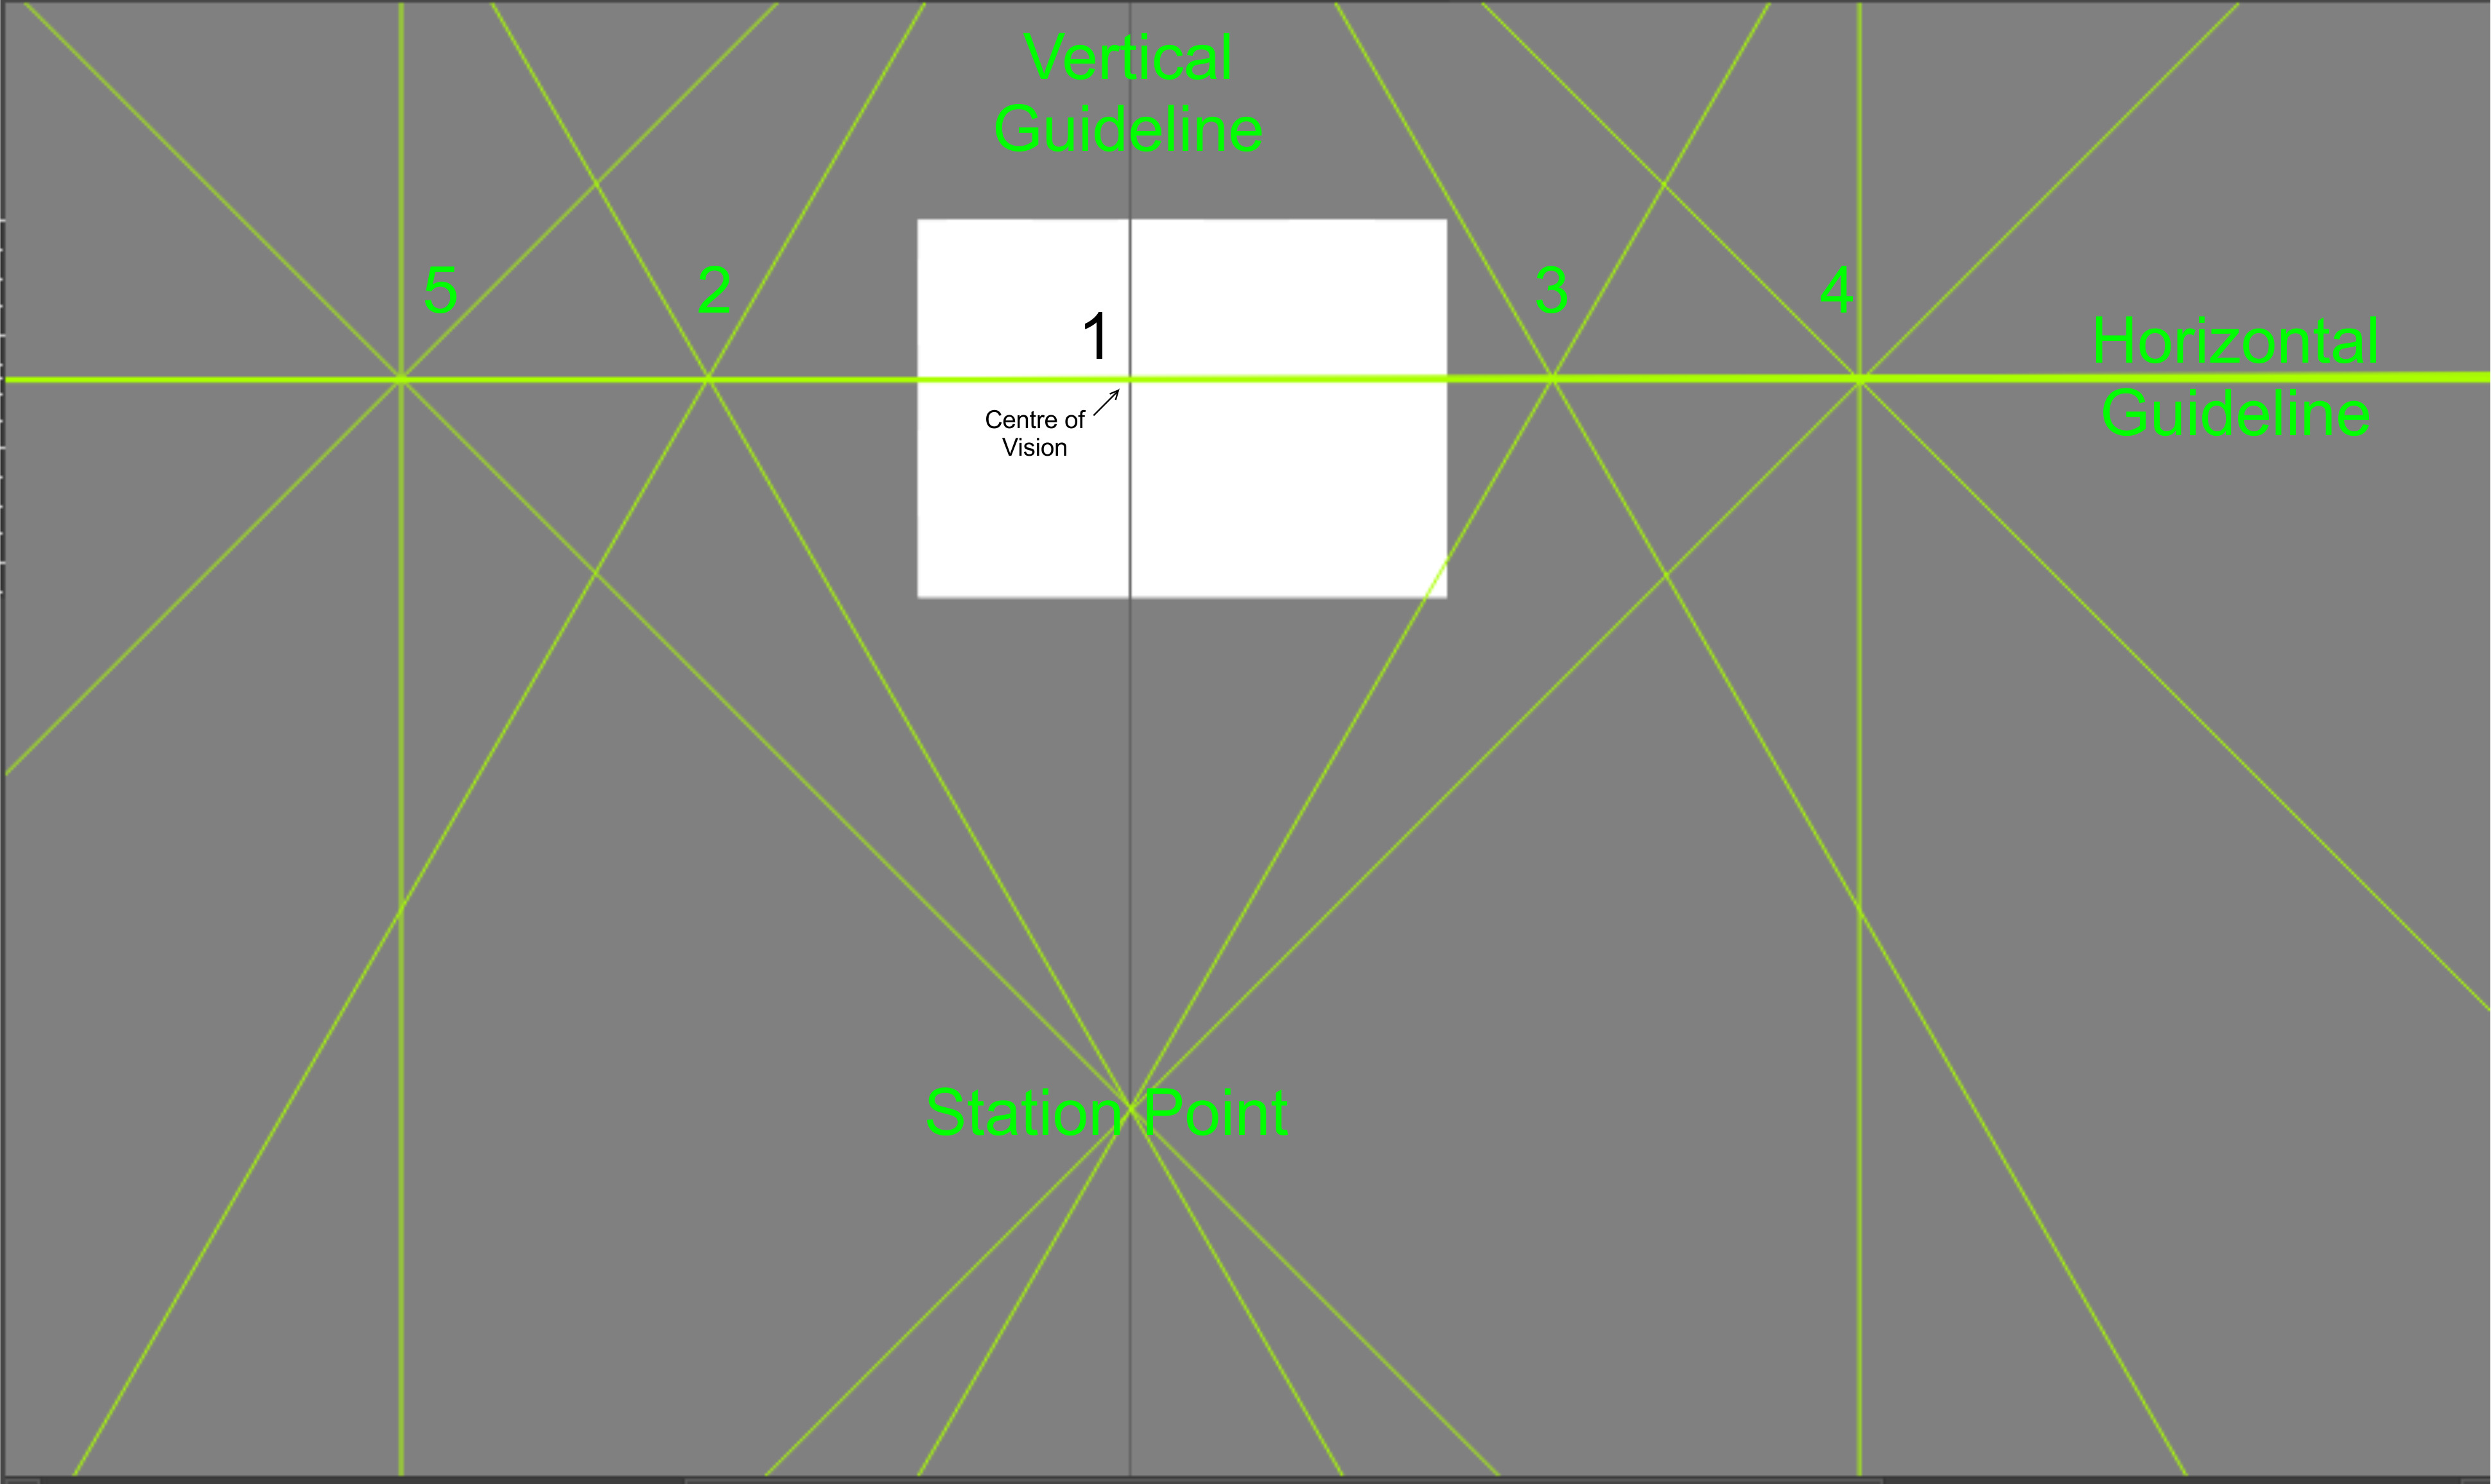
I wanted to create a perspective grid using a 60 degree cone of vision and two 45 degree vanishing points. The way I have gone about it is very complicated but the only way I can think of to achieve it.
I stared withan A4 canvas then
Found centre by drawing x across corners.
Centred ellipse assistant around centre.
Downloaded a protractor image from the web
Took infinite ruler and used protractor to find 30 degrees from perpendicular.
Did the same for the opposite direction.
Lined these up with the diameter of the ellipse to find station point.
Repeated steps 4 and 5 to find 45 degrees.
Placed these at station point.
Got a guideline to mark Horizon
Snapped vanishing point assistants to guideline and aligned them with 45 degree ruler
It works, but is there an easier way? I’m usually missing something obvious (besides a brain!)
Hmmm, this is obviously a much rarer state of affairs than I thought.
It must be me, whenever I start to learn anything people always say “Nobody’s asked that before!”
For anybody who is interested I have come up with a better idea and as usual it is ridiculously simple.
Use a massive canvas and set up the vanishing points then resize the canvas so that it fits in the cone of vision. This way you can accurately place everything as it will be on the canvas and all construction lines will be visible.
I have been a longtime Corel Draw and Photo Paint user.
I used to do my drawing and colouring in Photo Paint and arrange it in Draw because you can use the screen beyond the canvas. This made things much easier as every layer could be arranged around the canvas and everything was in view.
I understand why this isn’t possible with Krita because you can only use the canvas area in Photo Paint. It must be to do with memory capacity.
Hope this may have helped somebody.
Thanks
I believe that @tiar is involved with Painting Assistants and may be able to offer comment.
Krita can have off-canvas content and the layers are infinite in extent but you can only see that part of the layer the canvas is over. The Move Tool, as an example, detects and operates on off-canvas content.
Off-canvas content is used for sliding background content and other types of content in animations.
Your method of Resizing the canvas to create what will eventually become off-canvas content is a valid and useful method.
There have been thoughts about making off-canvas content visible in some way but it’s apparently a very difficult thing to do.
Thank you also for the thoughts about my question. I have been struggling to understand perspective for a long time now. As I mentioned in the last post, I always get caught up with details and then get sidetracked. The most common one being “Where should I place the station point?” and being unable to find an answer.
I recently stumbled across Drawsh Studio on YouTube. The tutorials there are first class and have chased the perspective demons away for the most part. Even there, though, it said “Place the station point…” without saying where or why.
Fortunately, Josh, who made the video was kind enought to respond and say it is not a fixed position.
Once I understood that I finally managed to grasp what the 60 degree cone of vision was all about and the benefit of placing vanishing points at 45 degrees, even in one point perspective.
And that was when I started struggling to construct it in Krita.
It would appear that not many people use a station point. I have watched videos from a wide range of people and the station point doesn’t get a mention.
I can’t complain about this struggle though, as Krita is excellent in all other areas and I think I have found a workaround.
I have been playing around with the vanishing point assistant and a vertical guideline to represent the centre of vision.
As it is easy to find 45 degrees when the density is set at 15 degrees, I have been lining the VPs up to dissect at the guideline. The trouble is the results are distorted and my tiny mind cannot fathom why.
This perspective business is like a greased piglet, you think you’ve got it then you realise you really haven’t.
Thanks again for the thoughts, I think I’ll quit while I’m ahead and stick with the enlarged canvas method.
It isn’t obvious but the Two Point Assistant actually already shows a station point. It’s where the grid lines appear to cross at exact visual right angles.
You can see them more clearly when rotating the VPs (holding Ctrl and dragging any one of the VPs) because the entire grid will appear to rotate around those points.
(I hope the video is visible on your browser. My Firefox is complaining it’s not a supported video format for some reason, but it is just an mp4)
I should have mentioned that I am using version 4 so do not have the two point assistant.
I have quite an old computer so I am sticking with 4 for the time being as it works well and I can use Corel at the same time.
However, after my last post and the thoughts of the lining up the ‘rays’ on the vanishing point tool, I woke up this morning with the answer.
Again it is so simple that is should have been obvious.
Then again, I may have got it completely wrong, if so I’m sure someone will put me right.
Decide on a centre of vision and horizon line and mark them with a vertical and horizontal guide line.
Get a Vanishing Point Assistant (VPA) and set the density to 60 degrees so the only diagonal ray is the 60 degree line of the cone of vision. Snap it to the horizontal guideline (HG) and move it so that it is away from the main body of the canvas.
Get a second VPA, density 60 degrees. Snap to the HG and move it along until the diagonal ray dissects the vertical guideline and the diagonal of the first VPA. This is the station point (SP)
Get a third VPA and set density to 45 degrees. Snap to the HG and move it right until it dissects the SP.
Repeat step 4 for the opposite side but move it left.
Your understanding is increasing day by day
When you’re ready, it would be interesting and useful to see artwork you make using the Cone of Vision method. Maybe even a tutorial topic one day?
In truth it’s taken me years to become an overnight success at this!
I read somewhere that after the age of 28 you cannot learn perspective, which seemed odd but was strangely prescient. I am getting to grips with it now but I’m not sure I would trust myself to attempt to explain it to anybody else.
Just before Christmas I was talking to a Canadian lady via the YouTube comments section. She was struggling to learn piano and had been told it was difficult after a certain age. I mentioned my perspective struggles and it turned out she was a retired head of a design company.
She said when she went to art school they only ever taught perspective to architects. I didn’t question her about it she was obviously more qualified than me to know what she was talking about but all of my difficulties stem from putting a composition together.
I can draw individual things without any difficulty but placing them into a scene convincingly is a real trial.
I can’t really understand how I can do it without at least a rudimentary grasp of perspective.
She did help me in one respect though, and made me realise I had been obsessing about it a bit too much. I was trying to learn every aspect of perspective. It was a bit like having to have an expert knowledge of internal combustion before getting behind the wheel of a car.
If the work ever gets finished I’ll certainly consider putting it on display here.
I guess with perspective it’s tricky cause you have to learn and understand it (at least the basics) and then kind of unlearn it again to not think about It to much when drawing.
It has to become a feeling what looks right and not if it’s actually correct. Kim Jung GI is an amazing example, his pictures look amazing but when draw the lines to the vanishing points; he is off a lot of times. Don’t be too hard on yourself.
If you’re concerned about technical accuracy of painted perspective, a technique that some people use is to create a 3D scene in Blender then take a simple screenshot or a proper positioned camera rendering (with adjustable FoV) of the scene to use as a base/guide for a painting.
Learning to use Blender is not a trivial thing but it’s easy enough to learn the basics and you can quickly make and arrange rectangular blocks, spheres, pyramids then effectively walk around and through the arrangement and see what it looks like.
Is this what you’re trying to do a kind of perspective template? If so, an alternative way is to do it in Inkscape and save the file so it can be exported to Krita. You only need to take two precautions to make it work: 1) The Inkscape file must not contain any layers; 2) The Inkscape file must be saved in Plain svg format (not normal Inkscape svg).
You mentioned enlarging the page view… it is also possible to resize the canvas by going to Image > Resize Canvas: there you can resize the page in pixels or in percentages, among other options.
Thank you for that, it is great advice.
I have never had any art tuition but I am extremely fortunate that I have always been able to draw. That is both a blessing and a curse, because you know you can do it but sometimes you can’t meet your own standards.
I have often abandoned something because it wasn’t right but then find it again months later and can’t remember what I thought was wrong with it.
“What looks right and not if it is actually correct” is the perfect description for that. Another thought I’ve had regarding perspective, is that sometimes it just isn’t right in any case.
It can be outside the cone of vision and look distorted or in the case large objects such as of buildings just look off.
I was watching a Stephen Travers vidoe where he was showing common perspective mistakes and he drew a building with a kind of roof extension. When he had corrected it it looked worse to me than the incorrect drawing, even though he had proved it was right.
This bugged me for a while until it occurred to me that we do not look at large objects the same way we look at small items, such as a box or cup. Our binocular vision and ability to move around means that we are more likely to see a building from more angles.
Our modern habit of looking at photos has probably made us more accepting of odd looking perspective. Often when I have edited a photo I haven’t even noticed how distorted the 24mm lens has made a building and it is a shock when I have put guidelines up. Yet if I made a drawing with the same lines I would immediately think it looked wrong.
Thank you for taking the time to reassure me.
Thank you for this advice. This is timely because I watched a perspective hacks video by David Finch this morning. I had seen some of his work on YouTube and thought how great his perspective and figure work was and I couldn’t fathom how he did it. These were imaginary offices and futuristic spaces, after all.
Then I found out that I have been incredibly naive, one of the great pitfalls of the self taught artist. He showed how he uses Sketchup and Daz 3D to capture poses and rooms.
These are things I have shied away from because I thought they were cheating. Now I’m not so sure because there is still a lot of artistry in what David Finch is doing. He will use two reference photos and take the scene and conmposition from one but introduce the perspective of the other, creating something new and unique.
I also read recently James Gurney’s book Imaginative Realism - how to paint what doesn’t exist. I had found his realistic works in Dinotopia hugely impressive and wondered how he had acheived them.
It turns out that imaginative realism was the perfect title for his book. The dinosaurs are imaginary but what he paints is real. He makes maquettes of the creatures and then physically builds the scene he wants to paint. He even gets models to wear the exact same clothes he wants in the picture. I’ll be honest, I was quite shocked for a start off, but I have come around to his way of thinking and the ends definitely justify the means in his case.
I did attempt to learn Blender because I have drawn some cartoon animals and I thought it may help me see them from different angles but I didn’t have a stylus at the time and I have since learnt that using a mouse to sculpt is not recommended. I might give it another try.
Your suggestion of walking around the and through the arrangement is a lovely idea
Hi Guerreiro
Thanks for the reply. I wanted to be able to construct a perspective grid so I could have a more accurate idea of the depth of my scenes. With the 45 degree vanishing points I can create squares and cubes. I am new to perspective drawing so it will be easier if I can envisege the floor as if it were tiled.
Your grids will be very useful for composition though, they are very nicely drawn and your artwork is very impressive.
Thanks for the tips about the canvas. There is so much to Krita that I always feel I am only scratching the surface of what it can do.
Thanks again
PS to all posters:
While I was typing this a side bar came up to tell me that I should consider replying to all people at once as it is difficult to read multiple entries.
I am new to this forum so please excuse my breach of etiquette. I thought my thread would appear below the reply I was responding to and now see that is not the case.
Please accept my apologies because it all looks a bit of a jumble now.
We will survive this
And it may be necessary to split very large posts anyway, because there is a limit of characters per post.
But to tell you also how to structure posts with control characters, put at the beginning of a line, after a blank line three consecutive dashes — (minus sign) to insert a dividing line in the post.