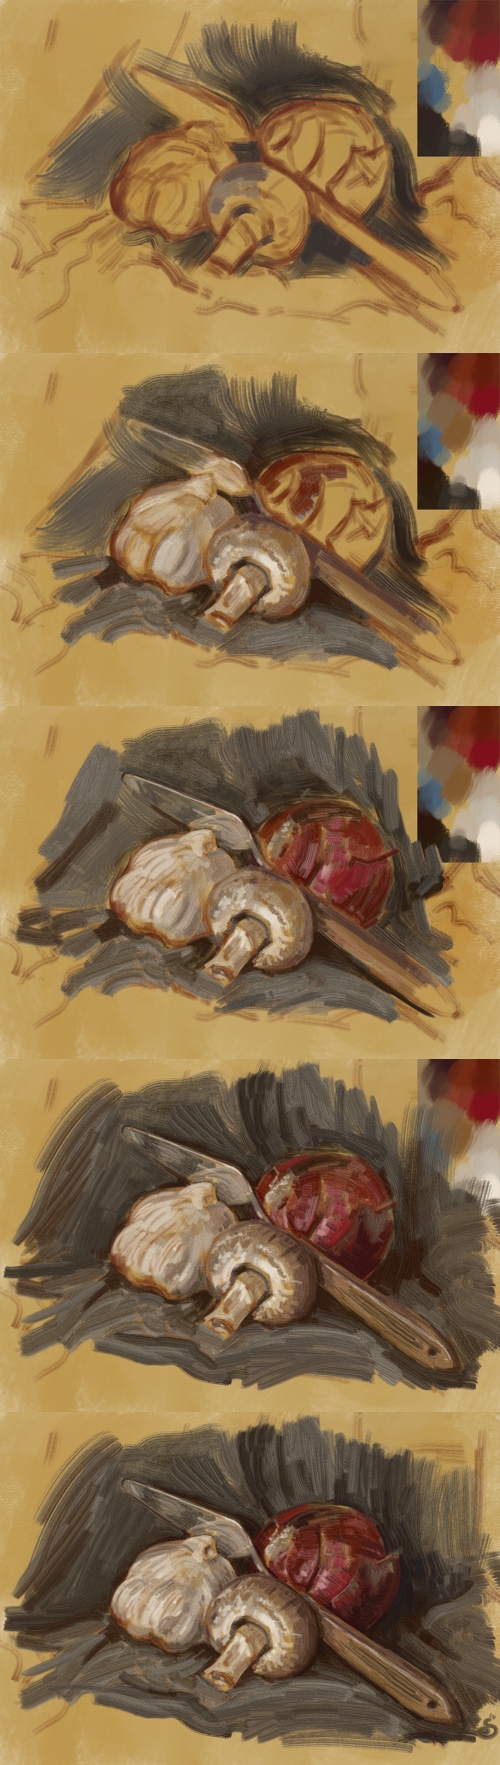
I wanted to do something to demonstrate what I’ve been saying about the clone brush in another thread.
I was also keen to try the technique in combination with the layered impasto effect I posted about a couple of weeks ago. I didn’t have much to demonstrate the effect before as I’ve never actually used it for a painting.
I’m not sure this qualifies as a full painting either - but I think it’s a better showcase for the effect at least.
Aside from that - I also tried to keep my process similar to working with real paint. So I did a toned background, then a loose sketch (in paint). The rendering was done on a single separate layer with the impasto effect applied. I also created an area on a new layer where I painted out a palette to sample from.
The vast majority of the painting was done using only the clone brush - sampling from the on-canvas palette, or the canvas itself. No photos were involved - the still life was set up below and to the side of my monitor and just used the natural light from the window. I wasn’t being fussy about accuracy or realism; aiming for a more sketchy-painterly interpretation.
Oh yeah! - And the onion is the same one I painted in the other thread; It’s been sat there all this time and it’s starting to go rotten!
I didn’t mention - but this uses the same settings as the first impasto template in the pack. It’s quite subtle, but you can really ramp things up to silly proportions. Some combinations end up looking like the surface has been laminated (I think the second template is a bit like that).
If anyone gives it a try it would be cool seeing what you do with it. I’m around fairly regularly if you need any help (it can be a bit complicated - that’s why I made the templates!).
Also - if anyone’s wondering what the point is with using the clone brush; it’s to give a dirty-brush effect like you’d get using real paint. If you look closely you’ll see the colour varies across the width of the stroke (It might have helped if I’d chosen more colourful objects to paint! ).
I’m generally more comfortable working on a single layer, and keep forgetting if I’m trying to keep things separate (e.g. layers for fore/middle/background etc). They are very useful though - and some things can’t be done without them (like this effect)!
I do have one ‘best of both’ trick I use frequently though - to keep things simple and tidy, I merge the main layers into one (when I’m happy), then duplicate it and work on the new layer. That way I have some flexibility, and can turn the layer off to check the older version underneath - just to make sure I’m improving rather than ruining it!
I also save multiple iterations as I go just to be safe (usually before I merge layers).
Cheers!
Thanks! - But I don’t think you’d want to eat them now - the mushroom is looking very shrivelled, and the onion… well… the less said about that the better…!
Have you had a play with any of the templates I made? It’s a bit of a novelty but quite fun to paint with. I don’t think it’s suitable for my usual kind of paintings, but I have done some interesting textural experiments that I’d like to make use of.
The clone brush on the other hand is very useful - which is why I’ve been gently pushing for expanded functionality.
I haven’t had the chance to try out the templates yet. Was it on the other linked threads? Because if it is, I haven’t fully read all of the linked threads yet.
Hi @Mythmaker your effect is interesting. I have been looking for a way to make a thick oil brush, your effect is close. However, even though I have posted many paintings in Krita, when it comes the the “how to do’s”, I am clearly incompetent. I read your other posts on the subject, have no idea how to do it. Example I have never used the “clone brush”. Many have directed me to the manual, it is to technical for me. I was wondering if you can send me the brush u created for the painting you posted? Thanks in advance.
Sydney (aka Zayde)
The ones in green border are clone brushes as indicated by picture in the Tumblr link
Also on the brush preset editor there is a collapsed part to the left that can be revealed by pressing arrow which reveals all the Brush Engines to choose from
The brush I used to paint this doesn’t have any thickness information built into it. The impasto effect is created using layer effects - like those used in my layered impasto templates.
I wouldn’t recommend trying to paint this way - especially if you have limited experience. It’s very complicated to set up, and also difficult to use because you have to keep resetting the sample point as you paint.
I developed the impasto technique many years ago, and even when I did this painting we didn’t yet have the lightness tip functionality in Krita. Now we have that for both the pixel and colour smudge engines, the results are generally better, and simpler to use.
The only advantage with the clone brush is the dirty brush effect - it’s currently the only way to do that. You can emulate the look to some degree though using lightness tips by having variable values across the tip.
You’ll probably be best served by using the colour-smudge engine in conjunction with a lightness brush tip. Ramon released a set of those late last year. I’m not sure if they’re integrated into the core set now - but they are freely available.