Please share any tips and tricks that you use while working with Krita. Any Hidden gem or underrated feature in Krita which is really a life saver for you. Let others know and get to know new ones from others in this thread.
For starters I’ll post some.
Your brush parameters like size opacity flow etc can be effected by perspective plane drawn by the assistant tool. For example If you can enable the perspective sensor for the size parameter and the brush tip will be scaled according to the perspective plane as shown here -
Krita has a snapshot functionality where it can save a particular state in document history so that you can come to it at a later stage. This can be helpful where you can record the state of the document and go back to it if you are not satisfied with the current path. This also helps you to take snapshot of various small adjustments and then quickly go through each snapshot and compare them. Please note that switching to a snapshot will erase your current history.
The arrange docker, it is such a useful feature while working with vectors. Though it only works with vectors now, would be awesome if someone could get the same working for the all the layers.
wat. That’s freakin awesome, I never knew about that!
As for tips, I have one that changed my workflow completely. When transforming is enabled (like when you press Ctrl+T), if you right click, a menu will pop up specifying what type of transform do you want. Having a firm grasp on how transform tools can help you can save you a lot of time in the end
In krita you can manage references both as embedded to the canvas, and embedded to the monitor. If you pick Settings → configure Krita-General → Window → Multiple document mode → Subwindows You can open artwork and reference images as separate documents (ctrl+o), click window → tile (ctrl+k) to have them on right and left half of canvas (if you want them to switch sides, click on the one you want to be on left, and click ctrl+k again). You can then adjust them if you want reference to take less screen than artwork.
Note that this way you can have a big, main reference that is separate from the artwork (you can scale, mirror, move it separately) and small “mood references” on your canvas using reference tool, just to look at from time to time.
Perspective assistant, with small impact on a canvas: create vanishing points (1, 2 or 3, as you need in the artwork) using painting assistant tool.
Then: View → Show painting assistants → Off (grids not visible)
And: View → Show assistants previews → On/Off (good to have it in a shortcut)
If you want to check if the perspective is correct you make ““show assistants previews - on”” and just see those lines. It’s easy to turn off when not needed.
You can still use snap to assistant in the brush tool options to get super precise construction.
My favourite one - picking the color without a docker. In keyboard shortcuts, in options you can change Show color selector from default shift+i to something closer to your non-dominant hand. Then you press it, and a big, full color selector shows off. You can customize its size in color selector options. The same goes with Show color history - you can also make those tiles way bigger. This way you don’t need to use the color docker. With presets and opacity on Right mouse button, ctrl+r to click-pick the new layer, layers management in keyboard shortcuts (duplicate, switch active layer, move active layer, grouping, change visibility and alpha block) you can stay in full screen and canvas only modes forever. Just you and your artwork.
Currently those pop ups appear, when you press a button, and disappear once you move your mouse away or press anything else (in color selector settings, in advanced color selector → behaviour → hide popup on click must be OFF - that’s super important). If someone with knowledge of krita documentation, could make it react to modifier slopes (you press ‘alt’ for instance, the popup shows up, and is active to the moment you release this ‘alt’ modifier), it would get insanely awesome. Now it’s only just awesome
I’m sure you know it, but in krita you can change any keyboard shortcut to your own. Just get those mostly used right near your non-dominant hand. Undo with simply “z”, eraser mode, change alpha block, all your most used tools. It’s so convenient once you switch to canvas only mode.
Configuring custom shortcuts or knowing the deafult ones, as someone said previously, is always something you want to. There’s a lot you can save.
Some of my most used tools are
switching between paint and eraser with “e”
color picker “command”
pick the real color from the active layer, if the you have a filter layer or mask that alters your colors “command - option”
alter value of current color “k” darker “l” lighter. It’s possible to add shortcut too, for “saturation”, add more “blue, red, green ,yellow” and shift “hue” in both directions.
pick a layer in the canvas with holding “r” and click on a part in the image.
If you use the palette presets /wheel “right click” you can customize the number of brushes you see there. Settings -> General -> Misc -> Number of palette presets -> enter a number.
I use the wrap mode a lot when I am creating patterns. Why? Because I can apply lot of filters that affect pixels, and get a nice texture from that. Later I will document it
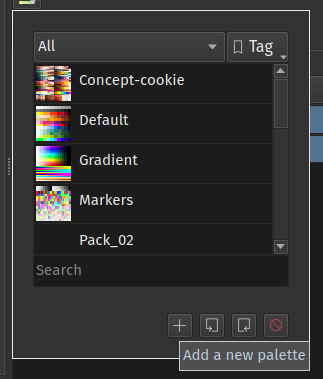
You can Save the color palette in the document itself. This comes in handy if the current project requires some color palette which is specific to that project. To use this feature, create a new palette by clicking on the plus icon in the palette selection drop down in the palette docker
Then it will show you a dialog to create new palette, there you can choose to save this new palette in the current document.
This comes in handy when you have send the file to your colleague while collaborating in a project. If they make a change in the palette it will be saved in the document and you’ll see the new colors when you get the file back.
If you’re using a tablet pc, you already know that two fingers on the screen let you pan, zoom, and rotate. There’s a chance that you might accidentally draw while trying to use this. To stop that from happening, you can turn off finger-drawing in the options. My experience with Krita got significantly better after turning this off.
Related to the first tip is rotation and zoom control. Keys 1 - 6 (maybe more, not remembering now) control rotation and zoom. For example, if you accidentally rotate your canvas while two-finger scrolling, press 5 to turn it back to 0% rotation.
I didn’t realize that finger-drawing was the reason my brush strokes sometimes went ham on my Surface! It happened rarely, but just enough that it got a bit annoying. Thank you for the great tip malle_yeno, this made drawing on it much more enjoyable!
. If you want more gradients but don’t know where to get them, You can get a bunch from the resources folder on gimp, witch has a lot of good default ones. same with textures.
Isn’t something similar to arranging already possible with other tools for raster layers? Or do you mean something like sending a selected part of one layer onto another one?
Thanks for the great tip! If anyone else is looking for these resources and you have GIMP installed, I found mine in:
C:\Program Files\GIMP 2\share\gimp\2.0
I’m on Windows, so YMMV for OSX or linux. Im on GIMP 2.10.14
Thanks for the ping @Michelist ! Basically, in the photobash plugin you can add images as references, but if there’s a way to crop a reference in the basic version of Krita’s references, it can be done in the plugin.
I believe you can do it without the plugin, but I’m not entirely sure.
Would I need to first install Krita Photobash Plugin, then the Modification? (both of which are listed in Michelist’s post) Or do they work independently of each other?
Took a look at your gif and it looks great.
Would a right click on the reference image still allows me to transform it just as it worked before.
Can reference images be placed beside the canvas. gif is showing them being placed on the canvas only.


